istio traffic control
istio 트래픽 제어 방식 살펴보기
들어가며
2주차에서는 Envoy의 내부 원리와 외부 트래픽을 클러스터 내부로 가져오는 방식 대해 자세히 살펴봤다.
여기서는 들어온 트래픽을 세밀하게 제어하는 방법, 트래픽 관리 및 제어에 대해 중점적으로 살펴본다. 그리고 해당 기능이 왜 필요한지도 알아본다.
*아래의 실습과 관련된 그림은 스터디원 이제원님이 직접 그려주셨다.
실습 환경 구성
실습 환경: docker (kind - k8s 1.23.17 ‘23.2.28 - Link) , istio 1.17.8(’23.10.11) - Link
환경은 최신버전이 아닌데, 그 이유는 Istio in Action의 번역판이 과거 개정판의 내용을 담고 있고 이를 맞추기 위함이다.
kind
실습 환경으로는 kind(kubernetes in docker)를 사용한다. kind를 통해 로컬에서 쿠버네티스와 가장 유사한 환경을 구축할 수 있다는 장점이 있다.
kind 설치(macOS)
윈도우 환경이라면, 문서를 참고
1
brew install kind
클러스터 구성
단일 노드 클러스터를 구성한다.
1
2
3
4
5
6
7
8
9
10
11
12
13
14
15
16
17
18
19
20
21
22
23
24
25
26
27
28
29
30
kind create cluster --name myk8s --image kindest/node:v1.23.17 --config - <<EOF
kind: Cluster
apiVersion: kind.x-k8s.io/v1alpha4
nodes:
- role: control-plane
  extraPortMappings:
  - containerPort: 30000 # Sample Application (istio-ingrssgateway) HTTP
    hostPort: 30000
  - containerPort: 30001 # Prometheus
    hostPort: 30001
  - containerPort: 30002 # Grafana
    hostPort: 30002
  - containerPort: 30003 # Kiali
    hostPort: 30003
  - containerPort: 30004 # Tracing
    hostPort: 30004
  - containerPort: 30005 # Sample Application (istio-ingrssgateway) HTTPS
    hostPort: 30005
  - containerPort: 30006 # TCP Route
    hostPort: 30006
  - containerPort: 30007 # kube-ops-view
    hostPort: 30007
  _extraMounts:
  - hostPath: $(pwd)
    containerPath: /istiobook_
networking:
  podSubnet: 10.10.0.0/16
  serviceSubnet: 10.200.1.0/24
EOF
노드 컨테이너에 실습에 필요한 유틸리티를 설치한다.
1
docker exec -it myk8s-control-plane sh -c 'apt update && apt install tree psmisc lsof wget bridge-utils net-tools dnsutils tcpdump ngrep iputils-ping git vim -y'
istio
istio를 설치하기 앞서, 우선 노드에 접속한다.
1
docker exec -it **myk8s****-control-plane bash**
istioctl 설치
1
2
3
4
export ISTIOV=1.17.8
echo 'export ISTIOV=1.17.8' >> /root/.bashrc
curl -s -L https://istio.io/downloadIstio | ISTIO_VERSION=$ISTIOV sh -
cp istio-$ISTIOV/bin/istioctl /usr/local/bin/istioctl
아래의 명령어로 정상 설치여부를 확인할 수 있다.
1
2
istioctl version --remote=false
1.17.8
istio 배포
1
istioctl install --set profile=default -y
Deployment vs Release
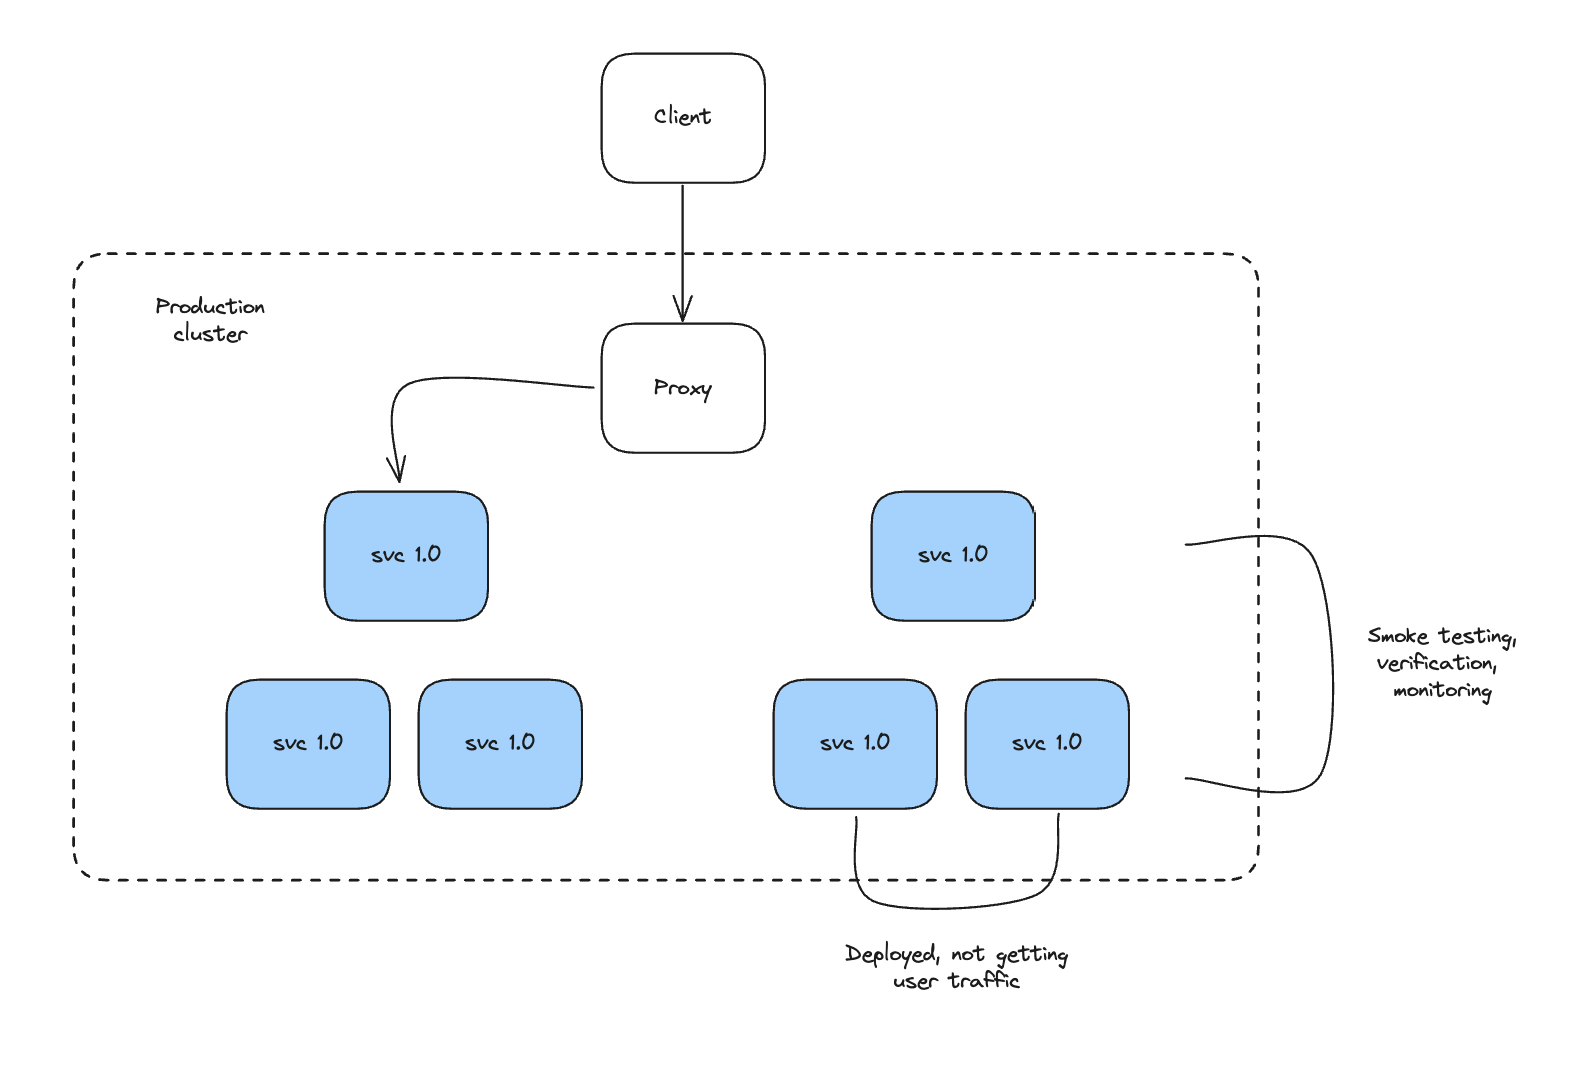
새로운 버전을 배포할 때, 기존 버전의 리소스와 새로운 버전의 리소스가 공존하는 상황이 온다. Istio에서는 이런 경우 트래픽을 섬세하게 제어할 수 있다. 운영 환경에 배포할 때는 새 코드를 운영 환경 리소스(서버, 컨테이너 등)에 배포하지만 트래픽을 라우팅하지 않는다. 내부 직원들만 새로운 기능 리소스에 접근하고 싶을 때, istio에서는 어떤 설정이 필요할지 아래에서 알아본다.
용어
Deployment는 새로운 기능/버전이 들어간 리소스를 의미한다. Release는 사용자에게 새로운 버전을 노출하는 것을 의미하고 여기서는 직접 트래픽이 해당 Deployment에게 전달되는 경우를 의미한다.
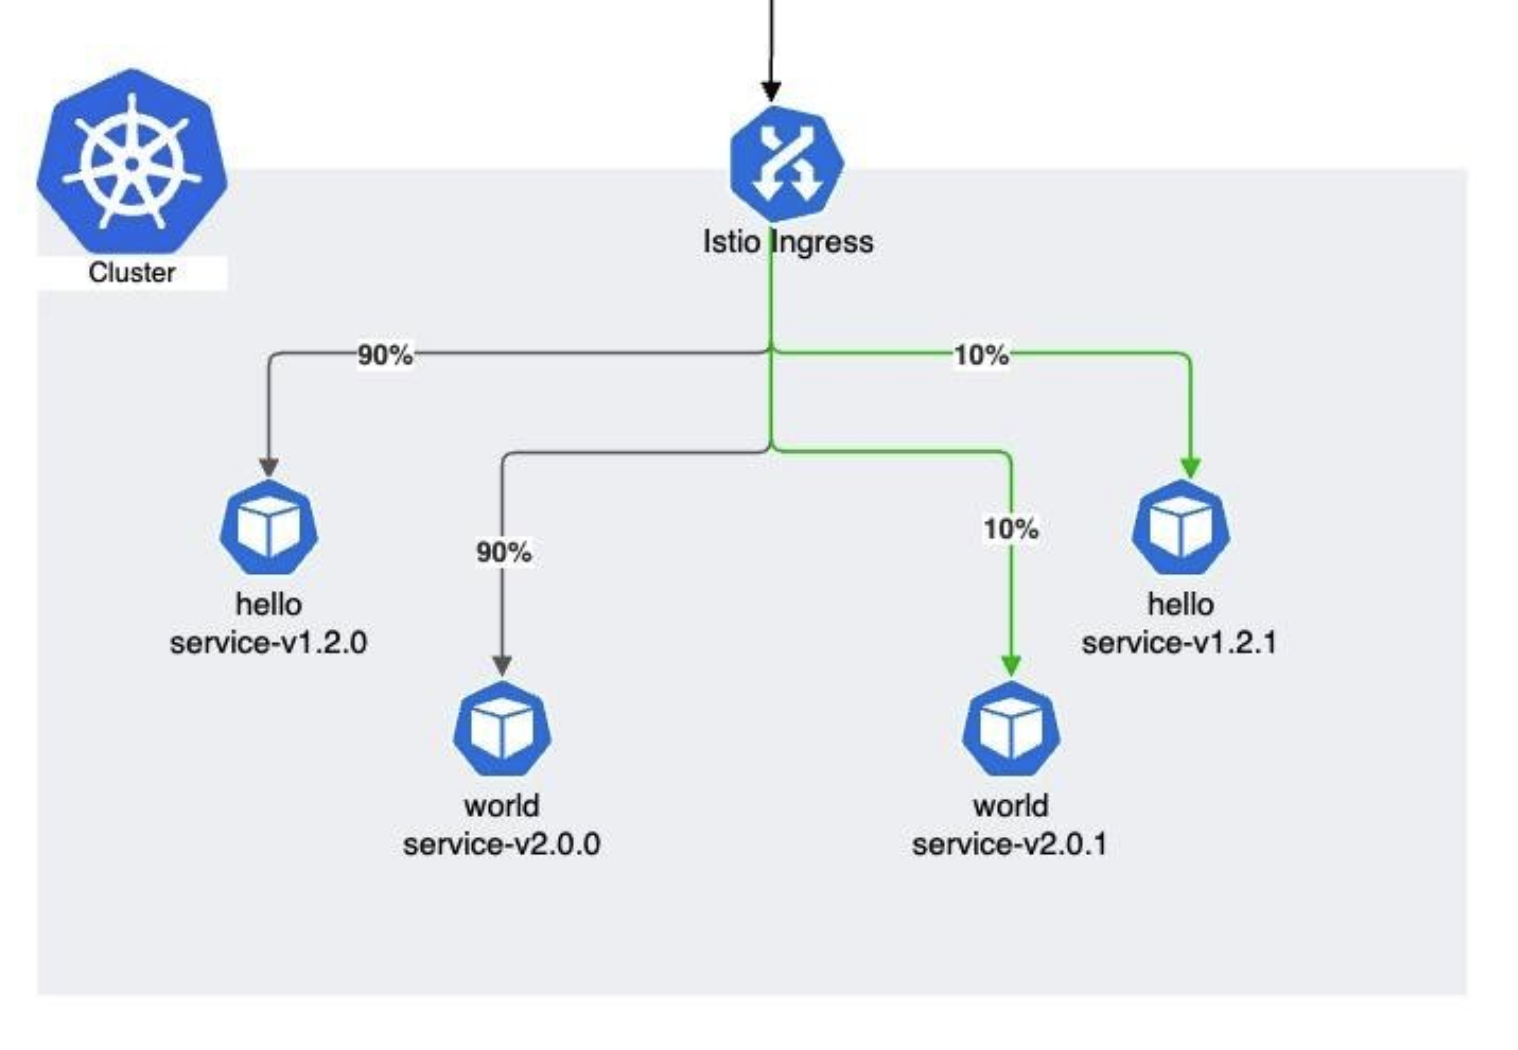
출처: https://www.sourcedgroup.com/blog/canary-release-and-deployment-on-istio-service-mesh/
Traffic routing
위와 같이 실제 운영환경에서 새로운 버전을 배포하고, 이를 내부 직원들만 접근할 수 있도록 istio를 설정해보는 실습을 진행한다.
catalog 서비스의 v1 배포(기존)
기존의 catalog 서비스를 배포한다.
1
kubectl apply -f services/catalog/kubernetes/catalog.yaml -n istioinaction
/etc/hosts 설정을 통해 테스트 도메인을 등록한다.
1
echo "127.0.0.1       catalog.istioinaction.io" | sudo tee -a /etc/hosts
istio 설정
Gateway, Virtual Service 설정을 통해 트래픽이 잘 들어올 수 있도록 설정한다.
1
2
3
4
5
6
7
8
9
10
11
12
13
14
apiVersion: networking.istio.io/v1alpha3
kind: Gateway
metadata:
  name: catalog-gateway
spec:
  selector:
    istio: ingressgateway
  servers:
  - port:
      number: 80
      name: http
      protocol: HTTP
    hosts:
    - "catalog.istioinaction.io"
1
2
3
4
5
6
7
8
9
10
11
12
13
apiVersion: networking.istio.io/v1alpha3
kind: VirtualService
metadata:
  name: catalog-vs-from-gw
spec:
  hosts:
  - "catalog.istioinaction.io"
  gateways:
  - catalog-gateway
  http:
  - route:
    - destination:
        host: catalog
1
2
3
4
5
6
7
kubectl get gw,vs -n istioinaction

NAME                                          AGE
gateway.networking.istio.io/catalog-gateway   14m

NAME                                                    GATEWAYS              HOSTS                          AGE
virtualservice.networking.istio.io/catalog-vs-from-gw   ["catalog-gateway"]   ["catalog.istioinaction.io"]   14m
http://catalog.istioinaction.io:30000/items 경로에 접근하면, 배포한 catalog v1 버전의 items를 직접 확인할 수 있다.

이제 지표 수집을 위해 반복적으로 catalog 도메인에 정보를 읽어온다.
1
while true; do curl -s http://catalog.istioinaction.io:30000/items/ ; sleep 1; echo; done
catalog 서비스의 v2 배포(신규)
이제 새로운 기능 역할을 하는 v2 리소스를 배포한다.
1
kubectl apply -f services/catalog/kubernetes/catalog-deployment-v2.yaml -n istioinaction
Label을 보면, version = v1 or v2 로 구분되는 것을 확인할 수 있다.
1
2
3
4
5
kubectl get deploy -n istioinaction --show-labels

NAME         READY   UP-TO-DATE   AVAILABLE   AGE    LABELS
catalog      1/1     1            1           20m    app=catalog,version=v1
catalog-v2   1/1     1            1           3m6s   app=catalog,version=v2
관련 파드의 IP 확인
1
2
3
4
5
kubectl get pod -n istioinaction -o wide

NAME                          READY   STATUS    RESTARTS   AGE     IP           NODE                  NOMINATED NODE   READINESS GATES
catalog-6cf4b97d-p8h4p        2/2     Running   0          20m     10.10.0.12   myk8s-control-plane   <none>           <none>
catalog-v2-6df885b555-7fjqf   2/2     Running   0          3m19s   10.10.0.13   myk8s-control-plane   <none>           <none>
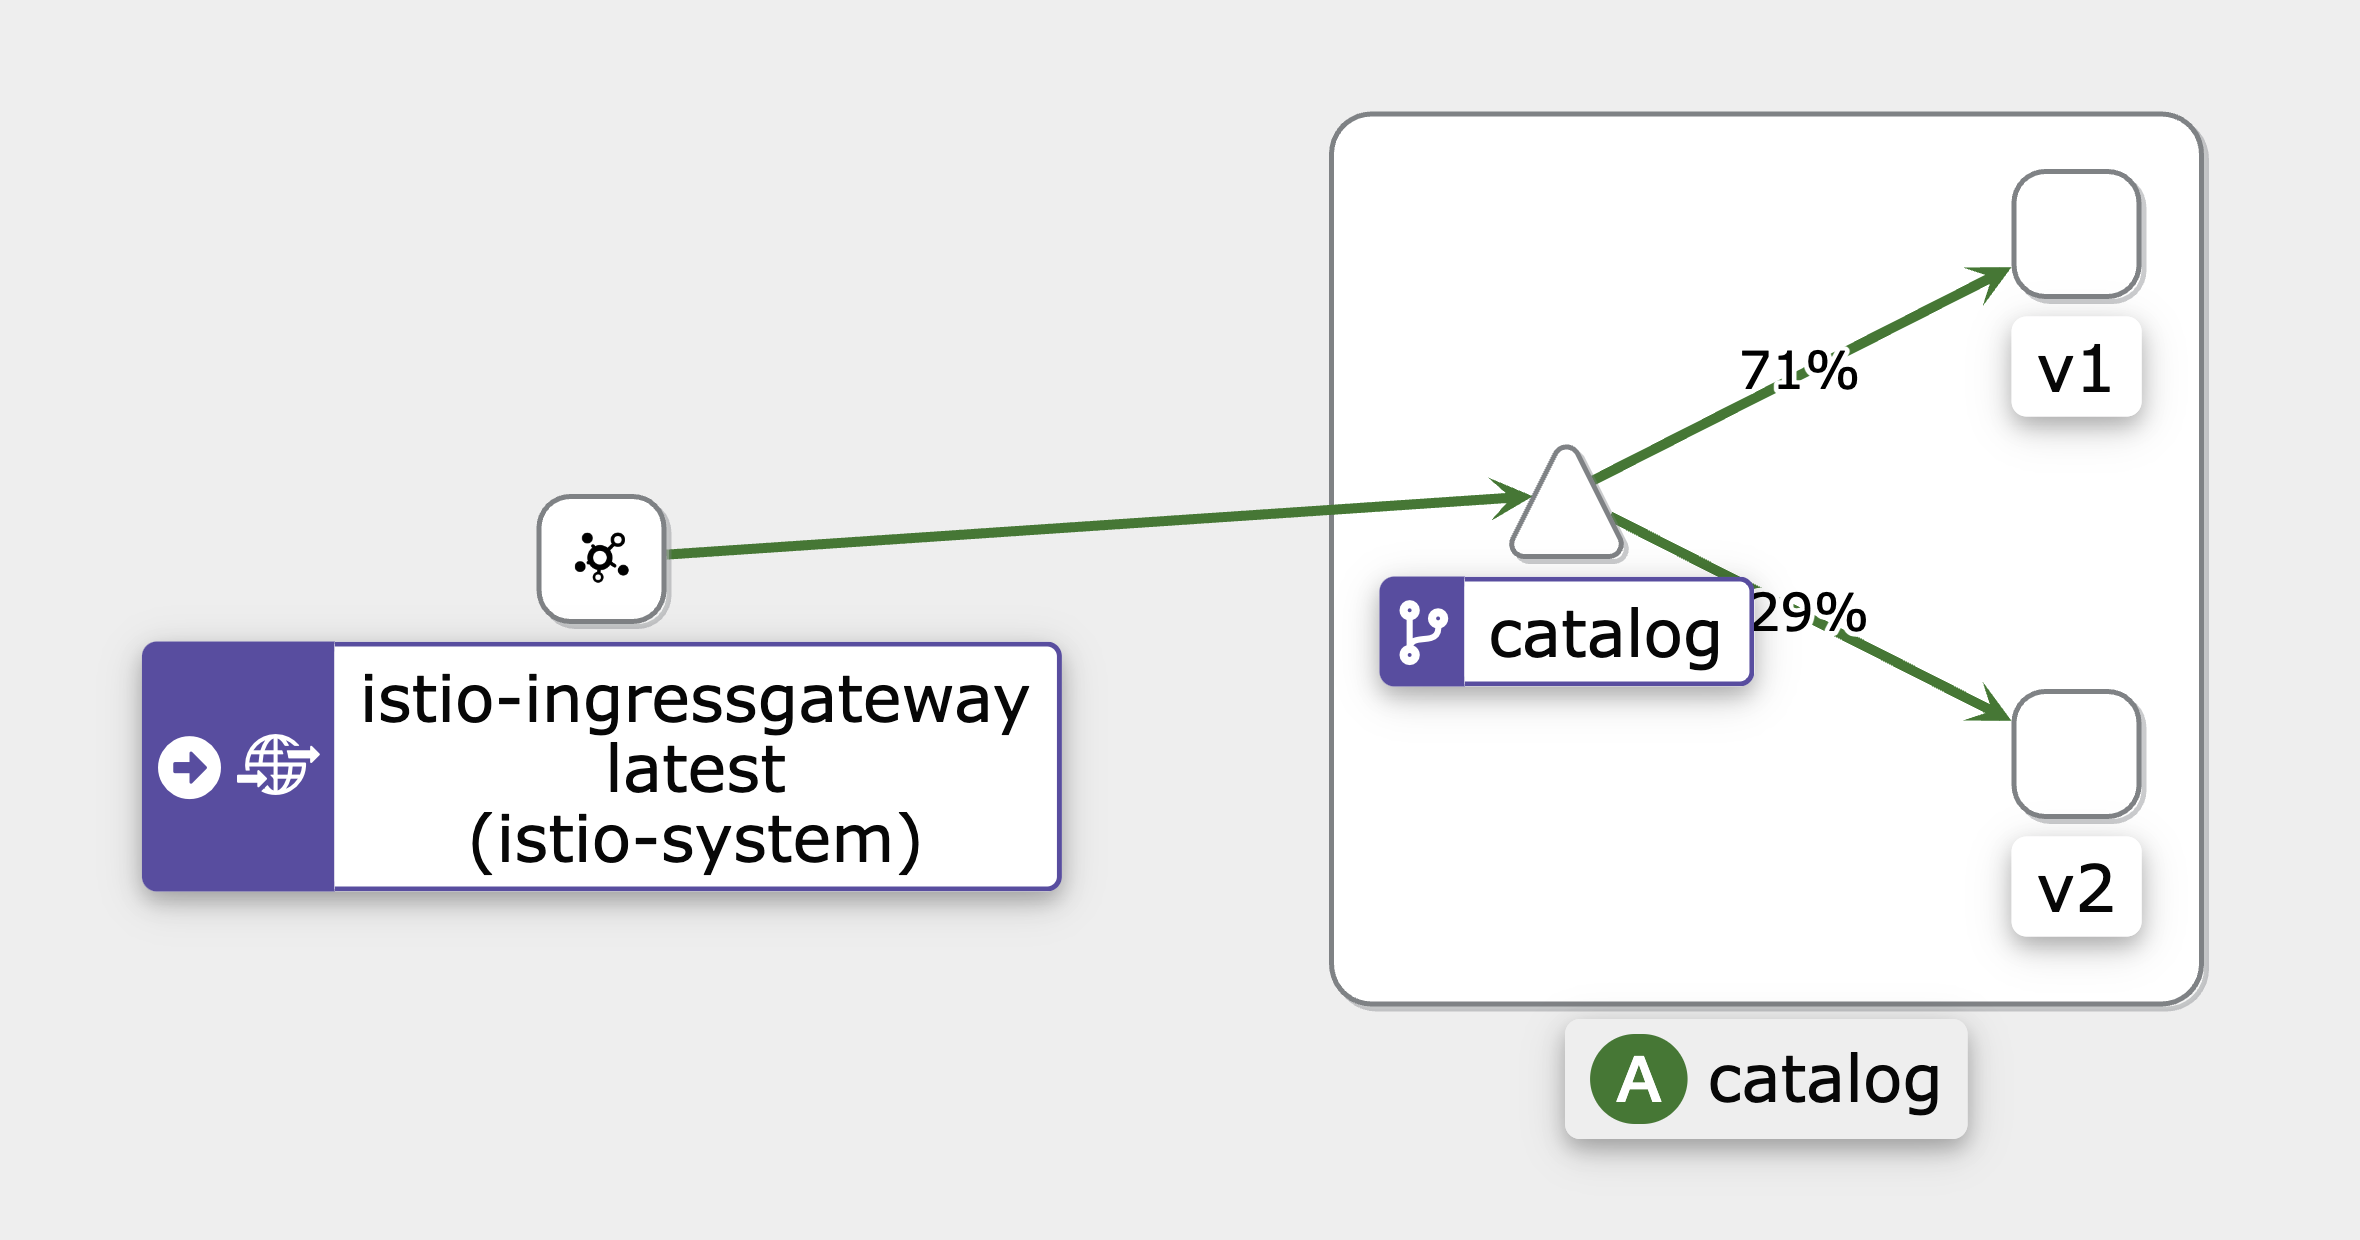
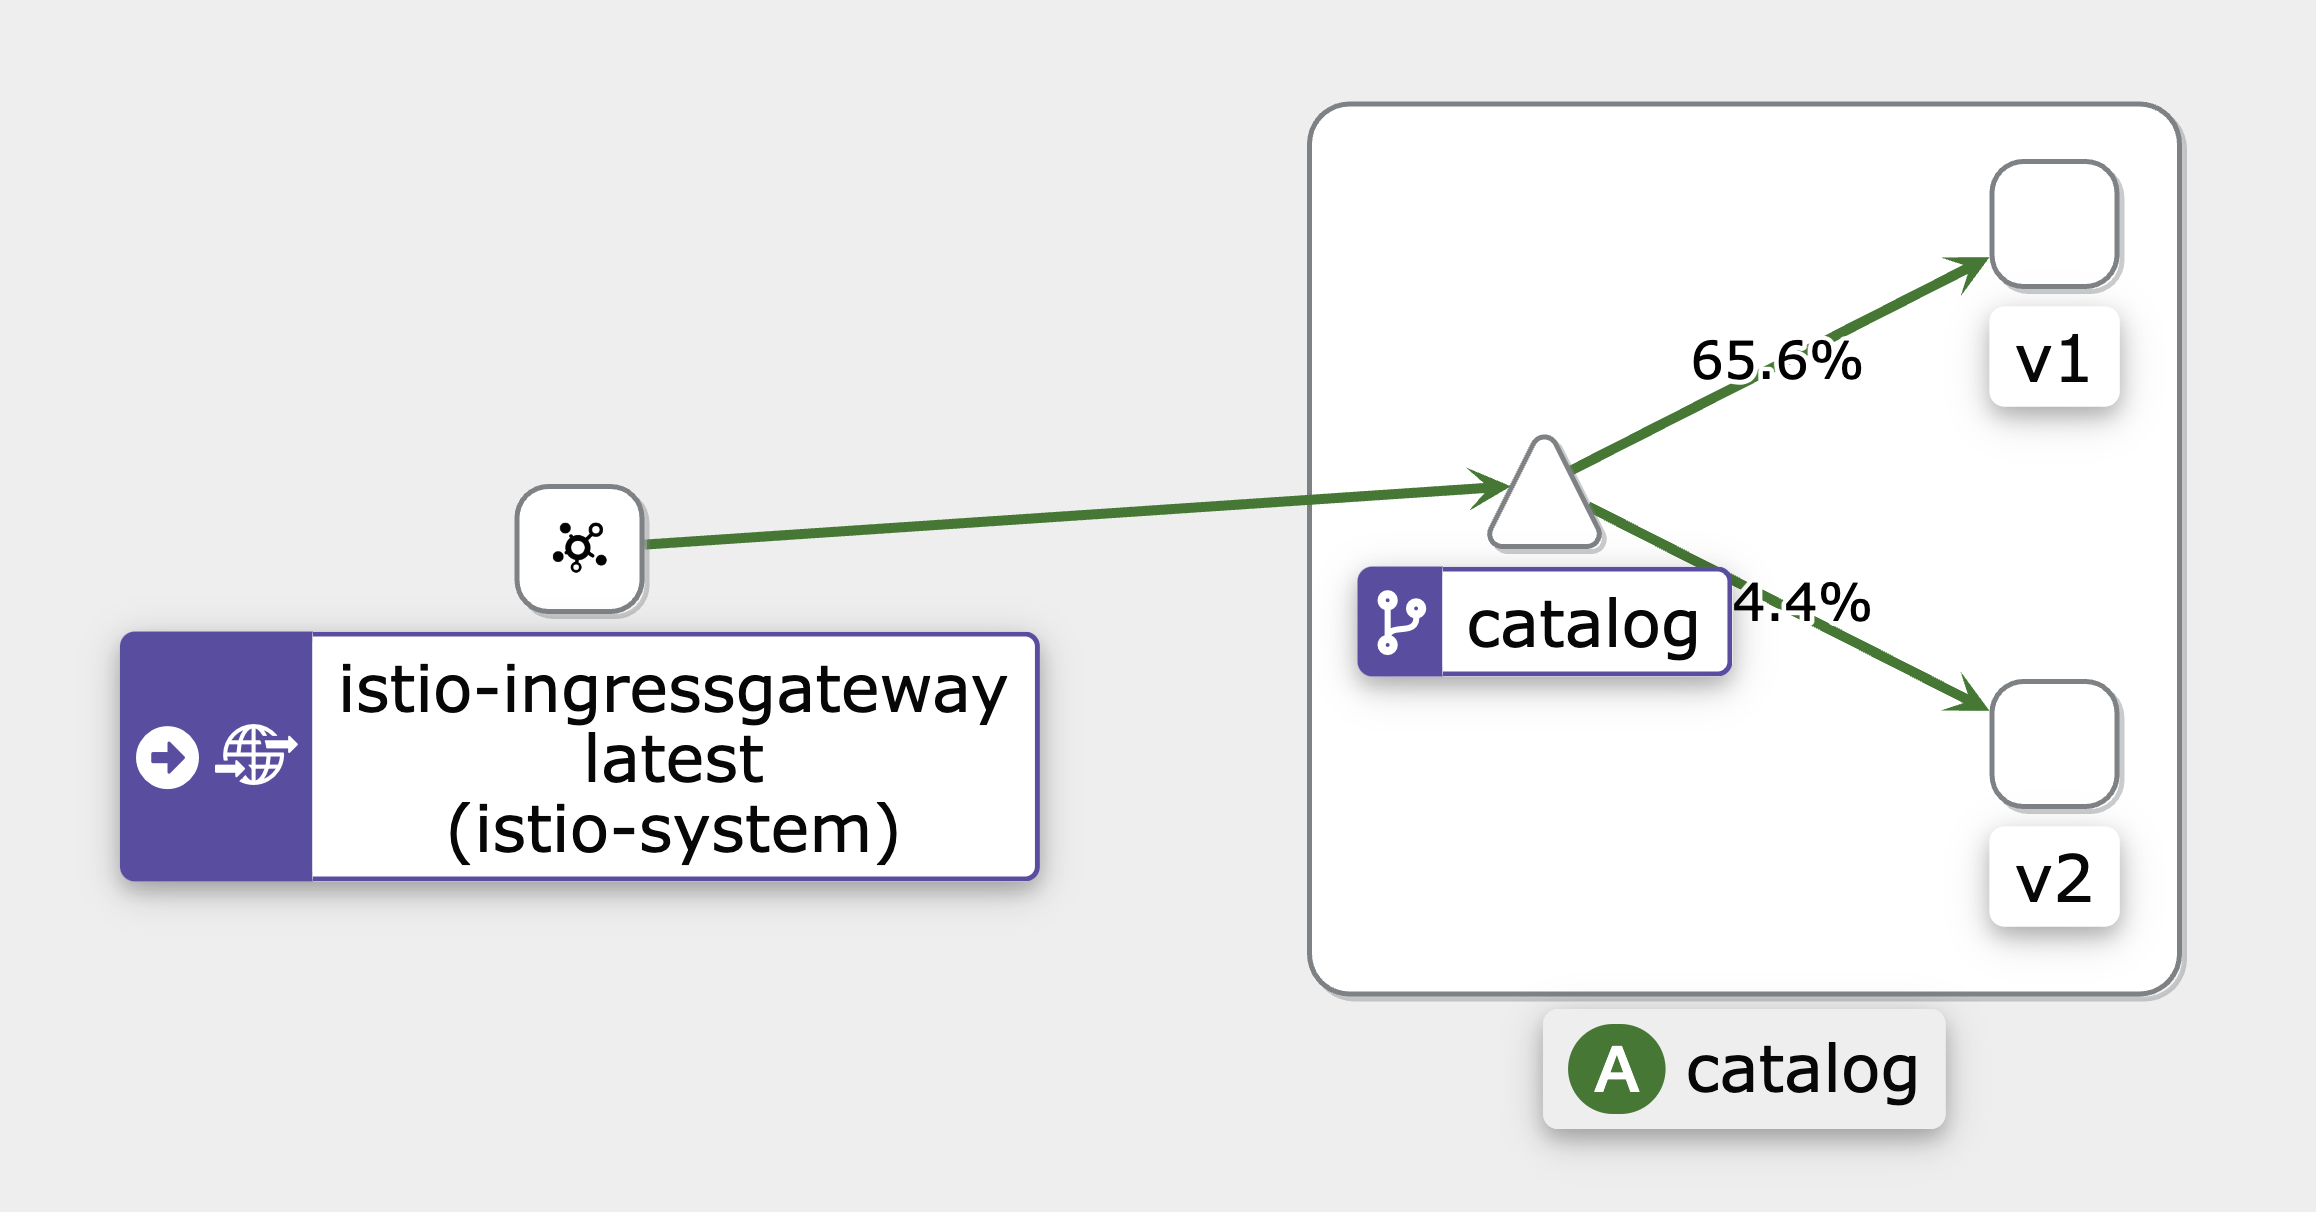
이제 kiali를 통해 트래픽을 확인하면, 최근 5분 기준으로 하여 아직 v2로 많은 트래픽이 흐르지 않았지만 공평하게 분산되는 것을 알 수 있다.
새로운 v2로 일반 사용자의 트래픽이 흘러들어가지 않도록 설정
이제 새로운 deployment를 일반 사용자가 접근하지 않도록 DestinationRule을 설정해본다.
1
2
3
4
5
6
7
8
9
10
11
12
13
apiVersion: networking.istio.io/v1alpha3
kind: DestinationRule
metadata:
  name: catalog
spec:
  host: catalog.istioinaction.svc.cluster.local
  subsets:
  - name: version-v1
    labels:
      version: v1
  - name: version-v2
    labels:
      version: v2
istio proxy 설정을 확인하면, 아래와 같이 version1, version2 서브넷이 업데이트 된 것을 볼 수 있다.
1
2
3
4
5
6
docker exec -it myk8s-control-plane istioctl proxy-config cluster deploy/istio-ingressgateway.istio-system --fqdn catalog.istioinaction.svc.cluster.local

SERVICE FQDN                                PORT     SUBSET         DIRECTION     TYPE     DESTINATION RULE
catalog.istioinaction.svc.cluster.local     80       -              outbound      EDS      catalog.istioinaction
catalog.istioinaction.svc.cluster.local     80       version-v1     outbound      EDS      catalog.istioinaction
catalog.istioinaction.svc.cluster.local     80       version-v2     outbound      EDS      catalog.istioinaction
별도로 proxy 엔드포인트를 확인해봐도 동일하다.
1
2
3
4
5
6
7
docker exec -it myk8s-control-plane istioctl proxy-config endpoint deploy/istio-ingressgateway.istio-system | egrep 'ENDPOINT|istioinaction'

ENDPOINT                                                STATUS      OUTLIER CHECK     CLUSTER
10.10.0.12:3000                                         HEALTHY     OK                outbound|80|version-v1|catalog.istioinactio .svc.cluster.local
10.10.0.12:3000                                         HEALTHY     OK                outbound|80||catalog.istioinaction.svc.cluster.local
10.10.0.13:3000                                         HEALTHY     OK                outbound|80|version-v2|catalog.istioinactio .svc.cluster.local
10.10.0.13:3000                                         HEALTHY     OK                outbound|80||catalog.istioinaction.svc.cluster.local
이제 Virtual Service를 업데이트하여, 트래픽이 v1으로만 가게끔 설정한다.
1
2
3
4
5
6
7
8
9
10
11
12
13
14
apiVersion: networking.istio.io/v1alpha3
kind: VirtualService
metadata:
  name: catalog-vs-from-gw
spec:
  hosts:
  - "catalog.istioinaction.io"
  gateways:
  - catalog-gateway
  http:
  - route:
    - destination:
        host: catalog
        subset: version-v1
라우팅 정보를 확인하면, "outbound|80|version-v1|catalog.istioinaction.svc.cluster.local"으로 version-v1 서브넷으로만 라우팅되는 것을 볼 수 있다.
1
2
3
4
5
6
7
8
9
10
11
12
13
14
15
16
17
18
19
20
21
22
23
24
docker exec -it myk8s-control-plane istioctl proxy-config routes deploy/istio-ingressgateway.istio-system --name http.8080 -o json

[
    {
        "name": "http.8080",
        "virtualHosts": [
            {
                "name": "catalog.istioinaction.io:80",
                "domains": [
                    "catalog.istioinaction.io"
                ],
                "routes": [
                    {
                        "match": {
                            "prefix": "/"
                        },
                        "route": {
                            "cluster": "outbound|80|version-v1|catalog.istioinaction.svc.cluster.local",
                            "timeout": "0s",
                            ...
                        },
                        ...
    }
]
실제 proxy config도 확인해보면 아래와 같이 1개의(v1) 엔드포인트만 볼 수 있다.
1
2
3
4
docker exec -it myk8s-control-plane istioctl proxy-config endpoint deploy/istio-ingressgateway.istio-system --cluster 'outbound|80|version-v1|catalog.istioinaction.svc.cluster.local'

ENDPOINT            STATUS      OUTLIER CHECK     CLUSTER
10.10.0.12:3000     HEALTHY     OK                outbound|80|version-v1|catalog.istioinaction.svc.cluster.local
아래는 kiali 모습
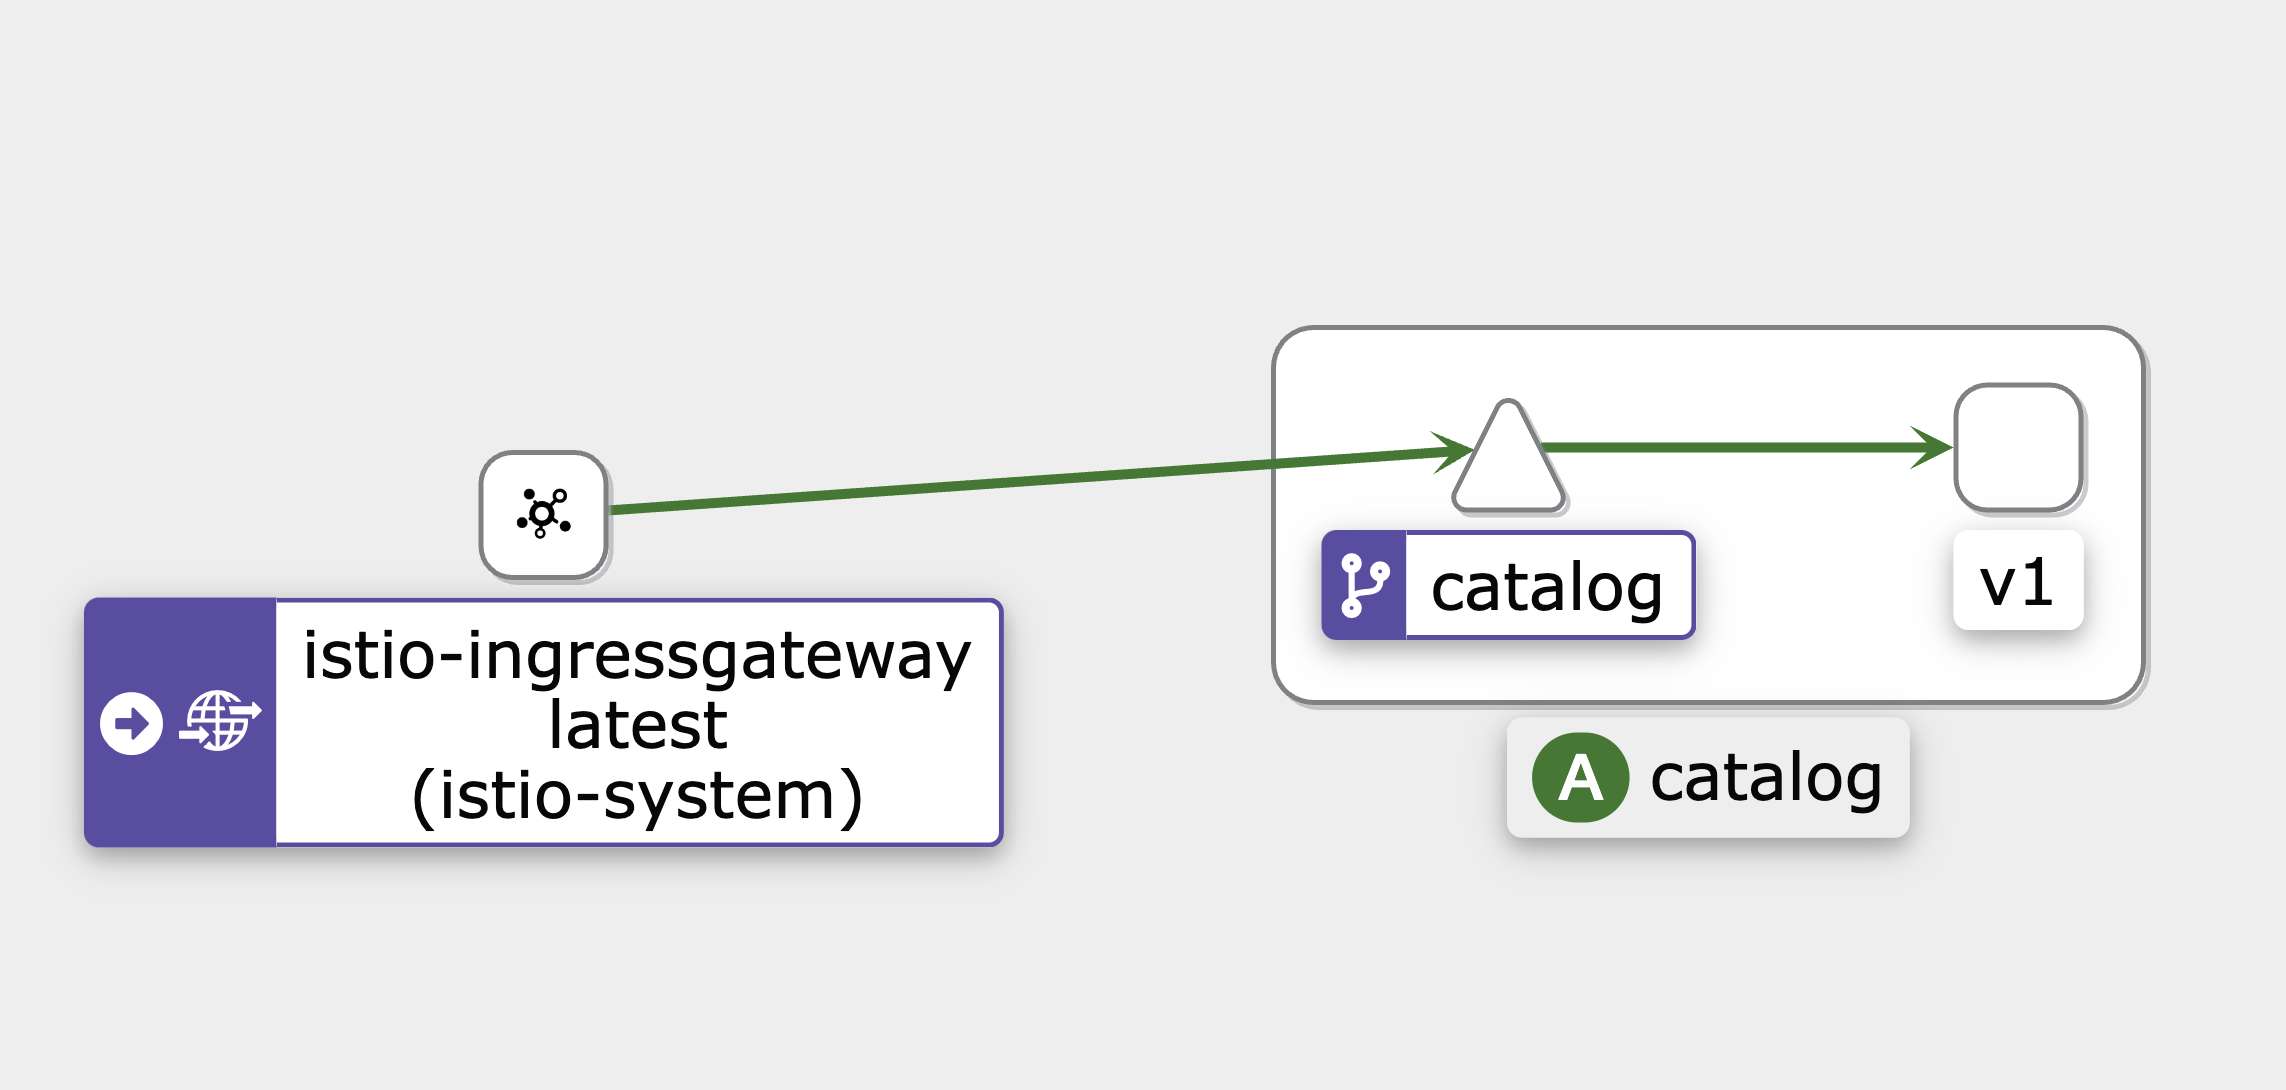
내부 직원(특정 사용자)의 트래픽은 v2로 라우팅 설정
이제 테스트를 진행할 특정 사용자(= 내부 직원)는 헤더를 통해 v2에 접근할 수 있도록 라우팅 설정을 진행해보자.
Virtual Service를 아래와 같이 수정한다. x-istio-cohort 헤더의 값이 internal 인 경우 v2로 라우팅한다는 설정이다.
1
2
3
4
5
6
7
8
9
10
11
12
13
14
15
16
17
18
19
20
21
22
apiVersion: networking.istio.io/v1alpha3
kind: VirtualService
metadata:
  name: catalog-vs-from-gw
spec:
  hosts:
  - "catalog.istioinaction.io"
  gateways:
  - catalog-gateway
  http:
  - match:
    - headers:
        x-istio-cohort:
          exact: "internal"
    route:
    - destination:
        host: catalog
        subset: version-v2
  - route:
    - destination:
        host: catalog
        subset: version-v1
설정을 진행하고 해당 헤더를 포함하여 http://catalog.istioinaction.io에 반복적으로 접근해보자.
1
while true; do curl -s http://catalog.istioinaction.io:30000/items/ -H "x-istio-cohort: internal" -I | head -n 1 ; date "+%Y-%m-%d %H:%M:%S" ; sleep 2; echo; done
사진에서 볼 수 있듯이 다시 v2로 일부 트래픽(특정 헤더를 가진)이 흘러들어가는 것을 볼 수 있다.
관련 Ingress 설정을 확인해보면, 아래와 같이 이전과 비교되게 라우팅 규칙에 엔드포인트 1개 더 추가되었다.
"cluster": "outbound|80|version-v2|catalog.istioinaction.svc.cluster.local""cluster": "outbound|80|version-v1|catalog.istioinaction.svc.cluster.local"
1
2
3
4
5
6
7
8
9
10
11
12
13
14
15
16
17
18
19
20
21
22
23
24
25
26
27
28
29
30
31
32
33
34
35
36
37
38
39
40
41
42
43
docker exec -it myk8s-control-plane istioctl proxy-config routes deploy/istio-ingressgateway.istio-system --name http.8080 -o json

[
    {
        "name": "http.8080",
        "virtualHosts": [
            {
                "name": "catalog.istioinaction.io:80",
                "domains": [
                    "catalog.istioinaction.io"
                ],
                "routes": [
                    {
                        "match": {
                            "prefix": "/",
                            "caseSensitive": true,
                            "headers": [
                                {
                                    "name": "x-istio-cohort",
                                    "stringMatch": {
                                        "exact": "internal"
                                    }
                                }
                            ]
                        },
                        "route": {
                            "cluster": "outbound|80|version-v2|catalog.istioinaction.svc.cluster.local",
                            "timeout": "0s",
                            ...
                        },
                       ...
                    },
                    {
                        "match": {
                            "prefix": "/"
                        },
                        "route": {
                            "cluster": "outbound|80|version-v1|catalog.istioinaction.svc.cluster.local",
                            "timeout": "0s",
                            ...
                        },
                       ...
]
catalog의 proxy 설정을 확인하면 catalog 서비스 IP만 존재하는 것을 볼 수 있다. 이는 ingress로 들어올 때 트래픽을 제어하기에 아래는 다음과 같이 별도 구분이 없다.
1
2
3
4
5
6
7
8
9
10
11
12
13
14
15
16
17
18
19
20
21
22
23
24
25
26
27
28
29
30
31
32
33
34
35
36
37
38
39
40
41
42
43
44
45
46
47
48
49
50
51
docker exec -it myk8s-control-plane istioctl proxy-config routes deploy/catalog.istioinaction --name 80 -o json

[
    {
        "name": "80",
        "virtualHosts": [
            {
                "name": "catalog.istioinaction.svc.cluster.local:80",
                "domains": [
                    "catalog.istioinaction.svc.cluster.local",
                    "catalog",
                    "catalog.istioinaction.svc",
                    "catalog.istioinaction",
                    "10.200.1.92"
                ],
                "routes": [
                    {
                        "name": "default",
                        "match": {
                            "prefix": "/"
                        },
                        "route": {
                            "cluster": "outbound|80||catalog.istioinaction.svc.cluster.local",
                            "timeout": "0s",
                            "retryPolicy": {
                                "retryOn": "connect-failure,refused-stream,unavailable,cancelled,retriable-status-codes",
                                "numRetries": 2,
                                "retryHostPredicate": [
                                    {
                                        "name": "envoy.retry_host_predicates.previous_hosts",
                                        "typedConfig": {
                                            "@type": "type.googleapis.com/envoy.extensions.retry.host.previous_hosts.v3.PreviousHostsPredicate"
                                        }
                                    }
                                ],
                                "hostSelectionRetryMaxAttempts": "5",
                                "retriableStatusCodes": [
                                    503
                                ]
                            },
                            "maxGrpcTimeout": "0s"
                        },
                        "decorator": {
                            "operation": "catalog.istioinaction.svc.cluster.local:80/*"
                        }
                    }
                ],
                "includeRequestAttemptCount": true
            },
            ...
]
클러스터 내부 라우팅 제어
위에서는 외부에서 해당 catalog 서비스로 직접 들어오는 트래픽을 제어했다. 여기서는 클러스터 내부 통신에 대한 제어를 진행해본다. 아래의 그림과 같이 catalog 앞에 webapp이라는 서비스를 두고, webapp에서 catalog로 들어오는 트래픽을 제어한다.

webapp 배포 및 라우팅 설정
1
kubectl apply -n istioinaction -f services/webapp/kubernetes/webapp.yaml
아래와 같이 istio 리소스를 배포하여 webapp.istioinaction.io 경로로 들어오는 트래픽이 정상적으로 webapp 파드로 라우팅되게 한다.
1
2
3
4
5
6
7
8
9
10
11
12
13
14
15
16
17
18
19
20
21
22
23
24
25
26
27
28
29
30
31
---
apiVersion: networking.istio.io/v1alpha3
kind: Gateway
metadata:
  name: coolstore-gateway
spec:
  selector:
    istio: ingressgateway # use istio default controller
  servers:
  - port:
      number: 80
      name: http
      protocol: HTTP
    hosts:
    - "webapp.istioinaction.io"
---
apiVersion: networking.istio.io/v1alpha3
kind: VirtualService
metadata:
  name: webapp-virtualservice
spec:
  hosts:
  - "webapp.istioinaction.io"
  gateways:
  - coolstore-gateway
  http:
  - route:
    - destination:
        host: webapp
        port:
          number: 80
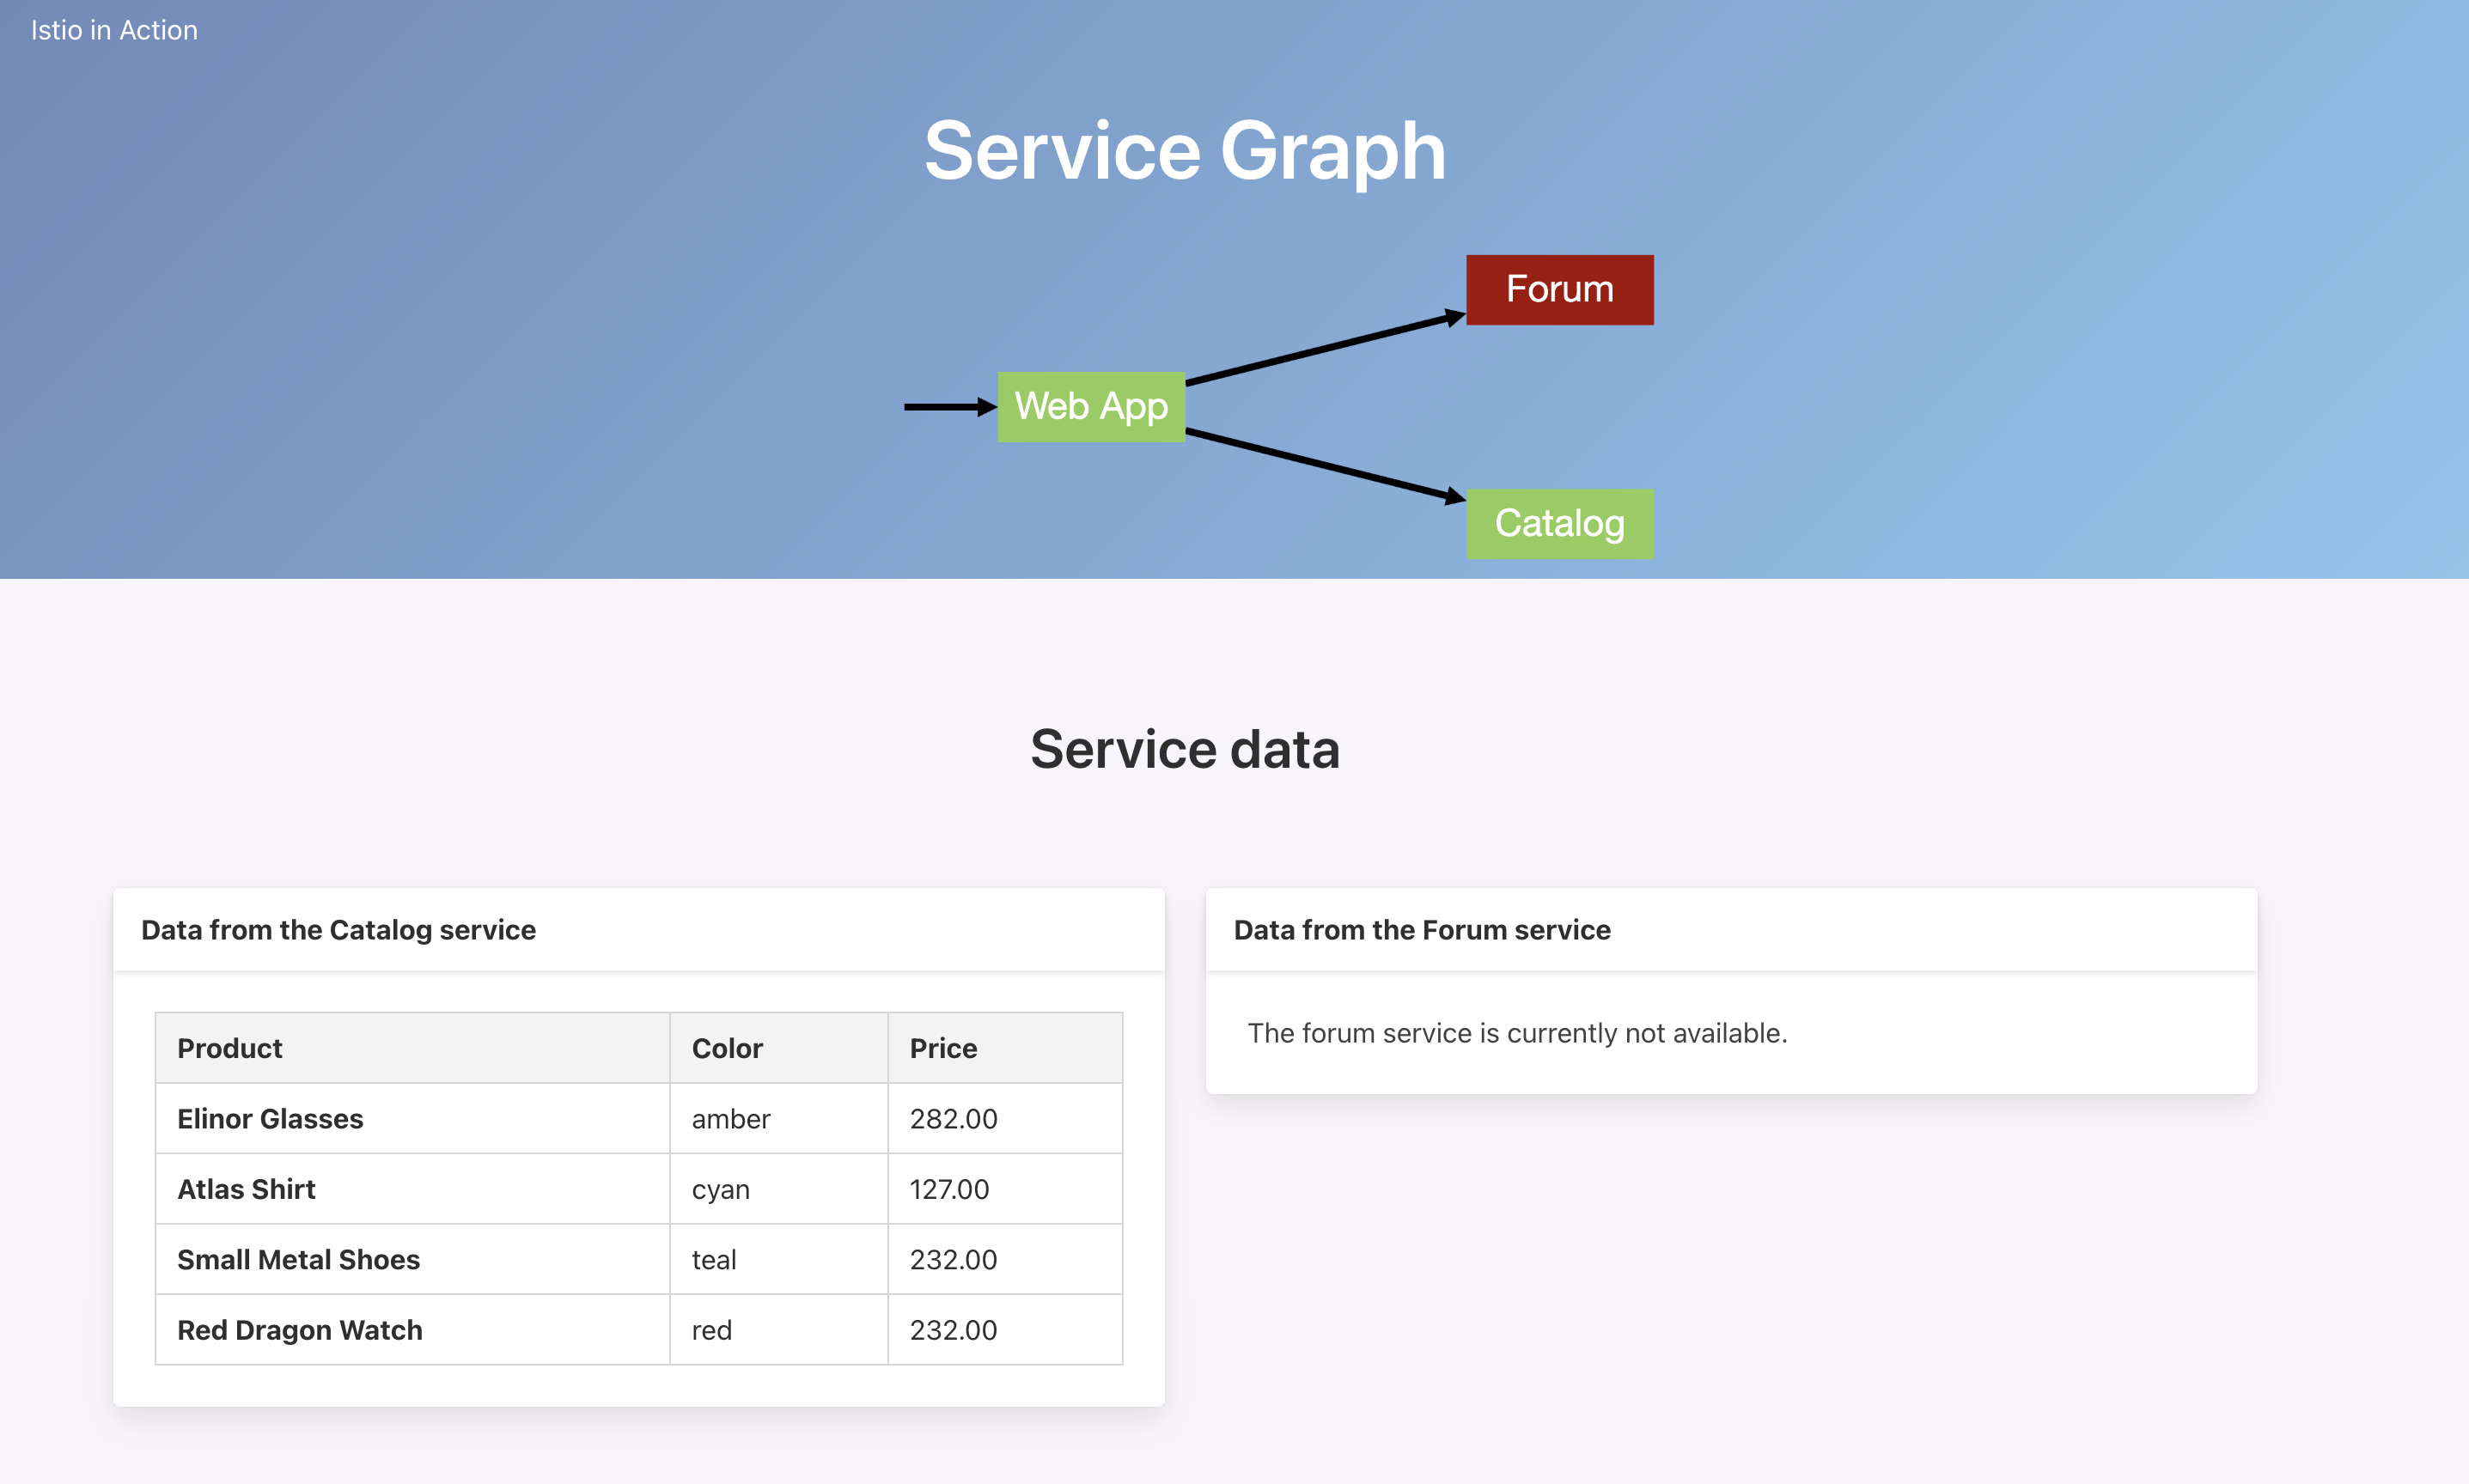
배포 후 webapp.istioinaction.io 사이트에 접속하면 아래와 같은 화면을 볼 수 있다.
이제 자세한 과정을 보기 위해 webapp 로그를 활성화한다.
1
2
3
4
5
6
7
8
9
10
11
12
13
14
15
16
cat << EOF | kubectl apply -f -
apiVersion: telemetry.istio.io/v1alpha1
kind: Telemetry
metadata:
  name: webapp
  namespace: istioinaction
spec:
  selector:
    matchLabels:
      app: webapp
  accessLogging:
  - providers:
    - name: envoy #2 액세스 로그를 위한 프로바이더 설정
    disabled: false #3 disable 를 false 로 설정해 활성화한다
EOF
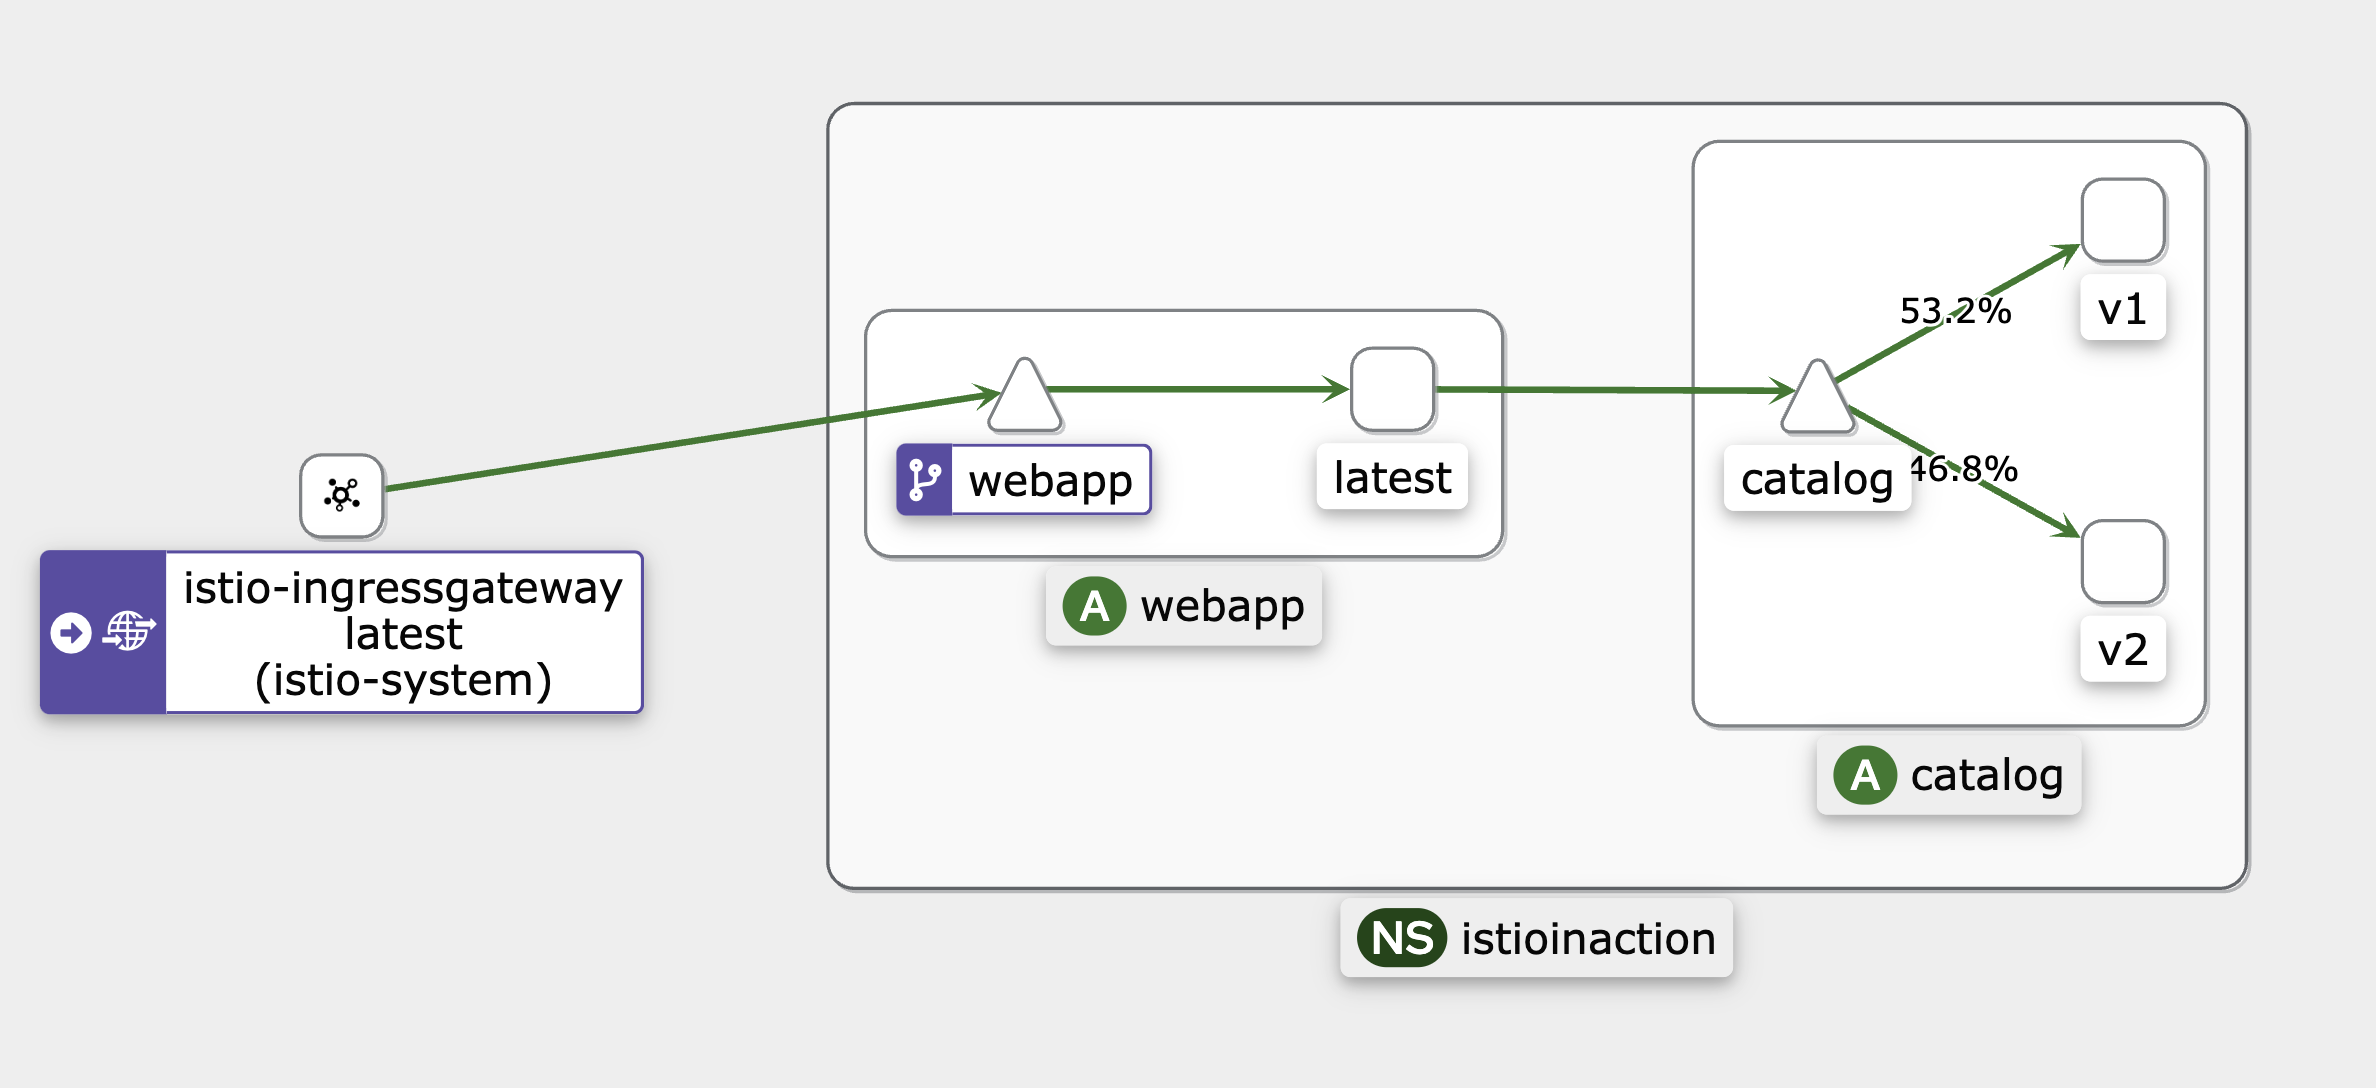
kiali 그림으로 들어오는 트래픽을 확인해보면, webapp → catalog(v1,v2)로 공평하게 분산되는 것을 볼 수 있다.
트래픽 제어
이제 webapp에서 catalog로 들어오는 트래픽을 제어해본다. (header를 통한 v1, v2 제어)
동일하게 DestinationRule을 배포하고,
1
2
3
4
5
6
7
8
9
10
11
12
13
apiVersion: networking.istio.io/v1alpha3
kind: DestinationRule
metadata:
  name: catalog
spec:
  host: catalog.istioinaction.svc.cluster.local
  subsets:
  - name: version-v1
    labels:
      version: v1
  - name: version-v2
    labels:
      version: v2
Virtual Service에 관련 설정을 둔다. 이전과는 차이가 gateways mesh 설정이 들어간 것을 볼 수 있다.
1
2
3
4
5
6
7
8
9
10
11
12
13
14
apiVersion: networking.istio.io/v1alpha3
kind: VirtualService
metadata:
  name: catalog
spec:
  hosts:
  - catalog
  gateways:
    - mesh
  http:
  - route:
    - destination:
        host: catalog
        subset: version-v1
Virtual Service를 조회해보면, 방금 배포한 catalog 서비스를 확인할 수 있다.
1
2
3
4
5
kubectl get vs -n istioinaction

NAME                    GATEWAYS                HOSTS                         AGE
catalog                 ["mesh"]                ["catalog"]                   16s
webapp-virtualservice   ["coolstore-gateway"]   ["webapp.istioinaction.io"]   3m49s
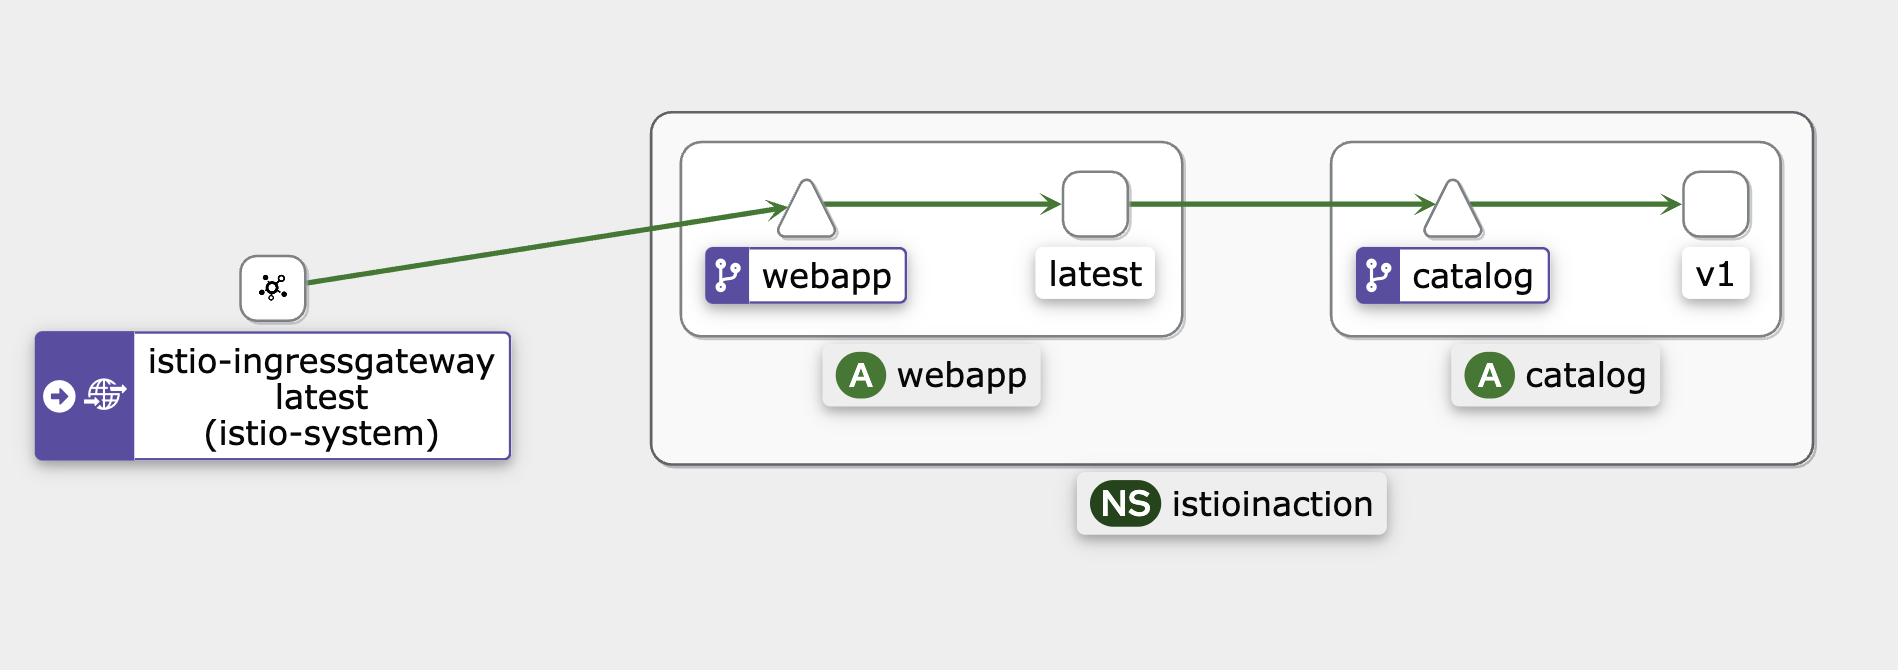
이제 라우팅 규칙을 확인해보자. 위에서 살펴봤을 땐 catalog.istioinaction.svc로만 라우팅되는 것(v1,v2 분산)을 볼 수 있었지만 지금은 v1으로만 향하는 것을 볼 수 있다.
outbound|80|version-v1|catalog.istioinaction.svc.cluster.local
1
2
3
4
5
6
7
8
9
10
11
12
13
14
15
16
17
18
19
20
21
22
23
24
25
26
27
cat webapp-routes.json | jq

[
  {
    "name": "80",
    "virtualHosts": [
      {
        "name": "catalog.istioinaction.svc.cluster.local:80",
        "domains": [
          "catalog.istioinaction.svc.cluster.local",
          "catalog",
          "catalog.istioinaction.svc",
          "catalog.istioinaction",
          "10.200.1.92"
        ],
        "routes": [
          {
            "match": {
              "prefix": "/"
            },
            "route": {
              "cluster": "outbound|80|version-v1|catalog.istioinaction.svc.cluster.local",
              "timeout": "0s",
              "...
        ],
      },
      ...
Traffic Shifting
Traffic Shifting은 Istio에서 트래픽을 여러 서비스 버전으로 비율을 나눠서 보내는 기능을 말한다. 주로 카나리 배포와 같은 점진적인 배포 상황에서 적용한다. 예를 들어, 전체 요청 중 90%는 기존 버전(v1)으로, 10%는 새 버전(v2)으로 보내어 리스크를 최소한으로 하여 신규 배포가 문제가 없는지 확인할 수 있다.
만약, 문제가 생긴다면 다시 v1으로만 트래픽이 향하도록 빠르게 롤백할 수 있다.
지표를 깔끔하게 보기 위해 v1으로만 라우팅 되도록 설정한다.
1
2
3
4
5
6
7
8
9
10
11
12
13
14
15
apiVersion: networking.istio.io/v1alpha3
kind: VirtualService
metadata:
  name: catalog
spec:
  hosts:
  - catalog
  gateways:
    - mesh
  http:
  - route:
    - destination:
        host: catalog
        subset: version-v1
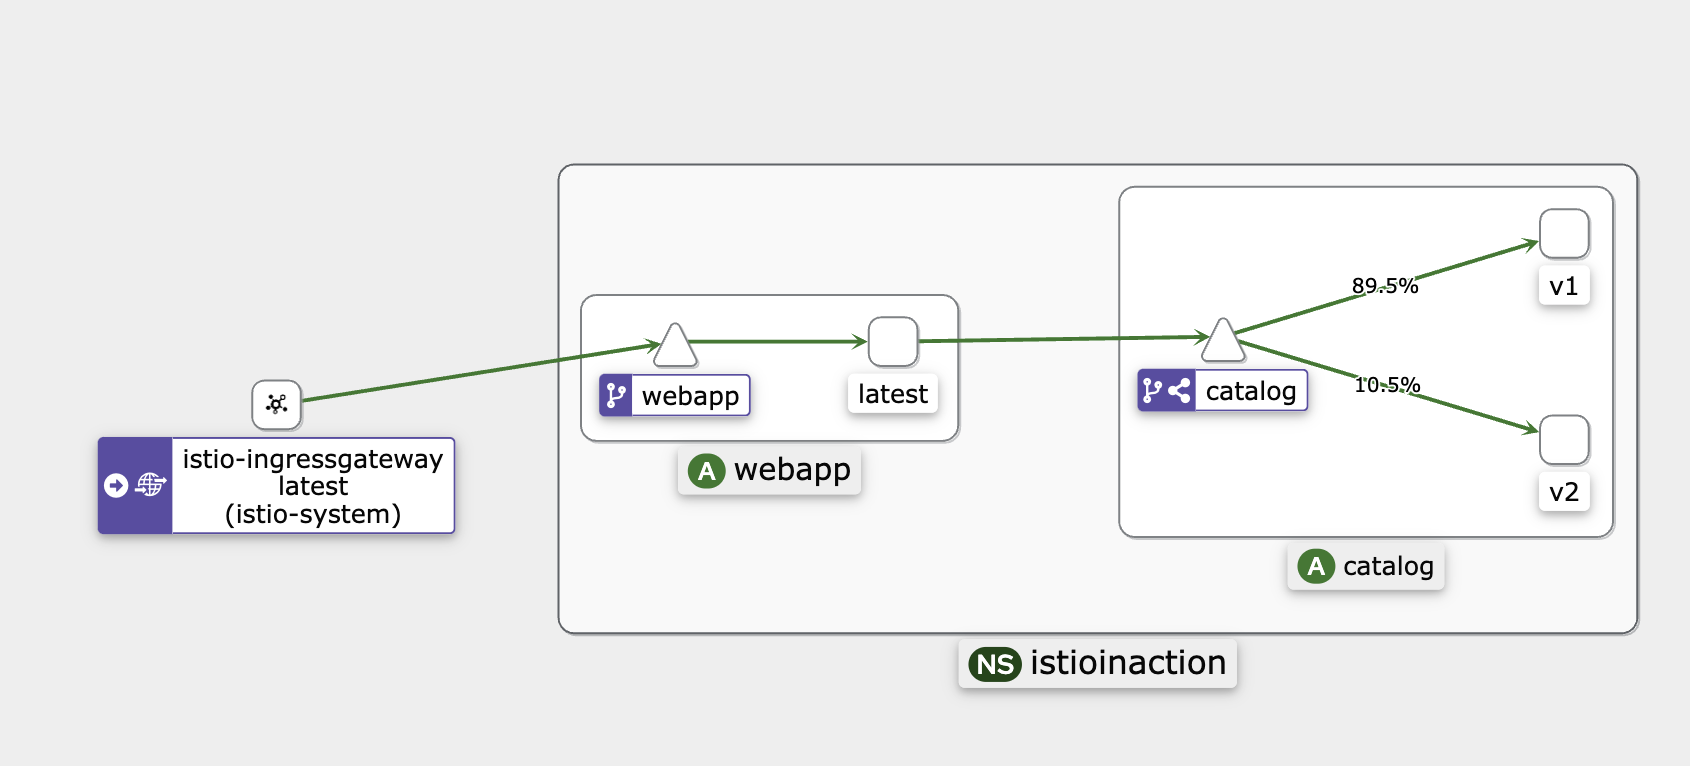
이제 VirtualService에서 weight를 조정한다. v1:v2 = 9:1 비중으로 조절해본다.
1
2
3
4
5
6
7
8
9
10
11
12
13
14
15
16
17
18
19
apiVersion: networking.istio.io/v1alpha3
kind: VirtualService
metadata:
  name: catalog
spec:
  hosts:
  - catalog
  gateways:
  - mesh
  http:
  - route:
    - destination:
        host: catalog
        subset: version-v1
      weight: 90
    - destination:
        host: catalog
        subset: version-v2
      weight: 10
Virtual Service가 반영된 것을 확인하고
1
2
3
4
kubectl get vs -n istioinaction catalog

NAME      GATEWAYS   HOSTS         AGE
catalog   ["mesh"]   ["catalog"]   11m
100번 접속하고, 이중에 v2로 라우팅된 트래픽의 횟수를 파악해보면 딱 10(9:1)에 맞게 나온다.
1
2
3
for i in {1..100}; do curl -s http://webapp.istioinaction.io:30000/api/catalog | grep -i imageUrl ; done | wc -l

      10
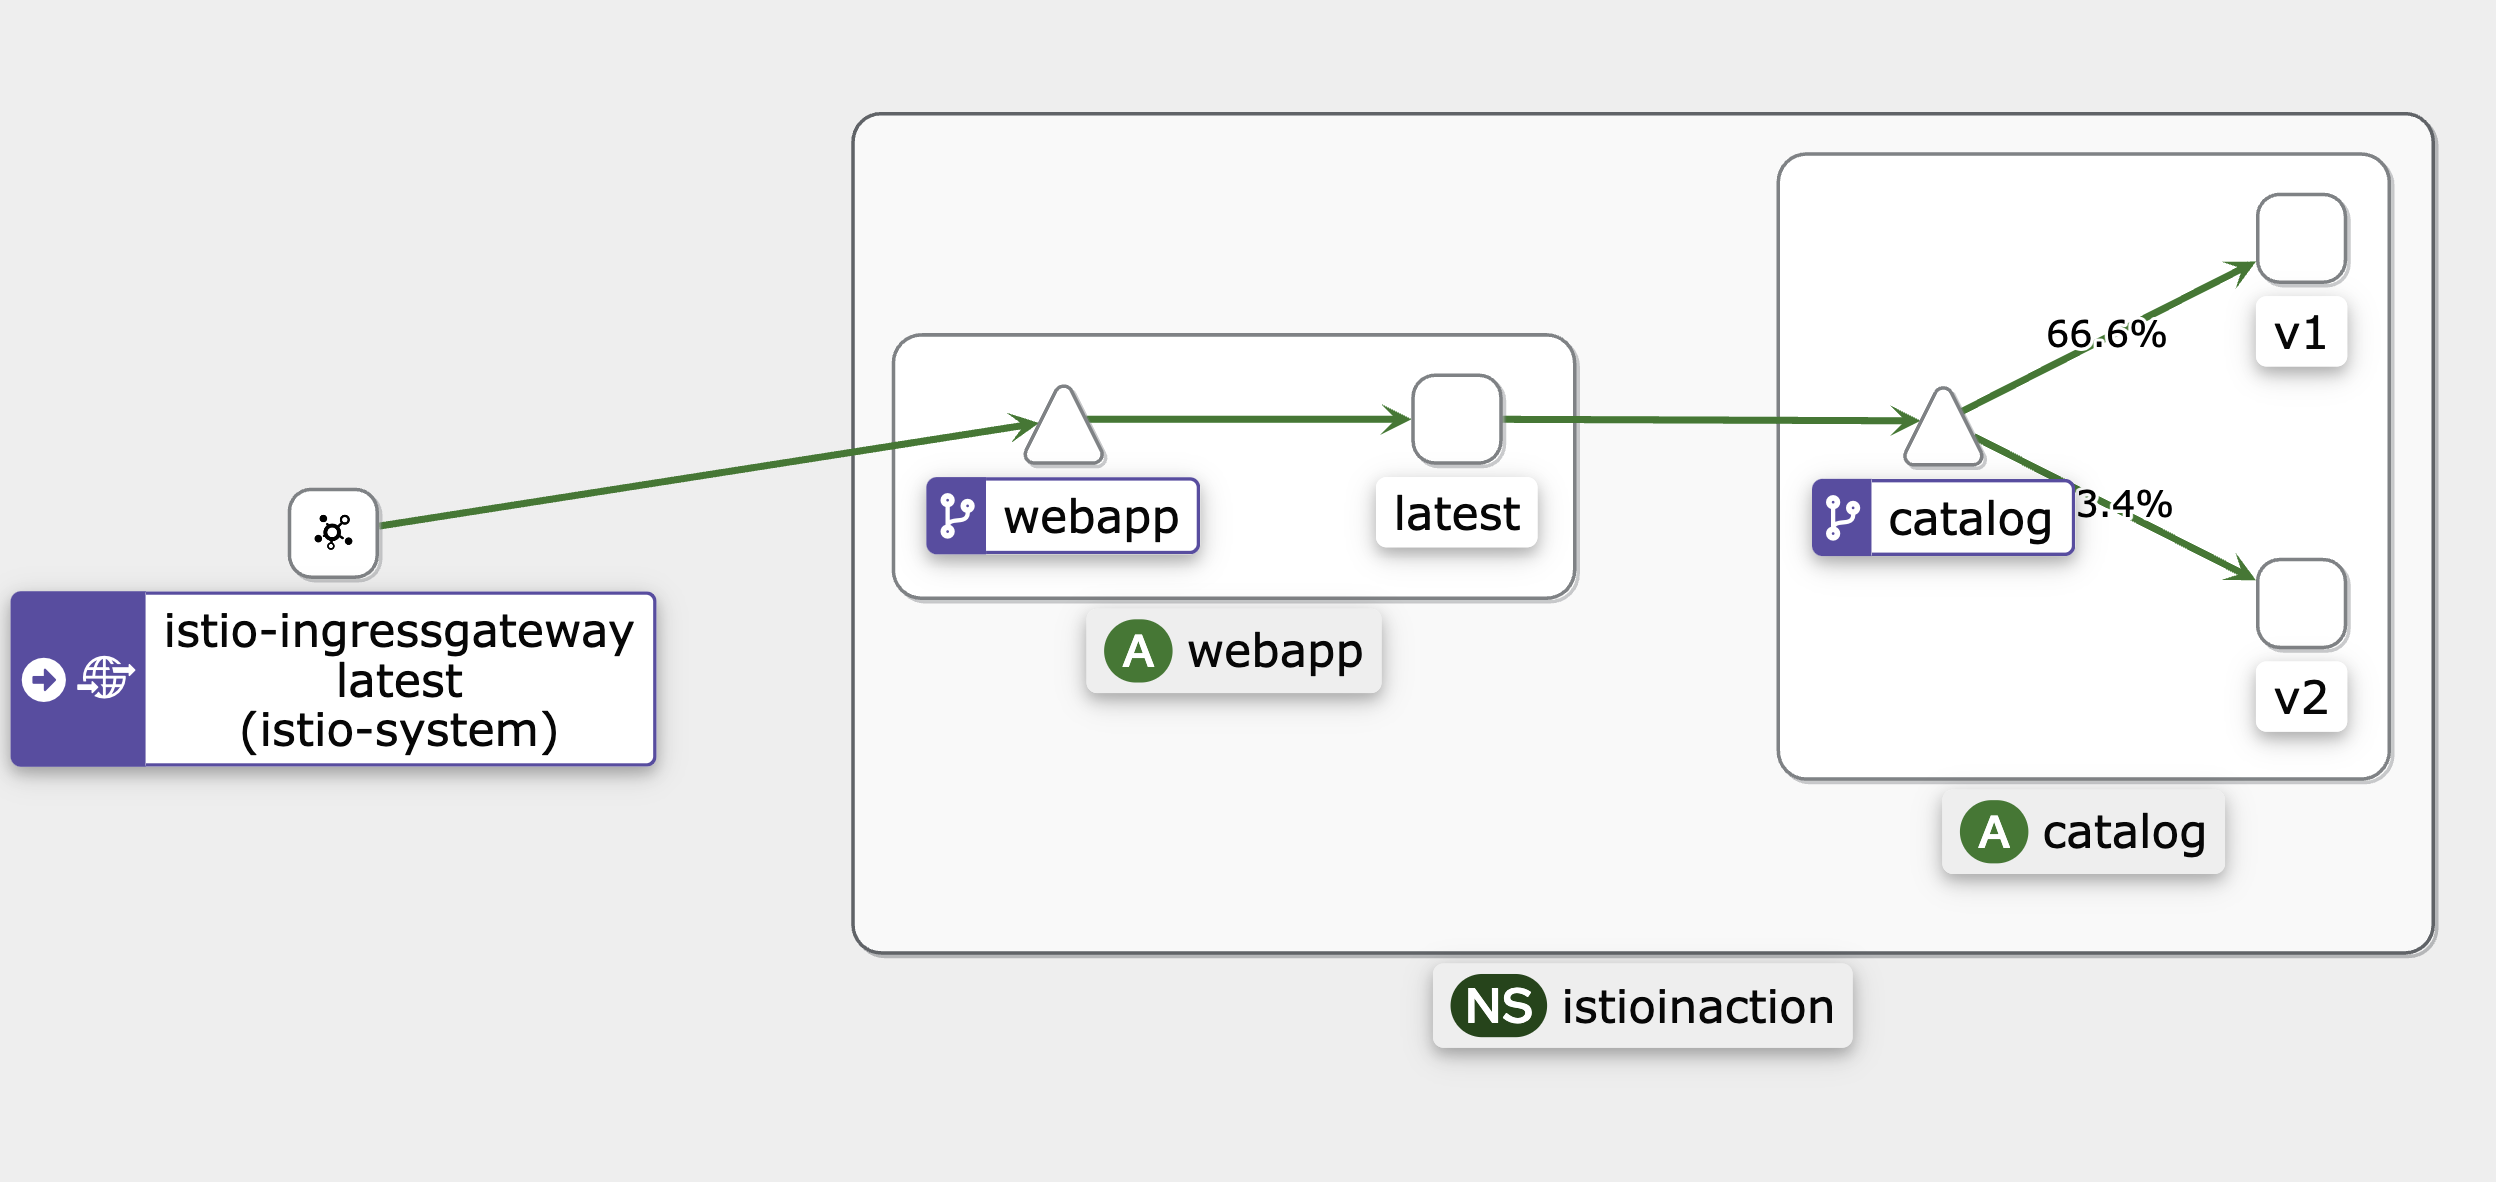
kiali로 확인해도 트래픽 비중이 9:1로 알맞게 shifting된 것을 볼 수 있다.
Traffic mirroring
기존 서비스로 트래픽을 정상적으로 보내면서, 동시에 복제된 트래픽을 새로운 서비스(또는 버전)로 보내는 방법이다. 미러링된 트래픽은 실제 응답에 영향을 주지 않아 “사용자에게 영향없이” 새 버전을 검증할 수 있다.
Virtual Service에 mirror 옵션을 추가한다.
1
2
3
4
5
6
7
8
9
10
11
12
13
14
15
16
17
kind: VirtualService
metadata:
  name: catalog
spec:
  hosts:
  - catalog
  gateways:
    - mesh
  http:
  - route:
    - destination:
        host: catalog
        subset: version-v1
      weight: 100
    mirror:
      host: catalog
      subset: version-v2
이제 배포 후 로그를 확인해보면
catalog.istioinaction-shadow -shadow가 붙어 미머링된 요청임을 식별할 수 있다.
1
2
3
4
5
6
7
8
9
 kubectl logs -n istioinaction -l app=catalog -l version=v2 -c catalog -f
request path: /items
blowups: {}
number of blowups: 0
GET catalog.istioinaction-shadow:80 /items 200 698 - 0.513 ms
GET /items 200 0.513 ms - 698
request path: /items
blowups: {}
number of blowups: 0
추가적으로 아래의 config에서도 "requestMirrorPolicies"를 확인할 수 있다.
1
2
3
4
5
6
7
8
9
10
11
12
13
14
15
16
17
18
19
20
21
22
23
24
25
26
27
28
29
30
31
32
33
34
35
36
37
38
39
40
41
42
43
44
45
46
47
48
49
50
[
  {
    "name": "80",
    "virtualHosts": [
      {
        "name": "catalog.istioinaction.svc.cluster.local:80",
        "domains": [
          "catalog.istioinaction.svc.cluster.local",
          "catalog",
          "catalog.istioinaction.svc",
          "catalog.istioinaction",
          "10.200.1.92"
        ],
        "routes": [
          {
            "match": {
              "prefix": "/"
            },
            "route": {
              "cluster": "outbound|80|version-v1|catalog.istioinaction.svc.cluster.local",
              "timeout": "0s",
              ...
              "requestMirrorPolicies": [
                {
                  "cluster": "outbound|80|version-v2|catalog.istioinaction.svc.cluster.local",
                  "runtimeFraction": {
                    "defaultValue": {
                      "numerator": 100
                    }
                  },
                  "traceSampled": false
                }
              ],
              "maxGrpcTimeout": "0s"
            },
            "metadata": {
              "filterMetadata": {
                "istio": {
                  "config": "/apis/networking.istio.io/v1alpha3/namespaces/istioinaction/virtual-service/catalog"
                }
              }
            },
            "decorator": {
              "operation": "catalog.istioinaction.svc.cluster.local:80/*"
            }
          }
        ],
        "includeRequestAttemptCount": true
      },
      ...
ServiceEntry
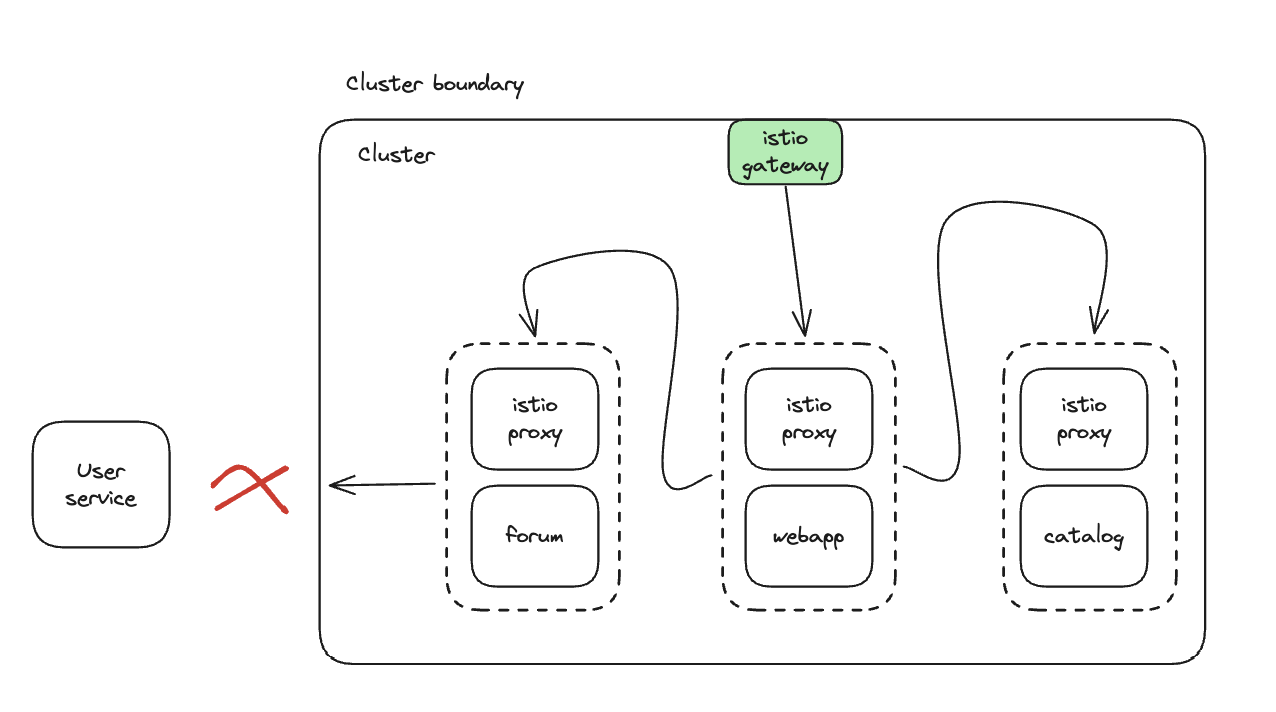
만약, 특정 서비스의 트래픽이 외부로 나가면 안되는 경우라면 예를 들어Database의 클러스터 외부에서 직접 요청하지않는다. 이럴 땐 해당 서비스가 외부와 직접 통신하는 것에 막을 수 있다.
외부 트래픽 차단하기
outboundTrafficPolicy.mode 설정을 REGISTRY_ONLY 로 변경한다.
1
2
istioctl install --set profile=default --set meshConfig.outboundTrafficPolicy.mode=REGISTRY_ONLY
아래와 같이 operator를 확인하여 설정이 적용된 것을 볼 수 있다.
1
2
3
4
 kubectl get istiooperators -n istio-system -o json | grep -A2 outbound
 "outboundTrafficPolicy": {
                        "mode": "REGISTRY_ONLY"
                    }
이제 webapp에서 외부 데이터를 가져오려고 하면, 아래와 같이 fail이 발생하는 것을 볼 수 있다.
1
2
3
4
5
kubectl exec -it deploy/webapp -n istioinaction -c webapp -- wget https://raw.githubusercontent.com/gasida/KANS/refs/heads/main/msa/sock-shop-demo.yaml

Connecting to raw.githubusercontent.com (185.199.111.133:443)
wget: error getting response: Connection reset by peer
command terminated with exit code 1
ServiceEntry를 이용해 외부 서비스 연결하기
외부와 통신을 막은 상태에서도 Sentry를 통해 클러스터 외부 서비스와 연결할 수 있다.
우선 forum을 배포한다.
1
kubectl apply -f services/forum/kubernetes/forum-all.yaml -n istioinaction
이후 ServiceEntry 설정을 두어 jsonplaceholder.typicode.com을 사용하는 서비스와의 통신을 허용한다.
1
2
3
4
5
6
7
8
9
10
11
12
13
apiVersion: networking.istio.io/v1alpha3
kind: ServiceEntry
metadata:
  name: jsonplaceholder
spec:
  hosts:
  - jsonplaceholder.typicode.com
  ports:
  - number: 80
    name: http
    protocol: HTTP
  resolution: DNS
  location: MESH_EXTERNAL
해당 호스트(jsonplaceholder.typicode.com)의 엔드포인트를 확인가능하고,
1
2
3
4
5
6
7
8
9
10
docker exec -it myk8s-control-plane istioctl proxy-config endpoint deploy/forum.istioinaction --cluster 'outbound|80||jsonplaceholder.typicode.com'

ENDPOINT            STATUS      OUTLIER CHECK     CLUSTER
104.21.112.1:80     HEALTHY     OK                outbound|80||jsonplaceholder.typicode.com
104.21.16.1:80      HEALTHY     OK                outbound|80||jsonplaceholder.typicode.com
104.21.32.1:80      HEALTHY     OK                outbound|80||jsonplaceholder.typicode.com
104.21.48.1:80      HEALTHY     OK                outbound|80||jsonplaceholder.typicode.com
104.21.64.1:80      HEALTHY     OK                outbound|80||jsonplaceholder.typicode.com
104.21.80.1:80      HEALTHY     OK                outbound|80||jsonplaceholder.typicode.com
104.21.96.1:80      HEALTHY     OK                outbound|80||jsonplaceholder.typicode.com
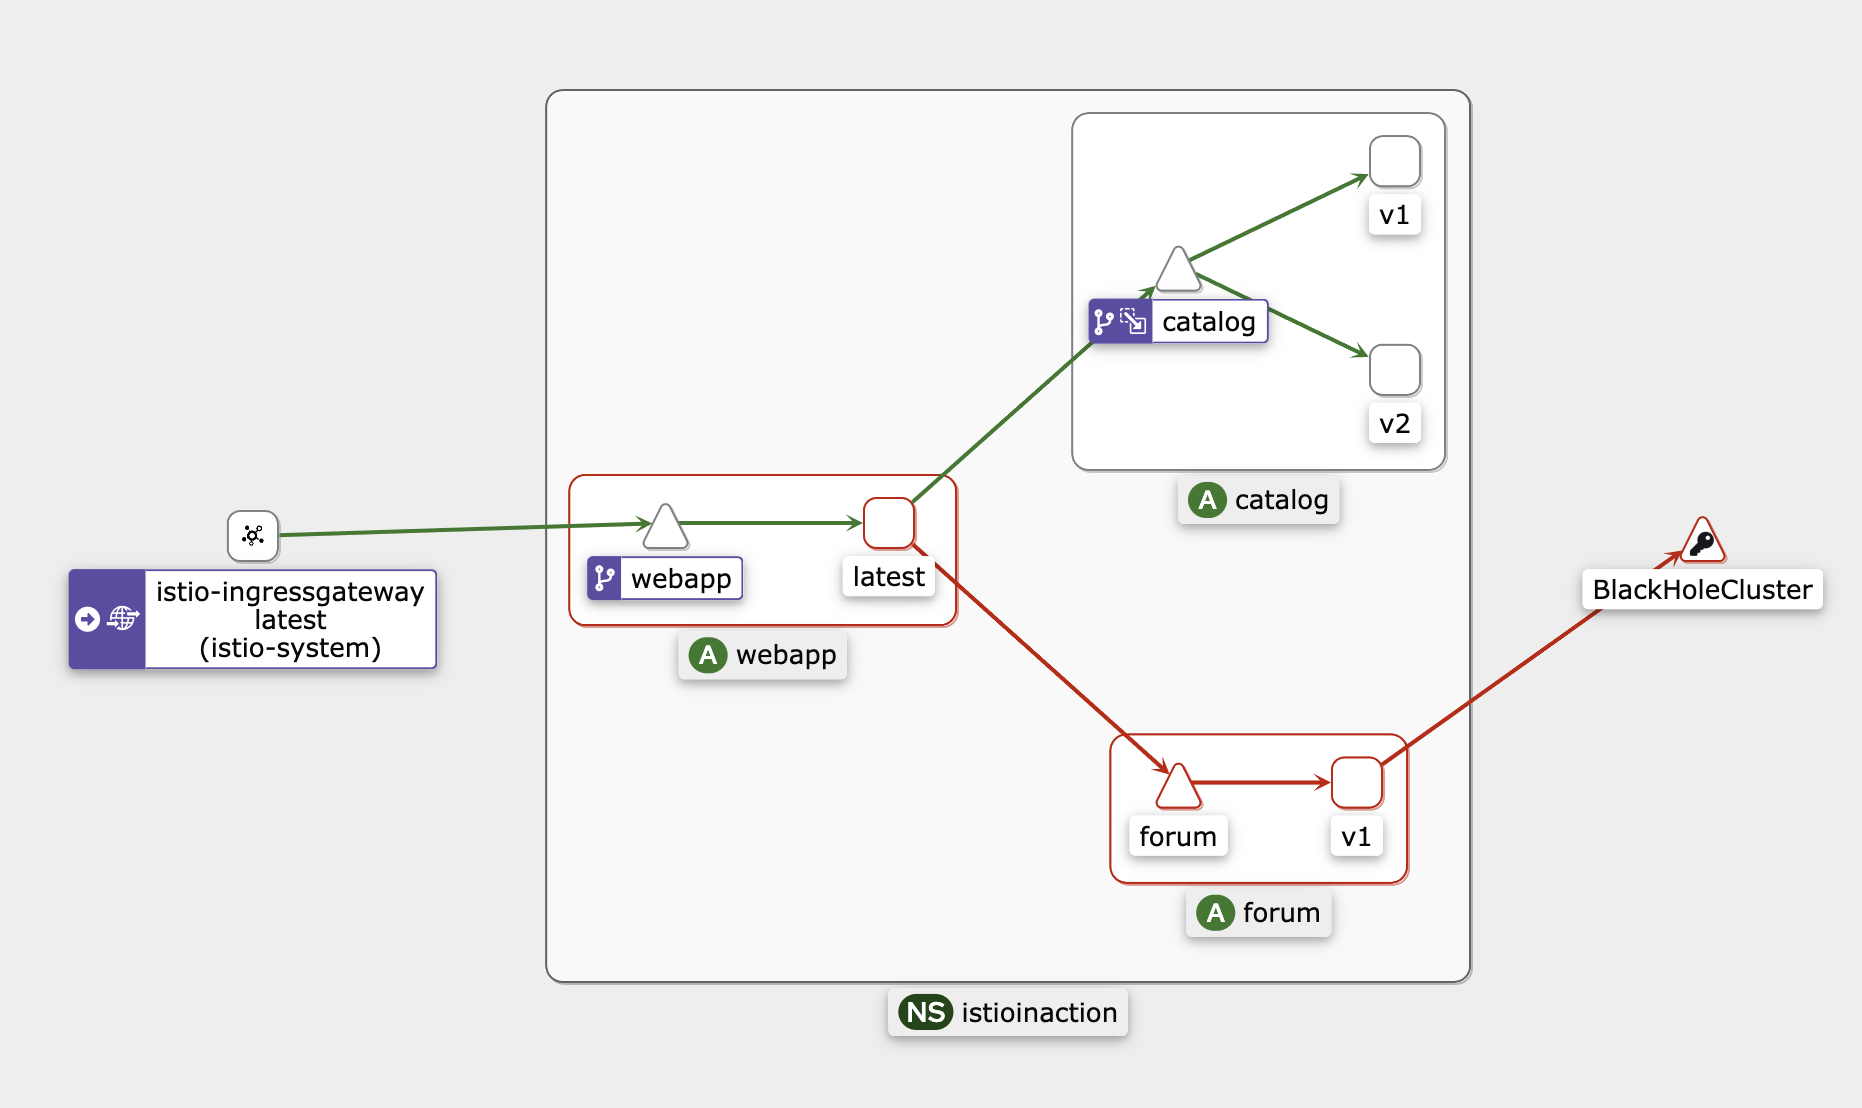
실제 webapp 사이트에도 접속하면 하단의 오른쪽과 같이 외부 서비스(Forum)의 데이터를 가져오는 것을 볼 수 있다.
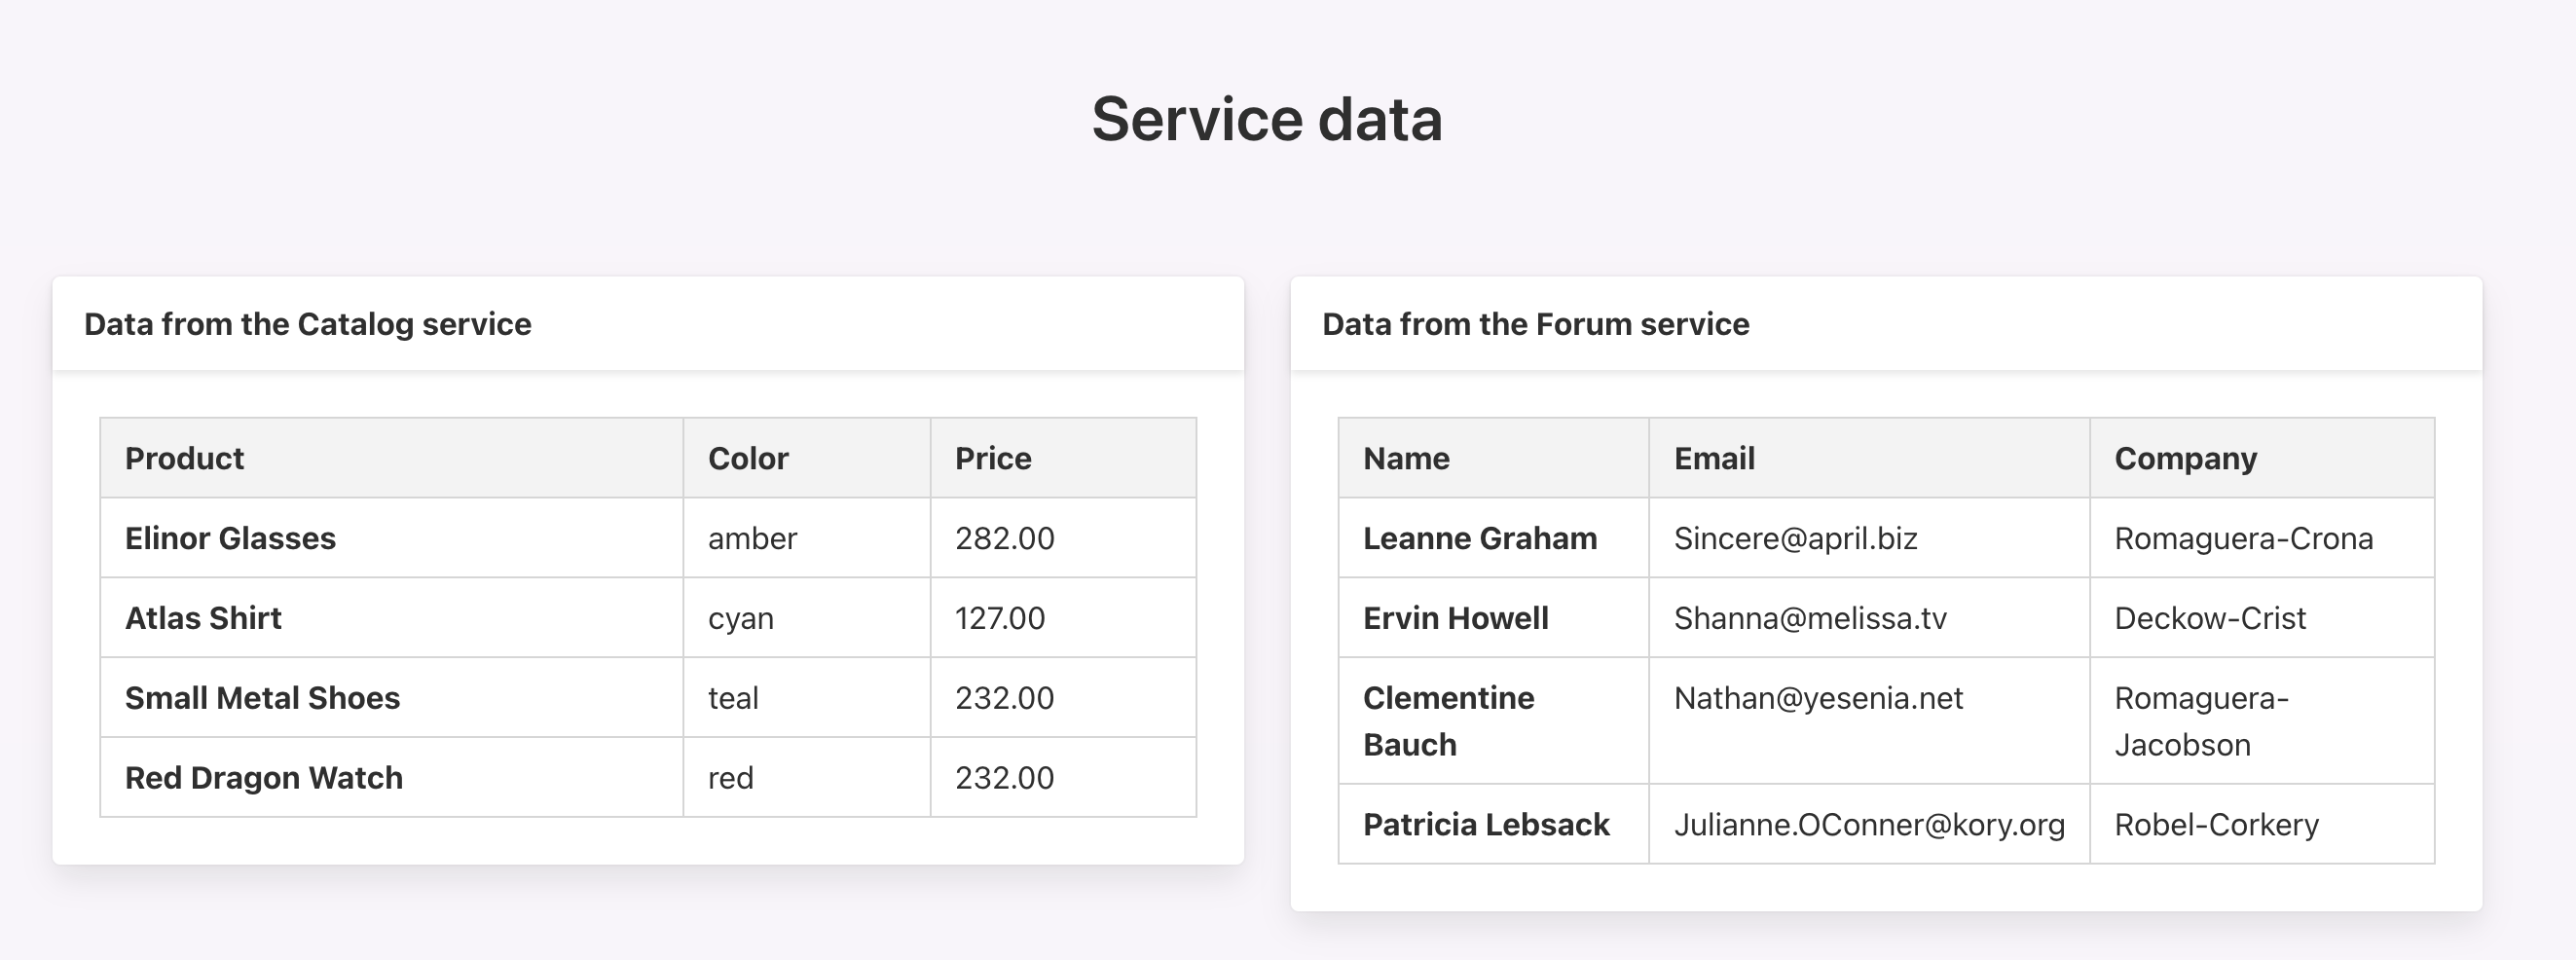
마지막으로 kiali에서도 확인가능하다.

마치며
이번 편에서는 istio에서 제공하는 트래픽 제어 방식(통제, shifting, mirroring, 외부 서비스와 연결 및 차단)에 대해 살펴봤다. 다음 편에서는 istio의 네트워크 복원성에 대해 살펴볼 예정이다.