Cilium 실습편
Cilium을 실습해보며 트래픽을 처리하는 방식 알아보기
💡 KANS 스터디
CloudNet에서 주관하는 KANS(Kubernetes Advanced Networking Study)으로 쿠버네티스 네트워킹 스터디입니다. 아래의 글은 스터디의 내용을 기반으로 작성했습니다.스터디에 관심이 있으신 분은 CloudNet Blog를 참고해주세요.
실습 환경 구성
이번 주차는 AWS를 사용하여 실습 환경을 구성한다. 자세한 내용은 아래와 같다. “VPC 1개(퍼블릭 서브넷 2개), EC2 인스턴스 3대 (Ubuntu 22.04 LTS, t3.xlarge - vCPU 4 , Mem 16) , testpc 1대는 t3.small”
AWS 리소스 배포
가시다님이 준비해주신 CloudFormation 파일을 통해 배포를 진행한다.
1
2
3
4
# YAML 파일 다운로드
curl -O https://s3.ap-northeast-2.amazonaws.com/cloudformation.cloudneta.net/kans/kans-8w.yaml
# 배포 진행
aws cloudformation deploy --template-file kans-8w.yaml --stack-name mylab --parameter-overrides KeyName={key-pair name} SgIngressSshCidr=$(curl -s ipinfo.io/ip)/32 --region ap-northeast-2
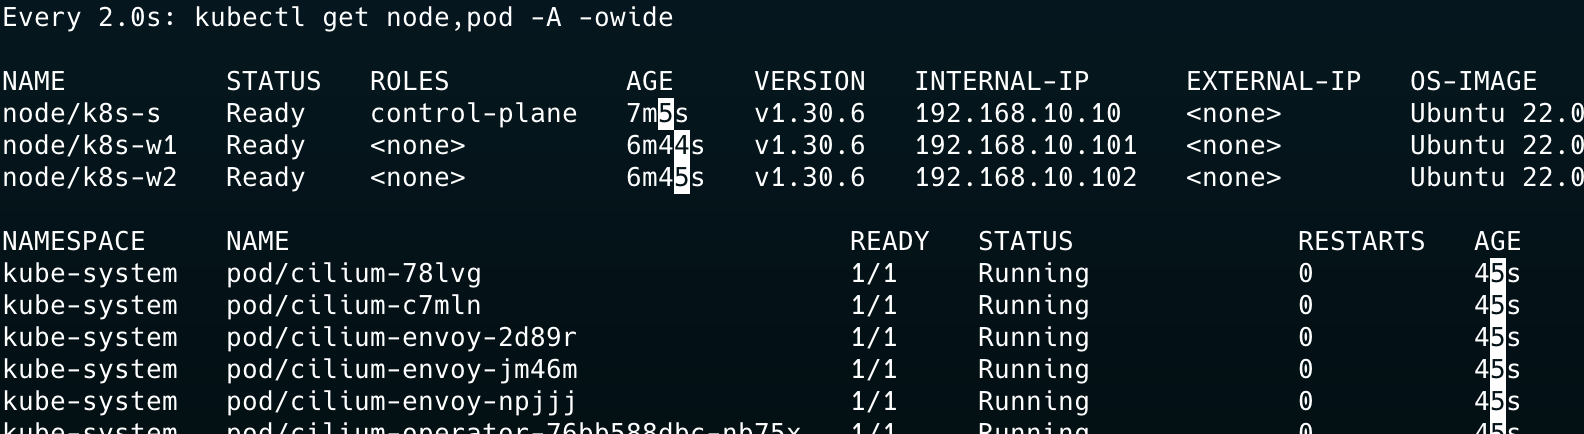
배포가 완료된 후 k8s-s EC2에 접속하여 노드 상태를 확인한다. CNI가 없어 NotReady 상태임을 확인할 수 있다.
1
2
3
4
5
kc get nodes
NAME     STATUS     ROLES           AGE   VERSION
k8s-s    NotReady   control-plane   95s   v1.30.6
k8s-w1   NotReady   <none>          74s   v1.30.6
k8s-w2   NotReady   <none>          75s   v1.30.6
Cilium 설치
이제 Helm을 통해 Cilium을 설치한다. 아래에서 kubeProxyReplacement 옵션을 살펴볼 수 있다. Cilium에서는 kube-proxy를 사용하지 않고 kube-proxy의 역할, 서비스에 대한 구현을 대신 수행할 수 있다.
1
2
3
4
5
6
7
8
9
10
11
12
helm repo add cilium https://helm.cilium.io/
helm repo update

helm install cilium cilium/cilium --version 1.16.3 --namespace kube-system \
--set k8sServiceHost=192.168.10.10 --set k8sServicePort=6443 --set debug.enabled=true \
--set rollOutCiliumPods=true --set routingMode=native --set autoDirectNodeRoutes=true \
--set bpf.masquerade=true --set bpf.hostRouting=true --set endpointRoutes.enabled=true \
--set ipam.mode=kubernetes --set k8s.requireIPv4PodCIDR=true --set kubeProxyReplacement=true \ #without kube-proxy
--set ipv4NativeRoutingCIDR=192.168.0.0/16 --set installNoConntrackIptablesRules=true \ #kube-porxy 안쓰니까 conntract tables도 No
--set hubble.ui.enabled=true --set hubble.relay.enabled=true --set prometheus.enabled=true --set operator.prometheus.enabled=true --set hubble.metrics.enableOpenMetrics=true \
--set hubble.metrics.enabled="{dns:query;ignoreAAAA,drop,tcp,flow,port-distribution,icmp,httpV2:exemplars=true;labelsContext=source_ip\,source_namespace\,source_workload\,destination_ip\,destination_namespace\,destination_workload\,traffic_direction}" \
--set operator.replicas=1
Cilium 파드가 뜨면서, 파드들도 IP를 받아오며 Pending 상태에서 Running으로 변하고 node의 상태가 Ready가 되는 모습을 확인할 수 있다.
iptables 확인
iptables NAT를 확인해본다. 원래는 kube-proxy나 기본적으로 배포되는 kubernetes 서비스에 대한 NAT 규칙이 있어야하지만 없다!
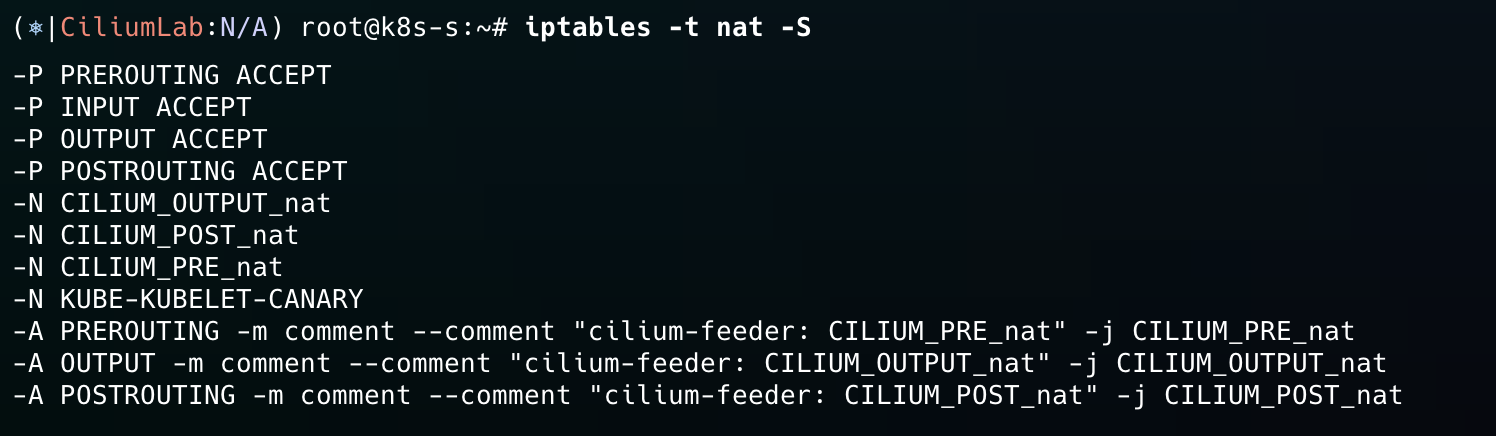
아래의 gloo Service Mesh를 테스트했던 kind 컨테이너에서 똑같은 명령어를 수행하면 157개의 규칙이 나온다.

이제 conntrack을 통해 살펴보자. etcd 관련 포트를 제외하고 보면, 별다른 규칙이 없는 것을 확인할 수 있다. iptables를 사용하는 CNI와 kube-proxy가 존재할 때랑 비교하면 정말 많은 차이가 있다.
1
2
3
4
5
6
7
8
9
10
conntrack -L | grep -v 2379
tcp      6 116 TIME_WAIT src=127.0.0.1 dst=127.0.0.1 sport=42192 dport=9878 src=127.0.0.1 dst=127.0.0.1 sport=9878 dport=42192 [ASSURED] mark=0 use=1
tcp      6 115 TIME_WAIT src=127.0.0.1 dst=127.0.0.1 sport=55044 dport=9879 src=127.0.0.1 dst=127.0.0.1 sport=9879 dport=55044 [ASSURED] mark=0 use=1
tcp      6 114 TIME_WAIT src=127.0.0.1 dst=127.0.0.1 sport=43108 dport=2381 src=127.0.0.1 dst=127.0.0.1 sport=2381 dport=43108 [ASSURED] mark=0 use=1
tcp      6 115 TIME_WAIT src=127.0.0.1 dst=127.0.0.1 sport=55050 dport=9879 src=127.0.0.1 dst=127.0.0.1 sport=9879 dport=55050 [ASSURED] mark=0 use=1
tcp      6 2 CLOSE src=127.0.0.1 dst=127.0.0.1 sport=54500 dport=10257 src=127.0.0.1 dst=127.0.0.1 sport=10257 dport=54500 [ASSURED] mark=0 use=1
tcp      6 104 TIME_WAIT src=127.0.0.1 dst=127.0.0.1 sport=44074 dport=2381 src=127.0.0.1 dst=127.0.0.1 sport=2381 dport=44074 [ASSURED] mark=0 use=1
conntrack v1.4.6 (conntrack-tools): tcp      6 2 CLOSE src=127.0.0.1 dst=127.0.0.1 sport=60814 dport=10259 src=127.0.0.1 dst=127.0.0.1 sport=10259 dport=60814 [ASSURED] mark=0 use=1
81 flow entries have been shown.
tcp      6 116 TIME_WAIT src=127.0.0.1 dst=127.0.0.1 sport=42190 dport=9878 src=127.0.0.1 dst=127.0.0.1 sport=9878 dport=42190 [ASSURED] mark=0 use=1
인터페이스 확인
노드에 접속하여 인터페이스를 확인하면 lxc_health라는 health check 전용 인터페이스가 보이고, cilium_host와 cilium_net가 보인다. 이 둘은 peer로 묶여있는 것도 확인할 수 있다. 각 인터페이스의 역할과 자세한 내용은 추후 Packet flow에서 확인해본다.
1
2
3
4
5
6
7
8
9
10
11
12
13
14
15
16
17
18
19
ip -c addr
1: lo: <LOOPBACK,UP,LOWER_UP> mtu 65536 qdisc noqueue state UNKNOWN group default qlen 1000
...
2: ens5: <BROADCAST,MULTICAST,UP,LOWER_UP> mtu 9001 qdisc mq state UP group default qlen 1000
...
3: cilium_net@cilium_host: <BROADCAST,MULTICAST,NOARP,UP,LOWER_UP> mtu 9001 qdisc noqueue state UP group default qlen 1000
    link/ether 16:cf:27:70:e7:01 brd ff:ff:ff:ff:ff:ff
    inet6 fe80::14cf:27ff:fe70:e701/64 scope link
       valid_lft forever preferred_lft forever
4: cilium_host@cilium_net: <BROADCAST,MULTICAST,NOARP,UP,LOWER_UP> mtu 9001 qdisc noqueue state UP group default qlen 1000
    link/ether 36:c8:ec:67:2d:e5 brd ff:ff:ff:ff:ff:ff
    inet 172.16.0.189/32 scope global cilium_host
       valid_lft forever preferred_lft forever
    inet6 fe80::34c8:ecff:fe67:2de5/64 scope link
       valid_lft forever preferred_lft forever
6: lxc_health@if5: <BROADCAST,MULTICAST,UP,LOWER_UP> mtu 9001 qdisc noqueue state UP group default qlen 1000
    link/ether ae:60:52:63:40:61 brd ff:ff:ff:ff:ff:ff link-netnsid 0
    inet6 fe80::ac60:52ff:fe63:4061/64 scope link
       valid_lft forever preferred_lft forever
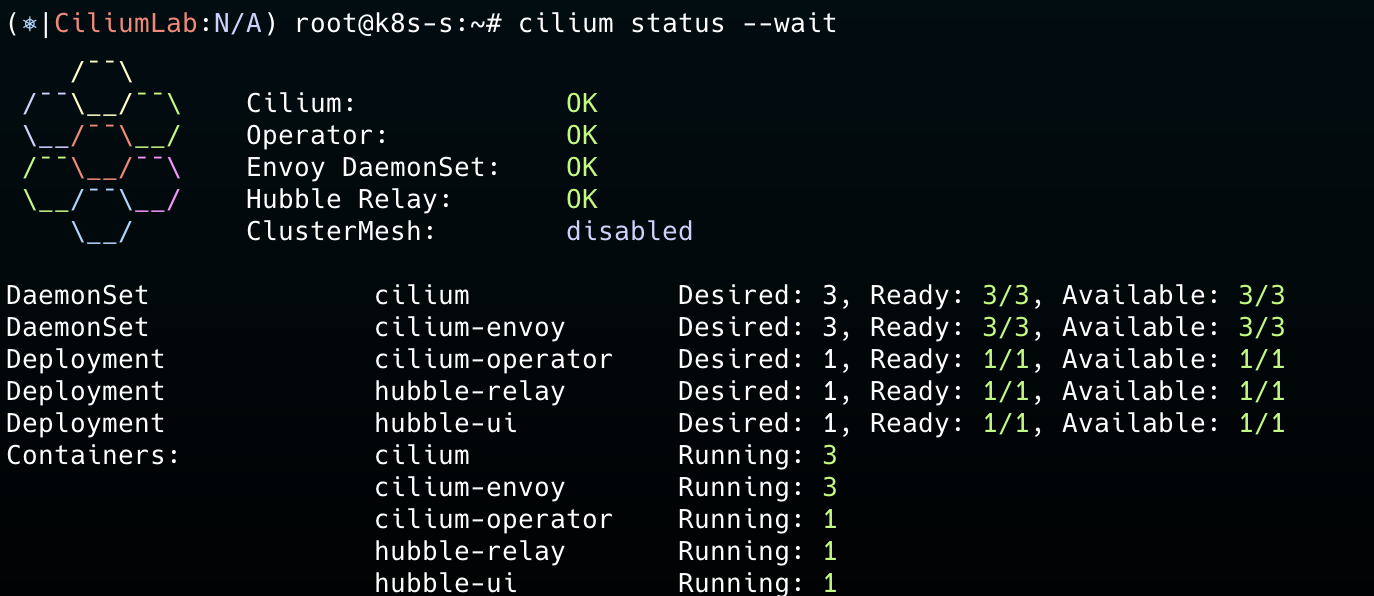
Cilium CLI 설치
아래의 코드를 실행하여 Cilium CLI를 설치한다.
1
2
3
4
5
6
7
CILIUM_CLI_VERSION=$(curl -s https://raw.githubusercontent.com/cilium/cilium-cli/main/stable.txt)
CLI_ARCH=amd64
if [ "$(uname -m)" = "aarch64" ]; then CLI_ARCH=arm64; fi
curl -L --fail --remote-name-all https://github.com/cilium/cilium-cli/releases/download/${CILIUM_CLI_VERSION}/cilium-linux-${CLI_ARCH}.tar.gz{,.sha256sum}
sha256sum --check cilium-linux-${CLI_ARCH}.tar.gz.sha256sum
sudo tar xzvfC cilium-linux-${CLI_ARCH}.tar.gz /usr/local/bin
rm cilium-linux-${CLI_ARCH}.tar.gz{,.sha256sum}
설치를 완료하면 아래와 같이 알록달록한 화면을 볼 수 있다.
리소스 확인
단축키 설정
각 노드에 존재하는 Cilium Agent 파드를 단축키로 지정한다. 만약, Helm을 통해 Cilium 관련 설정을 바꾸면 Agent도 재생성되어 이름이 변경되므로 아래 단축키를 다시 설정해줘야 한다.
1
2
3
4
5
6
7
8
9
10
11
12
13
14
# cilium 파드 이름
export CILIUMPOD0=$(kubectl get -l k8s-app=cilium pods -n kube-system --field-selector spec.nodeName=**k8s-s**  -o jsonpath='{.items[0].metadata.name}')
export CILIUMPOD1=$(kubectl get -l k8s-app=cilium pods -n kube-system --field-selector spec.nodeName=**k8s-w1** -o jsonpath='{.items[0].metadata.name}')
export CILIUMPOD2=$(kubectl get -l k8s-app=cilium pods -n kube-system --field-selector spec.nodeName=**k8s-w2** -o jsonpath='{.items[0].metadata.name}')

# 단축키(alias) 지정
alias c0="kubectl exec -it $CILIUMPOD0 -n kube-system -c cilium-agent -- cilium"
alias c1="kubectl exec -it $CILIUMPOD1 -n kube-system -c cilium-agent -- cilium"
alias c2="kubectl exec -it $CILIUMPOD2 -n kube-system -c cilium-agent -- cilium"

alias c0bpf="kubectl exec -it $CILIUMPOD0 -n kube-system -c cilium-agent -- bpftool"
alias c1bpf="kubectl exec -it $CILIUMPOD1 -n kube-system -c cilium-agent -- bpftool"
alias c2bpf="kubectl exec -it $CILIUMPOD2 -n kube-system -c cilium-agent -- bpftool"
구성요소
Agent에 접속하여 상태를 살펴본다.
- 사용하는 API: EndpointSliceOrEndpoint, Service, NetworkPolicy, 각종 Cilium CRD, …
- ebpf에서 사용하는 map으로 서비스와 관련된 map도 보인다.
- 마지막으로 ebpf 관련 모듈도 확인된다.
1
2
3
4
5
6
7
8
9
10
11
12
13
14
15
16
17
18
19
20
21
22
23
24
25
26
27
28
29
30
31
32
33
34
35
36
37
38
39
40
41
42
43
44
45
46
47
48
49
50
51
52
53
54
55
56
57
58
59
60
61
62
63
64
65
66
67
68
69
70
71
72
73
74
75
76
77
78
79
80
81
82
83
84
85
86
87
88
89
90
91
92
93
94
95
96
97
98
99
100
101
102
103
104
105
106
107
108
109
110
111
112
113
114
115
116
117
118
119
120
121
122
123
124
125
126
127
128
129
130
131
132
133
134
135
136
137
138
139
140
141
142
143
144
145
146
147
148
149
150
151
152
153
154
155
156
157
158
159
160
161
162
c0 status --verbose
KVStore:                Ok   Disabled
Kubernetes:             Ok   1.30 (v1.30.6) [linux/amd64]
Kubernetes APIs:        ["EndpointSliceOrEndpoint", "cilium/v2::CiliumClusterwideNetworkPolicy", "cilium/v2::CiliumEndpoint", "cilium/v2::CiliumNetworkPolicy", "cilium/v2::CiliumNode", "cilium/v2alpha1::CiliumCIDRGroup", "core/v1::Namespace", "core/v1::Pods", "core/v1::Service", "networking.k8s.io/v1::NetworkPolicy"]
KubeProxyReplacement:   True   [ens5   192.168.10.10 fe80::7e:aeff:fe5f:c8a9 (Direct Routing)]
Host firewall:          Disabled
SRv6:                   Disabled
CNI Chaining:           none
CNI Config file:        successfully wrote CNI configuration file to /host/etc/cni/net.d/05-cilium.conflist
Cilium:                 Ok   1.16.3 (v1.16.3-f2217191)
NodeMonitor:            Listening for events on 4 CPUs with 64x4096 of shared memory
Cilium health daemon:   Ok
IPAM:                   IPv4: 2/254 allocated from 172.16.0.0/24,
Allocated addresses:
  172.16.0.13 (health)
  172.16.0.186 (router)
IPv4 BIG TCP:           Disabled
IPv6 BIG TCP:           Disabled
BandwidthManager:       Disabled
Routing:                Network: Native   Host: BPF
Attach Mode:            TCX
Device Mode:            veth
Masquerading:           BPF   [ens5]   192.168.0.0/16 [IPv4: Enabled, IPv6: Disabled]
Clock Source for BPF:   ktime
Controller Status:      19/19 healthy
  Name                                  Last success   Last error   Count   Message
  cilium-health-ep                      9s ago         never        0       no error
  ct-map-pressure                       22s ago        never        0       no error
  daemon-validate-config                21s ago        never        0       no error
  dns-garbage-collector-job             23s ago        never        0       no error
  endpoint-1519-regeneration-recovery   never          never        0       no error
  endpoint-2104-regeneration-recovery   never          never        0       no error
  endpoint-gc                           23s ago        never        0       no error
  ep-bpf-prog-watchdog                  21s ago        never        0       no error
  ipcache-inject-labels                 20s ago        never        0       no error
  k8s-heartbeat                         23s ago        never        0       no error
  link-cache                            6s ago         never        0       no error
  node-neighbor-link-updater            2s ago         never        0       no error
  resolve-identity-1519                 22s ago        never        0       no error
  resolve-identity-2104                 20s ago        never        0       no error
  sync-lb-maps-with-k8s-services        22s ago        never        0       no error
  sync-policymap-1519                   18s ago        never        0       no error
  sync-policymap-2104                   12s ago        never        0       no error
  sync-utime                            22s ago        never        0       no error
  write-cni-file                        23s ago        never        0       no error
Proxy Status:            OK, ip 172.16.0.186, 0 redirects active on ports 10000-20000, Envoy: external
Global Identity Range:   min 256, max 65535
Hubble:                  Ok   Current/Max Flows: 93/4095 (2.27%), Flows/s: 3.35   Metrics: Ok
KubeProxyReplacement Details:
  Status:                 True
  Socket LB:              Enabled
  Socket LB Tracing:      Enabled
  Socket LB Coverage:     Full
  Devices:                ens5   192.168.10.10 fe80::7e:aeff:fe5f:c8a9 (Direct Routing)
  Mode:                   SNAT
  Backend Selection:      Random
  Session Affinity:       Enabled
  Graceful Termination:   Enabled
  NAT46/64 Support:       Disabled
  XDP Acceleration:       Disabled
  Services:
  - ClusterIP:      Enabled
  - NodePort:       Enabled (Range: 30000-32767)
  - LoadBalancer:   Enabled
  - externalIPs:    Enabled
  - HostPort:       Enabled
BPF Maps:   dynamic sizing: on (ratio: 0.002500)
  Name                          Size
  Auth                          524288
  Non-TCP connection tracking   72610
  TCP connection tracking       145220
  Endpoint policy               65535
  IP cache                      512000
  IPv4 masquerading agent       16384
  IPv6 masquerading agent       16384
  IPv4 fragmentation            8192
  IPv4 service                  65536
  IPv6 service                  65536
  IPv4 service backend          65536
  IPv6 service backend          65536
  IPv4 service reverse NAT      65536
  IPv6 service reverse NAT      65536
  Metrics                       1024
  NAT                           145220
  Neighbor table                145220
  Global policy                 16384
  Session affinity              65536
  Sock reverse NAT              72610
  Tunnel                        65536
Encryption:           Disabled
Cluster health:       0/3 reachable    (2024-10-27T09:14:55Z)
  Name                IP               Node          Endpoints
  k8s-s (localhost)   192.168.10.10    reachable     unreachable
  k8s-w1              192.168.10.101   reachable     unreachable
  k8s-w2              192.168.10.102   unreachable   unreachable
Modules Health:
      agent
      ├── controlplane
      │   ├── auth
      │   │   ├── observer-job-auth gc-identity-events            [OK] Primed (23s, x1)
      │   │   ├── observer-job-auth request-authentication        [OK] Primed (23s, x1)
      │   │   └── timer-job-auth gc-cleanup                       [OK] Primed (23s, x1)
      │   ├── bgp-control-plane
      │   │   ├── job-bgp-crd-status-initialize                   [OK] Running (22s, x1)
      │   │   ├── job-bgp-crd-status-update-job                   [OK] Running (22s, x1)
      │   │   ├── job-bgp-state-observer                          [OK] Running (22s, x1)
      │   │   └── job-diffstore-events                            [OK] Running (22s, x2)
      │   ├── daemon
      │   │   ├──                                                 [OK] daemon-validate-config (21s, x1)
      │   │   ├── ep-bpf-prog-watchdog
      │   │   │   └── ep-bpf-prog-watchdog                        [OK] ep-bpf-prog-watchdog (22s, x1)
      │   │   └── job-sync-hostips                                [OK] Synchronized (22s, x1)
      │   ├── endpoint-manager
      │   │   ├── cilium-endpoint-1519 (/)
      │   │   │   ├── datapath-regenerate                         [OK] Endpoint regeneration successful (14s, x3)
      │   │   │   └── policymap-sync                              [OK] sync-policymap-1519 (18s, x1)
      │   │   ├── cilium-endpoint-2104 (/)
      │   │   │   ├── datapath-regenerate                         [OK] Endpoint regeneration successful (12s, x2)
      │   │   │   └── policymap-sync                              [OK] sync-policymap-2104 (13s, x1)
      │   │   └── endpoint-gc                                     [OK] endpoint-gc (23s, x1)
      │   ├── envoy-proxy
      │   │   └── timer-job-version-check                         [OK] Primed (22s, x1)
      │   ├── l2-announcer
      │   │   └── job-l2-announcer lease-gc                       [OK] Running (23s, x1)
      │   ├── nat-stats
      │   │   └── timer-job-nat-stats                             [OK] OK (1.799164ms) (22s, x1)
      │   ├── node-manager
      │   │   ├── neighbor-link-updater
      │   │   │   ├── k8s-w1                                      [OK] Node neighbor link update successful (12s, x1)
      │   │   │   └── k8s-w2                                      [OK] Node neighbor link update successful (12s, x1)
      │   │   ├── node-checkpoint-writer                          [OK] node checkpoint written (23s, x1)
      │   │   └── nodes-add                                       [OK] Node adds successful (20s, x3)
      │   ├── service-manager
      │   │   └── job-ServiceReconciler                           [OK] 1 NodePort frontend addresses (22s, x1)
      │   ├── service-resolver
      │   │   └── job-service-reloader-initializer                [OK] Running (23s, x1)
      │   ├── stale-endpoint-cleanup
      │   │   └── job-endpoint-cleanup                            [OK] Running (22s, x1)
      │   └── timer-job-device-reloader                           [OK] OK (8.458µs) (12s, x1)
      ├── datapath
      │   ├── agent-liveness-updater
      │   │   └── timer-job-agent-liveness-updater                [OK] OK (34.252µs) (0s, x1)
      │   ├── iptables
      │   │   ├── ipset
      │   │   │   ├── job-ipset-init-finalizer                    [OK] Running (23s, x1)
      │   │   │   ├── job-reconcile                               [OK] OK, 0 object(s) (23s, x1)
      │   │   │   └── job-refresh                                 [OK] Next refresh in 30m0s (23s, x1)
      │   │   └── job-iptables-reconciliation-loop                [OK] iptables rules full reconciliation completed (22s, x1)
      │   ├── l2-responder
      │   │   └── job-l2-responder-reconciler                     [OK] Running (22s, x1)
      │   ├── maps
      │   │   └── bwmap
      │   │       └── timer-job-pressure-metric-throttle          [OK] Primed (22s, x1)
      │   ├── node-address
      │   │   └── job-node-address-update                         [OK] 172.16.0.186 (primary), fe80::90fa:55ff:fefe:af7a (primary) (22s, x1)
      │   └── sysctl
      │       ├── job-reconcile                                   [OK] OK, 16 object(s) (18s, x9)
      │       └── job-refresh                                     [OK] Next refresh in 10m0s (23s, x1)
      └── infra
          └── k8s-synced-crdsync
              └── job-sync-crds                                   [OK] Running (23s, x1)
IPAM 확인
한번 Pod CIDR을 붙여보려고 테스트를 진행했으나, 잘안되서 확인해보니 v1.70부터 Multi-Pool을 지원한다고 한다. 이때는 ipam.mode를 K8s가 아닌 --set ipam.mode=cluster-pool으로 설정해야 한다.
1
2
3
4
5
6
7
8
9
10
kubectl get ciliumnodes -o json | jq '.items[].spec.ipam.podCIDRs'
[
  "172.16.0.0/24"
]
[
  "172.16.2.0/24"
]
[
  "172.16.1.0/24"
]
CiliumNode에서 각 노드에 대한 IPAM을 확인할 수 있다.
1
2
3
4
5
6
7
8
9
10
11
12
13
14
15
16
17
18
19
20
21
22
23
24
25
26
27
28
29
30
31
32
33
34
35
36
37
38
kubectl get ciliumnodes.cilium.io k8s-w1 -o yaml
apiVersion: cilium.io/v2
kind: CiliumNode
metadata:
  creationTimestamp: "2024-10-27T00:25:18Z"
  generation: 1
  labels:
    beta.kubernetes.io/arch: amd64
    beta.kubernetes.io/os: linux
    kubernetes.io/arch: amd64
    kubernetes.io/hostname: k8s-w1
    kubernetes.io/os: linux
  name: k8s-w1
  ownerReferences:
  - apiVersion: v1
    kind: Node
    name: k8s-w1
    uid: 3efc368e-0df3-4f1d-b14a-2670f0e56518
  resourceVersion: "1291"
  uid: cdbc6c64-5835-48ee-b953-d2d124af8952
spec:
  addresses:
  - ip: 192.168.10.101
    type: InternalIP
  - ip: 172.16.2.77
    type: CiliumInternalIP
  alibaba-cloud: {}
  azure: {}
  bootid: 805b50be-1596-49b4-909c-6e1def95f2bc
  encryption: {}
  eni: {}
  health:
    ipv4: 172.16.2.122
  ingress: {}
  ipam:
    podCIDRs:
    - 172.16.2.0/24
    pools: {}
Cilium Packet Flow
첫번째로 Cilium이 어떻게 파드 통신을 지원하는지 알아보고, kube-proxy 없이 어떻게 서비스 통신을 지원하는지 살펴본다.
우선, 파드 통신에 대한 Flow를 알아보기 위해 파드를 배포한다.
파드 통신 확인하기
파드 배포
1
2
3
4
5
6
7
8
9
10
11
12
13
14
15
16
17
18
19
20
21
22
23
24
25
26
27
28
29
30
31
32
33
34
35
36
37
38
39
40
41
42
cat <<EOF | kubectl create -f -
apiVersion: v1
kind: Pod
metadata:
  name: netpod
  labels:
    app: netpod
spec:
  nodeName: k8s-s
  containers:
  - name: netshoot-pod
    image: nicolaka/netshoot
    command: ["tail"]
    args: ["-f", "/dev/null"]
  terminationGracePeriodSeconds: 0
---
apiVersion: v1
kind: Pod
metadata:
  name: webpod1
  labels:
    app: webpod
spec:
  nodeName: k8s-w1
  containers:
  - name: container
    image: traefik/whoami
  terminationGracePeriodSeconds: 0
---
apiVersion: v1
kind: Pod
metadata:
  name: webpod2
  labels:
    app: webpod
spec:
  nodeName: k8s-w2
  containers:
  - name: container
    image: traefik/whoami
  terminationGracePeriodSeconds: 0
EOF
편의를 위해 파드 단축키를 지정한다.
1
2
3
4
5
6
7
8
9
# 테스트 파드들 IP
NETPODIP=$(kubectl get pods netpod -o jsonpath='{.status.podIP}')
WEBPOD1IP=$(kubectl get pods webpod1 -o jsonpath='{.status.podIP}')
WEBPOD2IP=$(kubectl get pods webpod2 -o jsonpath='{.status.podIP}')

# 단축키(alias) 지정
alias p0="kubectl exec -it netpod  -- "
alias p1="kubectl exec -it webpod1 -- "
alias p2="kubectl exec -it webpod2 -- "
네트워크 환경 확인
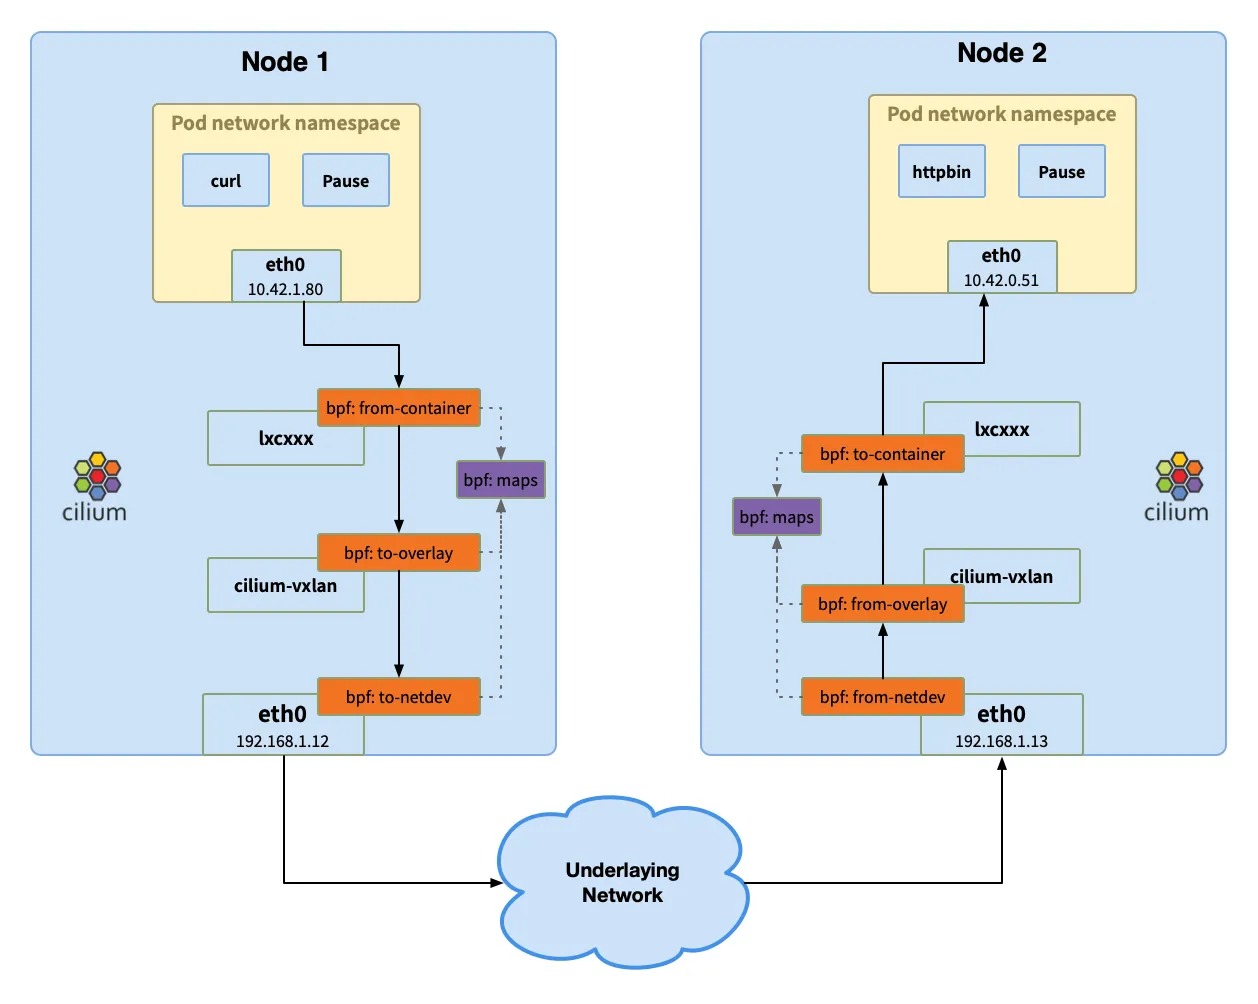
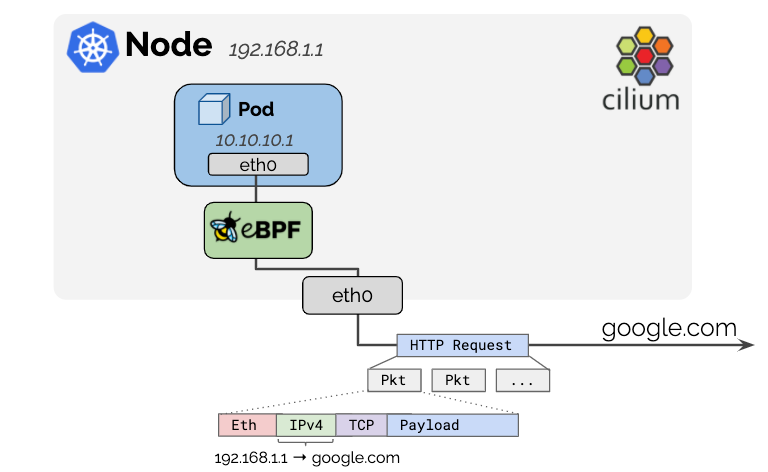
아래의 사진은 Cilium 배포시 호스트에 설정되는 기본 요소이다.
- Host 영역: cilium_host, cilium_net, cilium_vlxlan(오버레이 라우팅 선택시) 인터페이스 생성
- 파드 관련: lxc~로 시작하는 파드와 맵핑되는 인터페이스가 생성된다.

출처: https://arthurchiao.art/blog/cilium-life-of-a-packet-pod-to-service/
파드 생성 후 k8s-s 호스트 인터페이스를 확인해보면, 아래와 같이 마지막에 lxc 인터페이스가 하나 생성된다.
1
2
3
4
5
6
ip -c addr
...
10: lxce880e1eecb7a@if9: <BROADCAST,MULTICAST,UP,LOWER_UP> mtu 9001 qdisc noqueue state UP group default qlen 1000
    link/ether 3e:6a:d8:a6:93:05 brd ff:ff:ff:ff:ff:ff link-netns cni-829ecafa-430f-17ba-f69a-08f0bf5930b5
    inet6 fe80::3c6a:d8ff:fea6:9305/64 scope link
       valid_lft forever preferred_lft forever
lxce880e1eecb7a@if9 는 lxce880e1eecb7a 인터페이스와 if9가 peer로 연결되었단 의미이다. if9의 네트워크 네임스페이스는 cni-829ecafa-430f-17ba-f69a-08f0bf5930b5 라고 나와있다.
netns를 그대로 찾아서 확인해본다. 명령어를 수행하면 아래와 같이 해당 네임스페이가 파드의 네트워크 인터페이스라는 것을 확인할 수 있다.
- 호스트에서 network namespace로 확인
1
2
3
4
5
6
7
8
9
10
11
12
13
ip netns exec cni-829ecafa-430f-17ba-f69a-08f0bf5930b5 ip addr show
1: lo: <LOOPBACK,UP,LOWER_UP> mtu 65536 qdisc noqueue state UNKNOWN group default qlen 1000
    link/loopback 00:00:00:00:00:00 brd 00:00:00:00:00:00
    inet 127.0.0.1/8 scope host lo
       valid_lft forever preferred_lft forever
    inet6 ::1/128 scope host
       valid_lft forever preferred_lft forever
9: eth0@if10: <BROADCAST,MULTICAST,UP,LOWER_UP> mtu 9001 qdisc noqueue state UP group default qlen 1000
    link/ether ce:4f:33:14:59:b3 brd ff:ff:ff:ff:ff:ff link-netnsid 0
    inet 172.16.0.124/32 scope global eth0
       valid_lft forever preferred_lft forever
    inet6 fe80::cc4f:33ff:fe14:59b3/64 scope link
       valid_lft forever preferred_lft forever
- 파드에 접속하여 확인
1
2
3
4
5
6
7
8
9
10
11
12
13
p0 ip -c addr
1: lo: <LOOPBACK,UP,LOWER_UP> mtu 65536 qdisc noqueue state UNKNOWN group default qlen 1000
    link/loopback 00:00:00:00:00:00 brd 00:00:00:00:00:00
    inet 127.0.0.1/8 scope host lo
       valid_lft forever preferred_lft forever
    inet6 ::1/128 scope host proto kernel_lo
       valid_lft forever preferred_lft forever
9: eth0@if10: <BROADCAST,MULTICAST,UP,LOWER_UP> mtu 9001 qdisc noqueue state UP group default qlen 1000
    link/ether ce:4f:33:14:59:b3 brd ff:ff:ff:ff:ff:ff link-netnsid 0
    inet 172.16.0.124/32 scope global eth0
       valid_lft forever preferred_lft forever
    inet6 fe80::cc4f:33ff:fe14:59b3/64 scope link proto kernel_ll
       valid_lft forever preferred_lft forever
즉 lxce880e1eecb7a는 if9, 즉 파드의 네트워크 네임스페이스의 eth0과 peer로 연결된 것을 확인할 수 있다.
지금까지 파악한 내용을 확인하면 아래와 같다.
- lxc~ 인터페이스는 파드와 연결된 인터페이스이다.
- cilium_host, cilium_net은 서로 peer로 연결되어있으며, 호스트 네트워크에 존재하여 호스트 수준의 처리를 진행한다
출처: https://addozhang.medium.com/kubernetes-network-learning-with-cilium-and-ebpf-aafbf3163840
같은 노드 내의 파드 통신 확인
k8s-s 노드에 하나의 파드를 더 배포한다.
1
2
3
4
5
6
7
8
9
10
11
12
13
14
15
16
17
cat <<EOF | kubectl create -f -
apiVersion: v1
kind: Pod
metadata:
  name: netpod2
  labels:
    app: netpod2
spec:
  nodeName: k8s-s
  containers:
  - name: netshoot-pod
    image: nicolaka/netshoot
    command: ["tail"]
    args: ["-f", "/dev/null"]
  terminationGracePeriodSeconds: 0
EOF
pod/netpod2 created
단축키 설정도 똑같이 진행한다. netpod2는 p3이다.
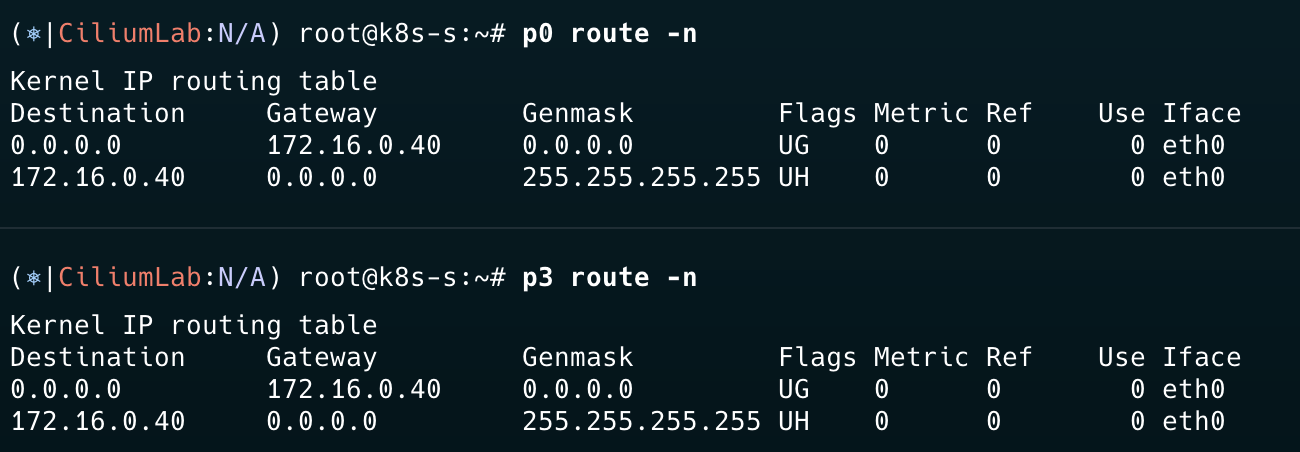
각 파드의 게이트웨이를 확인한다. cilium_host 인터페이스인 것을 확인할 수 있다.
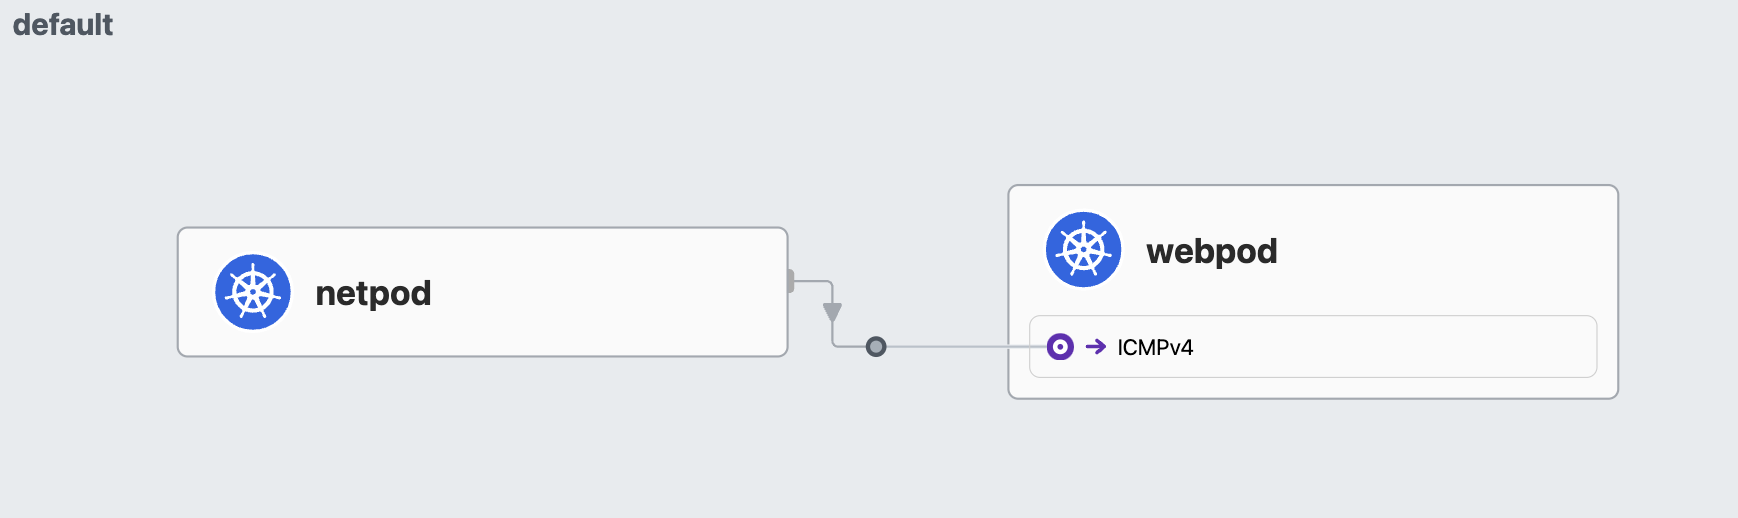
이제 ping 테스트를 각 파드에서 한번씩 진행한다. 정상 통신되는 것을 확인할 수 있다.
1
2
p3 ping -c 1 $NETPODIP
p0 ping -c 1 $NETPODIP2
이제 각 파드의 ip neigh를 확인한다. 이 명령어는 ARP 테이블을 조회하여 ip에 대한 MAC 주소를 알려준다. 게이트웨이에 대한 정보만 있다.
1
2
3
4
p3 ip -c neigh
172.16.0.40 dev eth0 lladdr b2:34:10:43:81:c6 REACHABLE
p0 ip -c neigh
172.16.0.40 dev eth0 lladdr 3e:6a:d8:a6:93:05 REACHABLE
정상적으로 통신이 이뤄지려면, 파드가 서로의 MAC주소 혹은 IP를 통해 통신해야 한다. 하지만 파드와 연결된 lxc인터페이스에는 IP가 존재하지 않는다. 그렇다면 MAC주소로 통신해야 하는데, 위의 ARP 테이블을 보면 없다는 것을 확인할 수 있다. 이를 통해 cilium_host가 ebpf를 통해 ARP을 중간에 가로채서 통신을 진행한다는 것을 알 수 있다.
결국 우리의 통신 시나리오의 Flow는 아래와 같이 진행된다.
p3에서 p0에 대한 ARP 요청 > kernel단에서 cilium_host으로 보내도록 조작 > p3이 cilium_host로 패킷 전송 > ciliu_host에서 해당 Pod와 연결된 lxc interface로 라우팅
이제 Cilium CLI를 통해 ebpf와 값을 확인하여, 자세한 내용을 확인해보자.
Cilium CLI를 통해 정보 확인
netpod의 interface를 LXC에 저장해둔다. c0bpf를 통해 cilium_agent에서 관련 인터페이스를 확인해보면, 아래와 같이 tc 단에서 ingress와 egress를 통제하는 것을 볼 수 있다. 이론편에서 살펴본 것과 같이 L3,4 정책이 있으면 리눅스 네트워크 스택 중 tc에서 packet을 drop할 수 있다.
1
2
3
c0bpf net show | grep $LXC
lxc8b470d2428ec(14) tcx/ingress cil_from_container prog_id 1402 link_id 27
lxc8b470d2428ec(14) tcx/egress cil_to_container prog_id 1396 link_id 28
위에서 나온 ID를 조회한다. 해당 ebpf에서 사용하는 map 정보를 알 수 있다.
1
2
3
4
5
6
7
8
9
10
c0bpf prog show id 1402
1402: sched_cls  name cil_from_container  tag 53dfab9415326465  gpl
	loaded_at 2024-10-28T13:50:16+0000  uid 0
	xlated 728B  jited 545B  memlock 4096B  map_ids 198,66
	btf_id 435
c0bpf prog show id 1396
1396: sched_cls  name cil_to_container  tag 06896e9e3562f5c2  gpl
	loaded_at 2024-10-28T13:50:16+0000  uid 0
	xlated 1712B  jited 1015B  memlock 4096B  map_ids 66,198
	btf_id 429
cilium_calls_00이 파드로 들어오는 트래픽을 처리하는 map이고 다른 map은 지표 수집을 위한 map임을 확인할 수 있다.
1
2
3
4
5
6
7
8
9

c0bpf map list | grep 66
66: percpu_hash  name cilium_metrics  flags 0x1
	key 8B  value 8B  max_entries 4096  memlock 66560B

c0bpf map list | grep 198 -A2
198: prog_array  name cilium_calls_00  flags 0x0
	key 4B  value 4B  max_entries 50  memlock 720B
	owner_prog_type sched_cls  owner jited
노드 간 파드 통신 확인
이제 노드 간의 파드 통신을 실제로 진행해보면서, Packet Flow를 자세히 확인해본다.
실습 시나리오
netpod는 k8s-s 노드에 위치하며, webpod는 각각 k8s-w1, k8s-w2에 위치한다. 우리는 여기서 netpod에서 각 webpod로 접속을 시도해보면서 다른 노드에 위치한 파드끼리의 통신 flow를 알아본다.
- 파드 IP 정보 확인

- 노드 IP 정보 확인

통신 진행(netpod > webpod로 ping -c 1 통신)
- hubble
- hubble cli를 통해 확인 가능
1
2
3
4
5
6
hubble observe --pod netpod
...
Nov  1 14:01:20.633: default/netpod (ID:504) -> default/webpod1 (ID:3470) to-network FORWARDED (ICMPv4 EchoRequest)
Nov  1 14:01:20.633: default/netpod (ID:504) -> default/webpod1 (ID:3470) to-endpoint FORWARDED (ICMPv4 EchoRequest)
Nov  1 14:01:20.633: default/netpod (ID:504) <- default/webpod1 (ID:3470) to-endpoint FORWARDED (ICMPv4 EchoReply)
Nov  1 14:01:20.633: default/netpod (ID:504) <- default/webpod1 (ID:3470) to-network FORWARDED (ICMPv4 EchoReply)
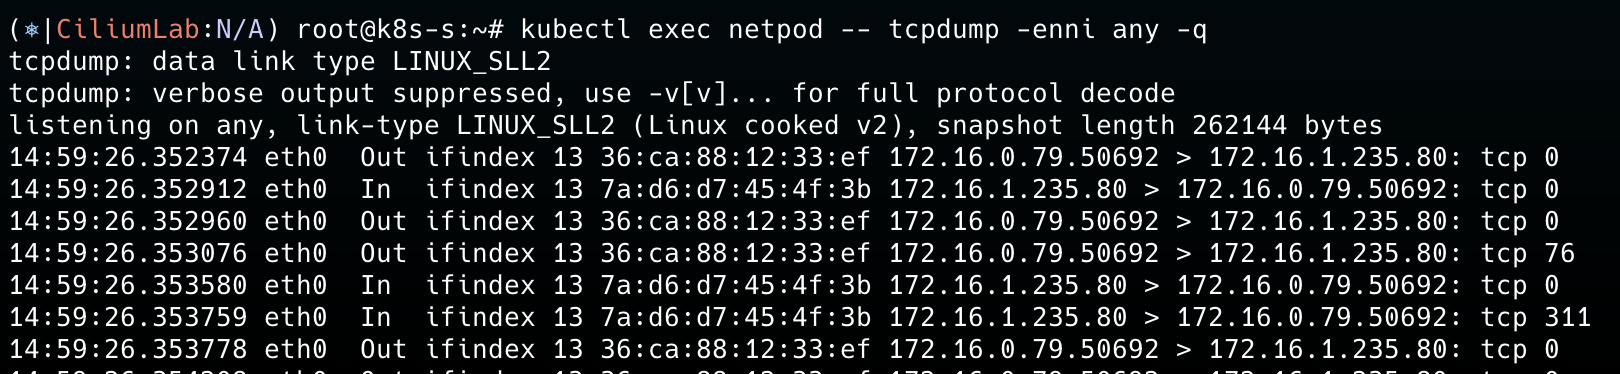
노드의 인터페이스로 tcpdump를 진행하면, 아래와 같은 정보가 출력된다. 이것외에는 동시간대에 출력되는 것은 없다. 이것 또한 ebpf를 통해 커널단에서 알아서 처리한다는 것을 알 수 있다. 그렇기에 보안 프로그램이 깔려있으면, 이것을 우회할 가능성도 크다.

- cilium map 확인
cilium map을 통해 ipcache를 확인하면 아래와 같이 어느 노드로 보내야하는지 확인할 수 있다.
1
2
c0 map get cilium_ipcache | grep $WEBPOD1IP
172.16.2.176/32     identity=3470 encryptkey=0 tunnelendpoint=192.168.10.101, flags=<none>    sync
NAT
MASQUERADE
MASQUERADE란 Iptables에서 사용하는 Target 중 하나로 외부와의 통신을 위해 노드의 IP로 NAT 변환을 수행할 때 사용된다.
ip-masq-agent
kube-proxy가 원래 기본적으로 외부로 나가는 트래픽에 대해 SNAT을 제공한다. cilium에서도 ebpf로 제공하나 ip-masq-agent를 통해 마스커레이드 예외 설정으로 더 세분화된 관리를 할 수 있다. 예를 들어, 특정 네트워크 대역에 한해서는 SNAT을 적용하지 않을 수 있다. 관련된 것은 해당 문서에서 확인가능하다.
ip-masq-agent 설정
1
helm upgrade cilium cilium/cilium --namespace kube-system --reuse-values --set ipMasqAgent.enabled=true
1
2
3
4
5
6
cilium config view | grep -i mascilium config view | grep -i masq
enable-bpf-masquerade                             true
enable-ip-masq-agent                              true
enable-ipv4-masquerade                            true
enable-ipv6-masquerade                            true
enable-masquerade-to-route-source                 false
1
2
kubectl get cm -n kube-system cilium-config -o yaml  | grep ip-masq
  enable-ip-masq-agent: "true"
만약, enable-ipv4-masquerade를 false로 설정하면 노드의 IP로 바뀌지 않아 파드의 IP가 노출되며 외부로 나가는 트래픽이라면 정상적으로 통신할 수 없다.
NAT 확인
파드에서 노드로 나가기 위한 위한 NAT 리스트를 아래에서 확인할 수 있다.
1
2
3
4
5
6
7
8
9
10
11
12
13
14
15
16
17
c0 bpf nat list
UDP IN 169.254.169.123:123 -> 192.168.10.10:54229 XLATE_DST 192.168.10.10:54229 Created=690sec ago NeedsCT=1
UDP OUT 192.168.10.10:49847 -> 169.254.169.123:123 XLATE_SRC 192.168.10.10:49847 Created=222sec ago NeedsCT=1
UDP OUT 192.168.10.10:37607 -> 169.254.169.123:123 XLATE_SRC 192.168.10.10:37607 Created=723sec ago NeedsCT=1
UDP IN 169.254.169.123:123 -> 192.168.10.10:34464 XLATE_DST 192.168.10.10:34464 Created=44sec ago NeedsCT=1
TCP IN 172.16.2.65:8081 -> 192.168.10.10:64431 XLATE_DST 221.142.255.113:64431 Created=275sec ago NeedsCT=0
UDP IN 3.39.176.65:123 -> 192.168.10.10:41170 XLATE_DST 192.168.10.10:41170 Created=213sec ago NeedsCT=1
ICMP OUT 192.168.10.10:62264 -> 192.168.10.102:0 XLATE_SRC 192.168.10.10:62264 Created=438sec ago NeedsCT=1
TCP OUT 221.142.255.113:63744 -> 172.16.2.65:8081 XLATE_SRC 192.168.10.10:63744 Created=2664sec ago NeedsCT=0
TCP OUT 221.142.255.113:64491 -> 172.16.2.65:8081 XLATE_SRC 192.168.10.10:64491 Created=21sec ago NeedsCT=0
UDP IN 169.254.169.123:123 -> 192.168.10.10:37667 XLATE_DST 192.168.10.10:37667 Created=335sec ago NeedsCT=1
UDP OUT 192.168.10.10:57668 -> 169.254.169.123:123 XLATE_SRC 192.168.10.10:57668 Created=788sec ago NeedsCT=1
UDP IN 169.254.169.123:123 -> 192.168.10.10:55335 XLATE_DST 192.168.10.10:55335 Created=255sec ago NeedsCT=1
UDP IN 169.254.169.123:123 -> 192.168.10.10:37169 XLATE_DST 192.168.10.10:37169 Created=771sec ago NeedsCT=1
UDP OUT 192.168.10.10:48469 -> 169.254.169.123:123 XLATE_SRC 192.168.10.10:48469 Created=125sec ago NeedsCT=1
ICMP OUT 192.168.10.10:58599 -> 192.168.10.102:0 XLATE_SRC 192.168.10.10:58599 Created=258sec ago NeedsCT=1
ICMP IN 192.168.10.101:0 -> 192.168.10.10:36878 XLATE_DST 192.168.10.10:36878 Created=678sec ago NeedsCT=1
서비스 통신 확인
기존에는 네트워크 대역에서 서비스에 로드밸런싱과 통신이 이뤄졌다. (ex. Iptables) 하지만 Cilium에서는 소켓 기반 로드밸런싱을 진행한다. 즉, ebpf가 소켓을 생성할 때 target IP를 서비스의 IP에서 적절한 파드의 IP로 변경한다. 만약, 서비스의 ClusterIP로 설정하면 DNAT 과정이 있어야하지만 파드의 IP로 소켓 연결을 진행하기에 DNAT 과정이 생략되어 네트워크 hop을 줄일 수 있다.
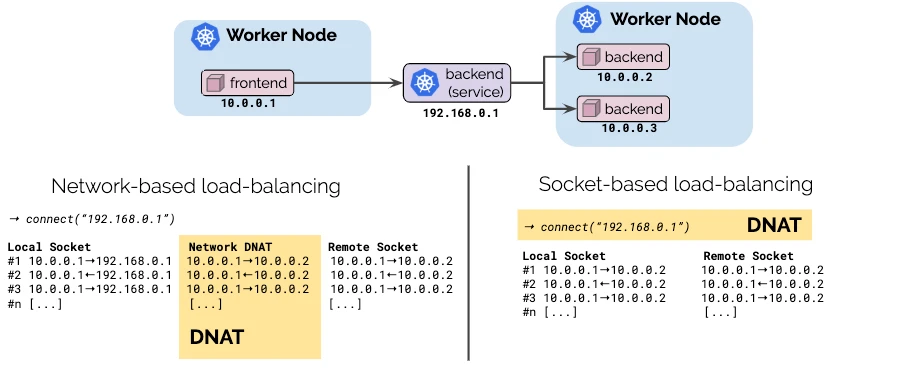
출처: https://cilium.io/blog/2019/08/20/cilium-16/
서비스 배포
1
2
3
4
5
6
7
8
9
10
11
12
13
14
15
cat <<EOF | kubectl create -f -
apiVersion: v1
kind: Service
metadata:
  name: svc
spec:
  ports:
    - name: svc-webport
      port: 80
      targetPort: 80
  selector:
    app: webpod
  type: ClusterIP
EOF
service/svc created
1
2
3
4
5
6
kubectl get svc,ep svc
NAME          TYPE        CLUSTER-IP      EXTERNAL-IP   PORT(S)   AGE
service/svc   ClusterIP   10.10.252.131   <none>        80/TCP    4s

NAME            ENDPOINTS                         AGE
endpoints/svc   172.16.1.235:80,172.16.2.253:80   4s
접속 확인
1
2
3
4
5
6
7
8
9
10
11
kubectl exec netpod -- curl -s $SVCIP
Hostname: webpod2
IP: 127.0.0.1
IP: ::1
IP: 172.16.2.253
IP: fe80::80c4:5bff:fe4b:6e3f
RemoteAddr: 172.16.0.79:33320
GET / HTTP/1.1
Host: 10.10.252.131
User-Agent: curl/8.7.1
Accept: */*
Flow 분석
netpod(Client) 파드에서 tcpdump 실행
서비스 IP(10.10.252.131)는 보이지 않는다. SNAT 과정은 없고, DNAT 된 것을 파드에서 볼 수 있다. 결국 파드에서 바로 서비스에 대한 DNAT 처리를 진행한다는 것이다.
strace 분석
strace를 통해 kernel 영역에 대한 모니터링 분석해보자.
socket 시스템 콜이 나오고, connect까지는 Service IP로 연결을 시도하지만, 바로 그 다음 getsockname 시스템 콜부터 파드의 IP로 바뀐 것을 확인할 수 있다. 이를 통해 ebpf를 통해 소켓 기반 로드밸런싱을 진행함을 확인할 수 있다.
1
2
3
4
5
6
7
8
9
10
11
12
13
14
15
16
17
18
19
20
21
22
23
24
25
26
27
28
29
30
31
32
33
34
35
36
37
38
39
40
41
42
kubectl exec netpod -- strace -s 65535 -f -tt curl -s $SVCIP
15:09:36.427597 execve("/usr/bin/curl", ["curl", "-s", "10.10.252.131"], 0x7ffda01c0eb0 /* 11 vars */) = 0
15:09:36.430429 close(3)                = 0
...
########################## socket ###################################
15:09:36.499211 socket(AF_INET, SOCK_STREAM, IPPROTO_TCP) = 5
15:09:36.499341 setsockopt(5, SOL_TCP, TCP_NODELAY, [1], 4) = 0
15:09:36.499442 setsockopt(5, SOL_SOCKET, SO_KEEPALIVE, [1], 4) = 0
15:09:36.499595 setsockopt(5, SOL_TCP, TCP_KEEPIDLE, [60], 4) = 0
15:09:36.499759 setsockopt(5, SOL_TCP, TCP_KEEPINTVL, [60], 4) = 0
15:09:36.499924 fcntl(5, F_GETFL)       = 0x2 (flags O_RDWR)
15:09:36.500077 fcntl(5, F_SETFL, O_RDWR|O_NONBLOCK|O_LARGEFILE) = 0
########################## connect(SVC IP 확인) ###################################
15:09:36.500128 connect(5, {sa_family=AF_INET, sin_port=htons(80), sin_addr=inet_addr("10.10.252.131")}, 16) = -1 EINPROGRESS (Operation in progress)
########################## getsocketname(파드 IP로 변경됨) ###################################
15:09:36.500580 getsockname(5, {sa_family=AF_INET, sin_port=htons(43654), sin_addr=inet_addr("172.16.0.79")}, [128 => 16]) = 0
15:09:36.501053 rt_sigaction(SIGPIPE, {sa_handler=SIG_IGN, sa_mask=[], sa_flags=SA_RESTORER|SA_RESTART, sa_restorer=0x7ee48f40afd0}, NULL, 8) = 0
15:09:36.501199 poll([{fd=5, events=POLLOUT}, {fd=3, events=POLLIN}], 2, 1000) = 1 ([{fd=5, revents=POLLOUT}])
15:09:36.501315 rt_sigaction(SIGPIPE, NULL, {sa_handler=SIG_IGN, sa_mask=[], sa_flags=SA_RESTORER|SA_RESTART, sa_restorer=0x7ee48f40afd0}, 8) = 0
15:09:36.501596 rt_sigaction(SIGPIPE, {sa_handler=SIG_IGN, sa_mask=[], sa_flags=SA_RESTORER|SA_RESTART, sa_restorer=0x7ee48f40afd0}, NULL, 8) = 0
15:09:36.502077 poll([{fd=5, events=POLLPRI|POLLOUT|POLLWRNORM}], 1, 0) = 1 ([{fd=5, revents=POLLOUT|POLLWRNORM}])
15:09:36.502555 getsockopt(5, SOL_SOCKET, SO_ERROR, [0], [4]) = 0
15:09:36.502720 getsockname(5, {sa_family=AF_INET, sin_port=htons(43654), sin_addr=inet_addr("172.16.0.79")}, [128 => 16]) = 0
15:09:36.503023 getsockname(5, {sa_family=AF_INET, sin_port=htons(43654), sin_addr=inet_addr("172.16.0.79")}, [128 => 16]) = 0
15:09:36.503493 getsockname(5, {sa_family=AF_INET, sin_port=htons(43654), sin_addr=inet_addr("172.16.0.79")}, [128 => 16]) = 0
15:09:36.503838 sendto(5, "GET / HTTP/1.1\r\nHost: 10.10.252.131\r\nUser-Agent: curl/8.7.1\r\nAccept: */*\r\n\r\n", 76, MSG_NOSIGNAL, NULL, 0) = 76
...
15:09:36.505368 recvfrom(5, "HTTP/1.1 200 OK\r\nDate: Mon, 28 Oct 2024 15:09:36 GMT\r\nContent-Length: 193\r\nContent-Type: text/plain; charset=utf-8\r\n\r\nHostname: webpod2\nIP: 127.0.0.1\nIP: ::1\nIP: 172.16.2.253\nIP: fe80::80c4:5bff:fe4b:6e3f\nRemoteAddr: 172.16.0.79:43654\nGET / HTTP/1.1\r\nHost: 10.10.252.131\r\nUser-Agent: curl/8.7.1\r\nAccept: */*\r\n\r\n", 102400, 0, NULL, NULL) = 311
15:09:36.505864 ioctl(1, TIOCGWINSZ, 0x7ffda7d10c68) = -1 ENOTTY (Not a tty)
15:09:36.505972 writev(1, [{iov_base="", iov_len=0}, {iov_base="Hostname: webpod2\nIP: 127.0.0.1\nIP: ::1\nIP: 172.16.2.253\nIP: fe80::80c4:5bff:fe4b:6e3f\nRemoteAddr: 172.16.0.79:43654\nGET / HTTP/1.1\r\nHost: 10.10.252.131\r\nUser-Agent: curl/8.7.1\r\nAccept: */*\r\n\r\n", iov_len=193}], 2) = 193
Hostname: webpod2
IP: 127.0.0.1
IP: ::1
IP: 172.16.2.253
IP: fe80::80c4:5bff:fe4b:6e3f
RemoteAddr: 172.16.0.79:43654
GET / HTTP/1.1
Host: 10.10.252.131
User-Agent: curl/8.7.1
Accept: */*

...
Cilium에서 확인
서비스에 대한 설정값을 확인해본다.
1
2
3
4
5
6
7
8
9
10
11
12
13
14
15
16
17
18
19
c0 service list | grep 10.10.252.131 -A2
9    10.10.252.131:80      ClusterIP      1 => 172.16.1.235:80 (active)
                                          2 => 172.16.2.253:80 (active)
c0 bpf lb list | grep 10.10.252.131
10.10.252.131:80 (2)      172.16.2.253:80 (9) (2)
10.10.252.131:80 (1)      172.16.1.235:80 (9) (1)
10.10.252.131:80 (0)      0.0.0.0:0 (9) (0) [ClusterIP, non-routable]

c0 bpf lb list --revnat
ID   BACKEND ADDRESS (REVNAT_ID) (SLOT)
1    10.10.0.1:443
4    10.10.25.166:80
6    10.10.0.10:9153
7    192.168.10.10:32283
2    10.10.152.163:443
9    10.10.252.131:80
5    10.10.0.10:53
8    0.0.0.0:32283
3    10.10.15.144:80
아래와 값이 서비스 IP가 들어올 때 사용하는 map 데이터구조의 저장된 Key값 확인 가능하다.
1
2
3
4
c0 map get cilium_lb4_services_vc0 map get cilium_lb4_services_v2 | grep 10.10.252.131
10.10.252.131:80 (2)      12 0 (9) [0x0 0x0]   sync
10.10.252.131:80 (1)      11 0 (9) [0x0 0x0]   sync
10.10.252.131:80 (0)      0 2 (9) [0x0 0x0]    sync
키 값을 따라가보면, 파드의 IP가 나온다.
1
2
3
c0 map get cilium_lb4_backends_v3 | grep -E '11|12'
11    ANY://172.16.1.235    sync
12    ANY://172.16.2.253    sync
IP에 대한 캐시값으로, 해당 값이 있으면 라우팅된다. 여기선 tunnel 포인트는 해당 IP가 위치하고 있는 노드를 의미한다.
1
2
3
4
5
6
7
8
9
10
11
12
13
14
15
16
17
18
19
c0 map get cilium_ipcache
Key                 Value                                                                     State   Error
192.168.10.102/32   identity=6 encryptkey=0 tunnelendpoint=0.0.0.0, flags=<none>              sync
0.0.0.0/0           identity=2 encryptkey=0 tunnelendpoint=0.0.0.0, flags=<none>              sync
172.16.1.235/32     identity=10037 encryptkey=0 tunnelendpoint=192.168.10.101, flags=<none>   sync
172.16.0.79/32      identity=26332 encryptkey=0 tunnelendpoint=0.0.0.0, flags=<none>          sync
172.16.2.253/32     identity=10037 encryptkey=0 tunnelendpoint=192.168.10.102, flags=<none>   sync
172.16.0.144/32     identity=40127 encryptkey=0 tunnelendpoint=0.0.0.0, flags=<none>          sync
192.168.10.101/32   identity=6 encryptkey=0 tunnelendpoint=0.0.0.0, flags=<none>              sync
172.16.1.180/32     identity=4 encryptkey=0 tunnelendpoint=192.168.10.101, flags=<none>       sync
172.16.2.144/32     identity=4 encryptkey=0 tunnelendpoint=192.168.10.102, flags=<none>       sync
172.16.2.65/32      identity=46309 encryptkey=0 tunnelendpoint=192.168.10.102, flags=<none>   sync
172.16.0.189/32     identity=1 encryptkey=0 tunnelendpoint=0.0.0.0, flags=<none>              sync
192.168.10.10/32    identity=1 encryptkey=0 tunnelendpoint=0.0.0.0, flags=<none>              sync
172.16.2.206/32     identity=6 encryptkey=0 tunnelendpoint=192.168.10.102, flags=<none>       sync
172.16.0.43/32      identity=4 encryptkey=0 tunnelendpoint=0.0.0.0, flags=<none>              sync
172.16.0.193/32     identity=40127 encryptkey=0 tunnelendpoint=0.0.0.0, flags=<none>          sync
172.16.2.82/32      identity=2396 encryptkey=0 tunnelendpoint=192.168.10.102, flags=<none>    sync
172.16.1.1/32       identity=6 encryptkey=0 tunnelendpoint=192.168.10.101, flags=<none>       sync
IP를 확인하면 key값은 webpod IP이다. (1.235, 2.253) Value 값은 서비스 IP인 것을 확인할 수 있다.
1
2
3
4
5
6
7
8
9
10
11
12
13
14
15
16
17
18
19
20
c0 map get cilium_lb4_reverse_sk
Key                           Value                         State   Error
[172.16.1.235]:20480, 41965   [10.10.252.131]:20480, 2304
[172.16.2.253]:20480, 45863   [10.10.252.131]:20480, 2304
[172.16.1.235]:20480, 46010   [10.10.252.131]:20480, 2304
[172.16.1.235]:20480, 42061   [10.10.252.131]:20480, 2304
[172.16.2.253]:20480, 37682   [10.10.252.131]:20480, 2304
[172.16.2.253]:20480, 45865   [10.10.252.131]:20480, 2304
[172.16.1.235]:20480, 45687   [10.10.252.131]:20480, 2304
[172.16.2.253]:20480, 33634   [10.10.252.131]:20480, 2304
[172.16.2.253]:20480, 37663   [10.10.252.131]:20480, 2304
[172.16.1.235]:20480, 33627   [10.10.252.131]:20480, 2304
[172.16.2.253]:20480, 42120   [10.10.252.131]:20480, 2304
[172.16.2.253]:20480, 38044   [10.10.252.131]:20480, 2304
[172.16.1.235]:20480, 34037   [10.10.252.131]:20480, 2304
[192.168.10.10]:11033, 8207   [10.10.0.1]:-17663, 256
[172.16.2.253]:20480, 37628   [10.10.252.131]:20480, 2304
[172.16.1.235]:20480, 38184   [10.10.252.131]:20480, 2304
...
cilium connectivity test with hubble
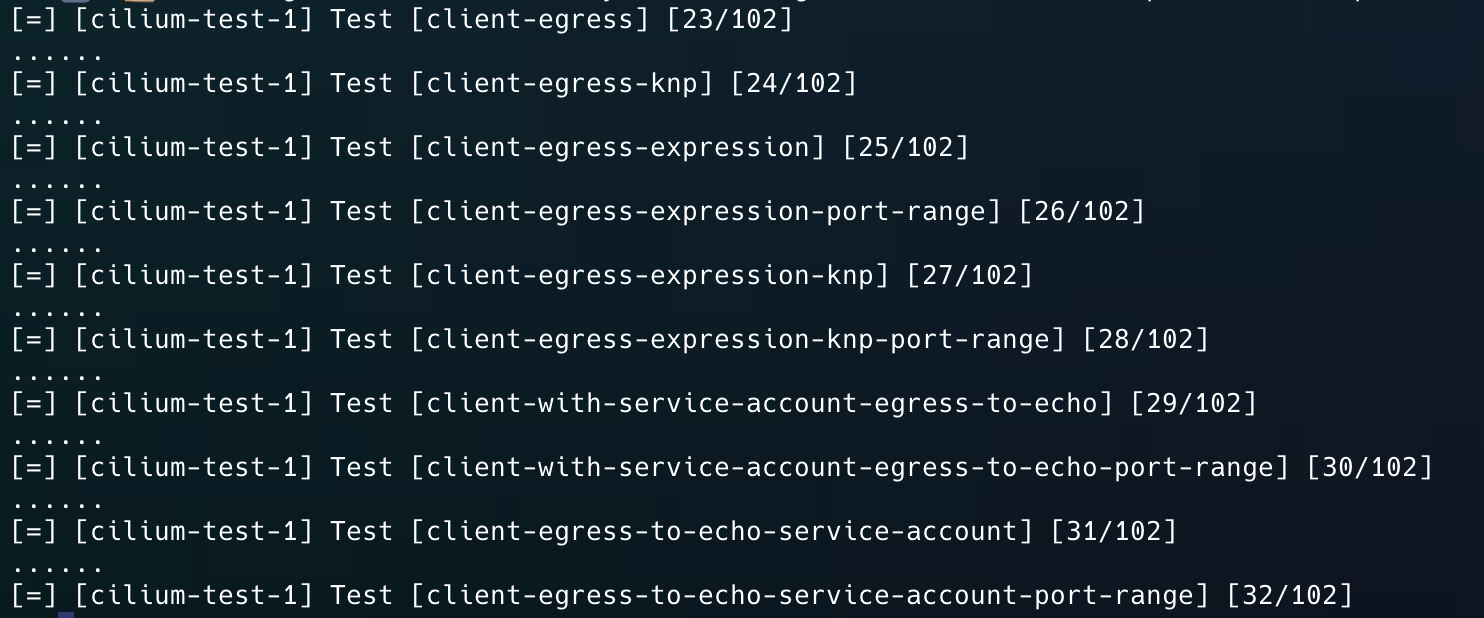
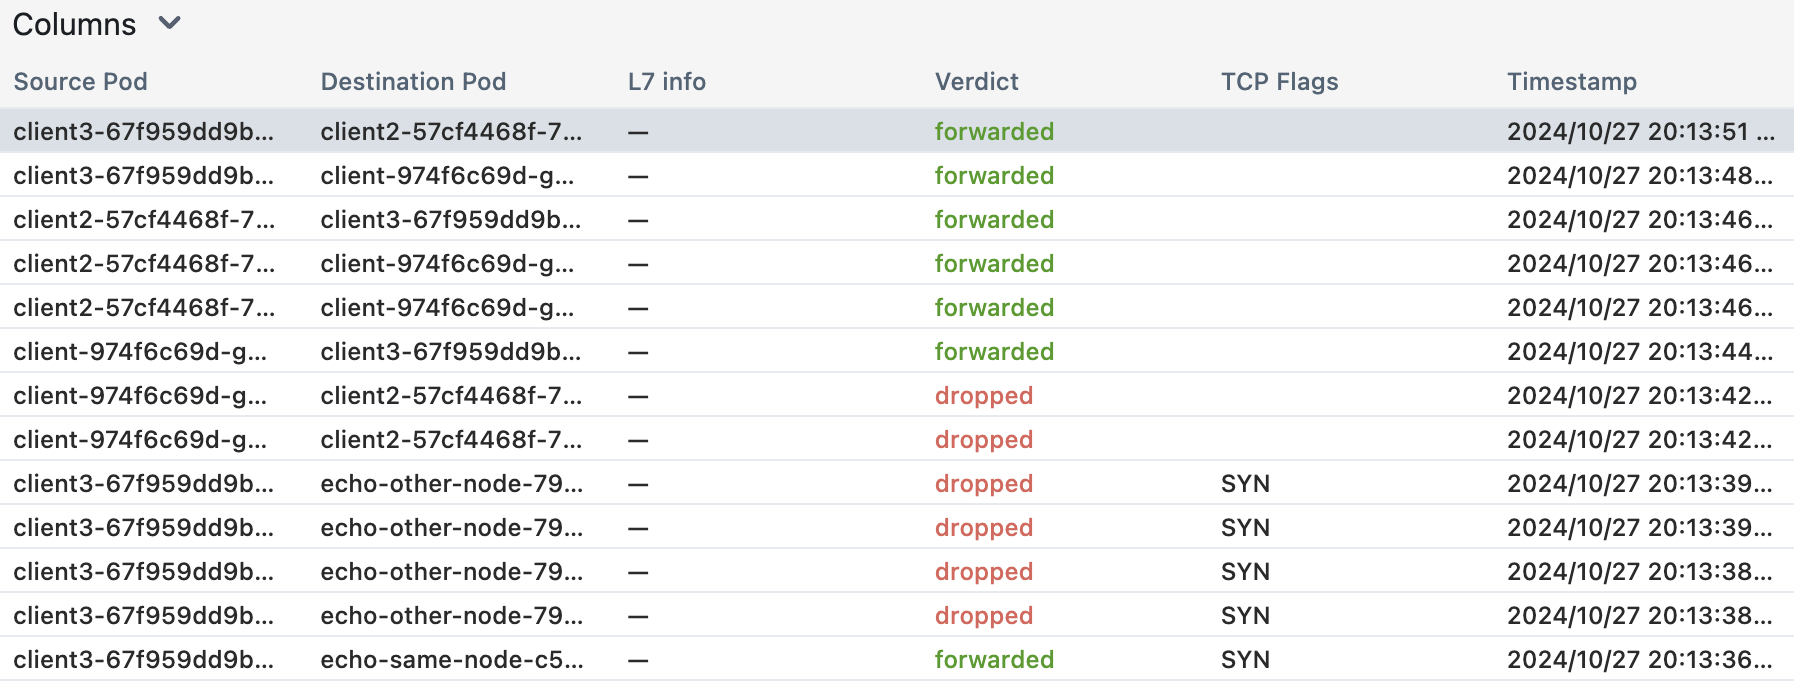
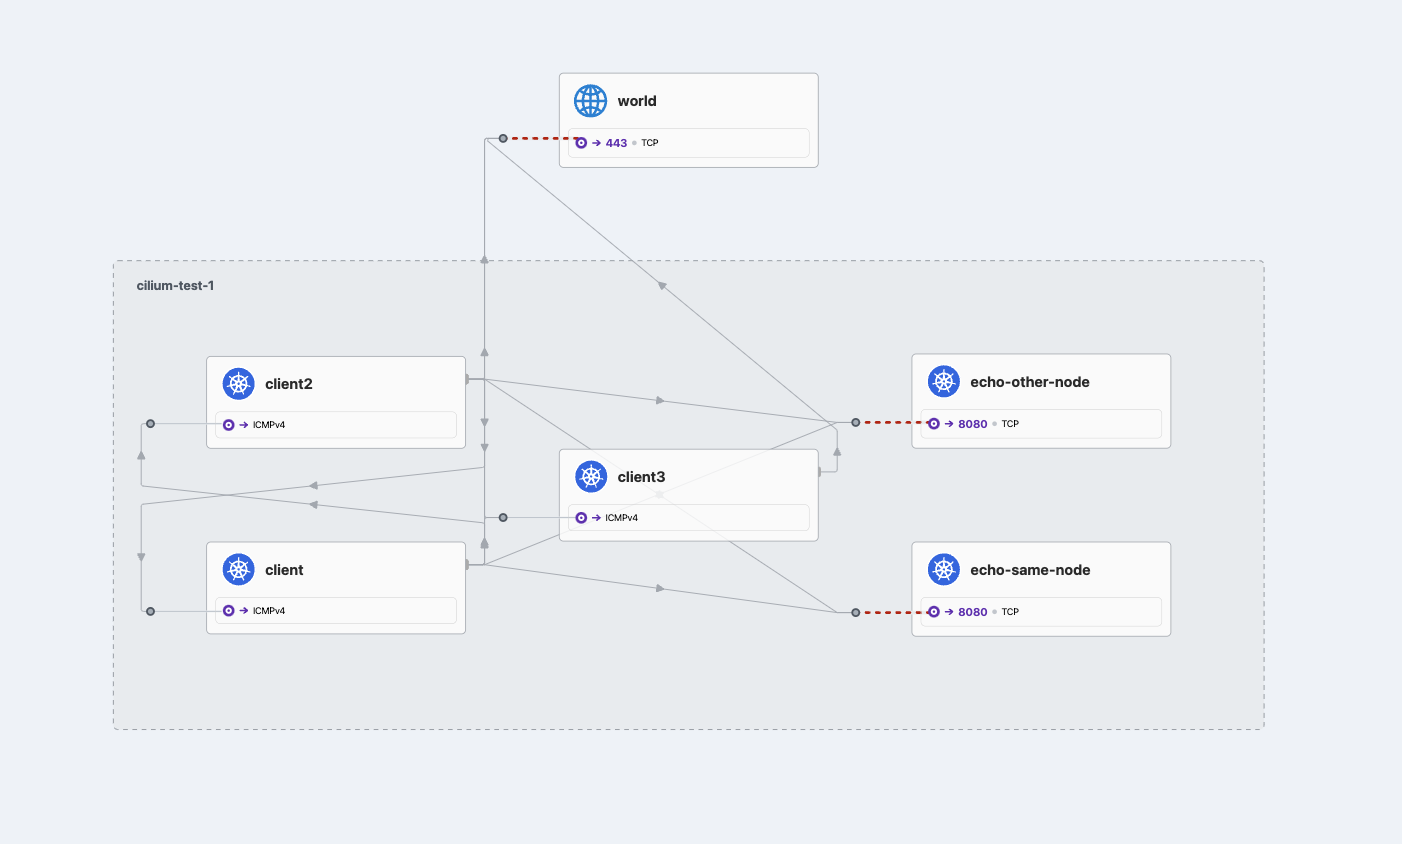
cilium에서는 connectivity test를 지원한다. cilium connectivity test 명령어를 수행하면 아래와 같이 테스트를 진행한다. ingress, egress, 외부 통신, 다른 노드 내의 통신, 같은 노드 내의 통신 정말 다양하게 진행한다. 이를 통해 세분화된 케이스에 대한 결과를 알 수 있다.
1
2
3
4
5
6
7
8
9
10
11
12
13
14
15
16
17
18
19
20
21
22
23
24
25
26
27
28
29
30
31
32
33
34
35
36
[=] [cilium-test-1] Test [echo-ingress-l7] [63/102]
.......
  ℹ️  curl stdout:
  :0 -> :0 = 000
  ℹ️  curl stderr:
  curl: (28) Failed to connect to 172.16.1.54 port 8080 after 2002 ms: Timeout was reached

  [.] Action [echo-ingress-l7/pod-to-pod-with-endpoints/curl-ipv4-2-private: cilium-test-1/client2-57cf4468f-77vcg (172.16.2.185) -> curl-ipv4-2-private (172.16.1.54:8080)]
  ℹ️  📜 Applying CiliumNetworkPolicy 'echo-ingress-l7-http' to namespace 'cilium-test-1'..
  [-] Scenario [echo-ingress-l7/pod-to-pod-with-endpoints]
  [.] Action [echo-ingress-l7/pod-to-pod-with-endpoints/curl-ipv4-0-public: cilium-test-1/client-974f6c69d-gwvfp (172.16.2.79) -> curl-ipv4-0-public (172.16.2.162:8080)]
  [.] Action [echo-ingress-l7/pod-to-pod-with-endpoints/curl-ipv4-0-private: cilium-test-1/client-974f6c69d-gwvfp (172.16.2.79) -> curl-ipv4-0-private (172.16.2.162:8080)]
  [.] Action [echo-ingress-l7/pod-to-pod-with-endpoints/curl-ipv4-0-privatewith-header: cilium-test-1/client-974f6c69d-gwvfp (172.16.2.79) -> curl-ipv4-0-privatewith-header (172.16.2.162:8080)]
  [.] Action [echo-ingress-l7/pod-to-pod-with-endpoints/curl-ipv4-1-public: cilium-test-1/client-974f6c69d-gwvfp (172.16.2.79) -> curl-ipv4-1-public (172.16.1.54:8080)]
  [.] Action [echo-ingress-l7/pod-to-pod-with-endpoints/curl-ipv4-1-private: cilium-test-1/client-974f6c69d-gwvfp (172.16.2.79) -> curl-ipv4-1-private (172.16.1.54:8080)]
  [.] Action [echo-ingress-l7/pod-to-pod-with-endpoints/curl-ipv4-1-privatewith-header: cilium-test-1/client-974f6c69d-gwvfp (172.16.2.79) -> curl-ipv4-1-privatewith-header (172.16.1.54:8080)]
  [.] Action [echo-ingress-l7/pod-to-pod-with-endpoints/curl-ipv4-2-public: cilium-test-1/client2-57cf4468f-77vcg (172.16.2.185) -> curl-ipv4-2-public (172.16.1.54:8080)]
  ❌ command "curl -w %{local_ip}:%{local_port} -> %{remote_ip}:%{remote_port} = %{response_code} --silent --fail --show-error --output /dev/null --connect-timeout 2 --max-time 10 http://172.16.1.54:8080/public" failed: error with exec request (pod=cilium-test-1/client2-57cf4468f-77vcg, container=client2): command terminated with exit code 28
.  ❌ command "curl -w %{local_ip}:%{local_port} -> %{remote_ip}:%{remote_port} = %{response_code} --silent --fail --show-error --output /dev/null --connect-timeout 2 --max-time 10 http://172.16.1.54:8080/private" failed with unexpected exit code: error with exec request (pod=cilium-test-1/client2-57cf4468f-77vcg, container=client2): command terminated with exit code 28 (expected 22, found 28)
  [.] Action [echo-ingress-l7/pod-to-pod-with-endpoints/curl-ipv4-2-privatewith-header: cilium-test-1/client2-57cf4468f-77vcg (172.16.2.185) -> curl-ipv4-2-privatewith-header (172.16.1.54:8080)]
.  ❌ command "curl -w %{local_ip}:%{local_port} -> %{remote_ip}:%{remote_port} = %{response_code} --silent --fail --show-error --output /dev/null --connect-timeout 2 --max-time 10 -H X-Very-Secret-Token: 42 http://172.16.1.54:8080/private" failed: error with exec request (pod=cilium-test-1/client2-57cf4468f-77vcg, container=client2): command terminated with exit code 28
  ℹ️  curl stdout:
  :0 -> :0 = 000
  ℹ️  curl stderr:
  curl: (28) Failed to connect to 172.16.1.54 port 8080 after 2002 ms: Timeout was reached

  [.] Action [echo-ingress-l7/pod-to-pod-with-endpoints/curl-ipv4-3-public: cilium-test-1/client2-57cf4468f-77vcg (172.16.2.185) -> curl-ipv4-3-public (172.16.2.162:8080)]
.  [.] Action [echo-ingress-l7/pod-to-pod-with-endpoints/curl-ipv4-3-private: cilium-test-1/client2-57cf4468f-77vcg (172.16.2.185) -> curl-ipv4-3-private (172.16.2.162:8080)]
.  [.] Action [echo-ingress-l7/pod-to-pod-with-endpoints/curl-ipv4-3-privatewith-header: cilium-test-1/client2-57cf4468f-77vcg (172.16.2.185) -> curl-ipv4-3-privatewith-header (172.16.2.162:8080)]
.  [.] Action [echo-ingress-l7/pod-to-pod-with-endpoints/curl-ipv4-4-public: cilium-test-1/client3-67f959dd9b-czshf (172.16.1.91) -> curl-ipv4-4-public (172.16.1.54:8080)]
.  [.] Action [echo-ingress-l7/pod-to-pod-with-endpoints/curl-ipv4-4-private: cilium-test-1/client3-67f959dd9b-czshf (172.16.1.91) -> curl-ipv4-4-private (172.16.1.54:8080)]
.  [.] Action [echo-ingress-l7/pod-to-pod-with-endpoints/curl-ipv4-4-privatewith-header: cilium-test-1/client3-67f959dd9b-czshf (172.16.1.91) -> curl-ipv4-4-privatewith-header (172.16.1.54:8080)]
.  [.] Action [echo-ingress-l7/pod-to-pod-with-endpoints/curl-ipv4-5-public: cilium-test-1/client3-67f959dd9b-czshf (172.16.1.91) -> curl-ipv4-5-public (172.16.2.162:8080)]
.  [.] Action [echo-ingress-l7/pod-to-pod-with-endpoints/curl-ipv4-5-private: cilium-test-1/client3-67f959dd9b-czshf (172.16.1.91) -> curl-ipv4-5-private (172.16.2.162:8080)]
.  [.] Action [echo-ingress-l7/pod-to-pod-with-endpoints/curl-ipv4-5-privatewith-header: cilium-test-1/client3-67f959dd9b-czshf (172.16.1.91) -> curl-ipv4-5-privatewith-header (172.16.2.162:8080)]
.  ℹ️  📜 Deleting CiliumNetworkPolicy 'echo-ingress-l7-http' from namespace 'cilium-test-1'..
마치며
Cilium에서 트래픽을 처리하는 방식에 대해 알아봤다. 간단하게 여기서 정리하면 Cilium은 파드의 기본 게이트웨이가 cilium_host 인터페이스를 향하게 두며 각 파드와 연결되는 lxc로 시작하는 인터페이스가 존재한다.
- 파드 통신은 호스트 영역에서 ebpf를 통해 처리한다. 같은 노드 내의 파드는 cilium_host에서 알맞는 파드로 라우팅하며, 다른 노드내의 파드도 ebpf를 통해 NAT처리하여 보낸다. kernel에서 처리하므로 노드의 인터페이스 수준에서 이를 감지할 수 없다.
- 서비스 통신은 파드에서 서비스에 대한 통신을 진행하며 소켓 호출이 일어날 때, ebpf를 통해 서비스의 IP를 적절한 파드의 IP로 변경한다. 덕분에 DNAT 과정을 없앨 수 있다.