Ingress & Gateway 살펴보기
💡 KANS 스터디
CloudNet에서 주관하는 KANS(Kubernetes Advanced Networking Study)으로 쿠버네티스 네트워킹 스터디입니다. 아래의 글은 스터디의 내용을 기반으로 작성했습니다.스터디에 관심이 있으신 분은 CloudNet Blog를 참고해주세요.
들어가며
이번 스터디 시간에는 주로 Ingress와 GatewayAPI에 대해 배웠다. Ingress에 대해 제대로 알아가기도 전에 GatewayAPI가 등장했다. Ingress 공식문서에 들어가서 아래와 같은 문구를 봤을 때 빠르게 변화하는 개발 속도에 놀랐다. 정말 쿠버네티스 릴리즈는 빠른 속도로 올라가는 것 같다.

여기서는 Ingress와 GatewayAPI 대해 살펴본다. 간단하게 Ingress에 등장배경과 구성에 대해 알아보고, Nginx Ingress Controller의 구성과 세부 기능을 실습한다. 마지막으로 GatewayAPI에 대해 알아보고 마무리한다.
Ingress
등장 배경
서비스 타입으로는 provide load balancing, SSL termination and name-based virtual hosting이 불가능하다. Load Balancer 타입의 서비스로 운영하면, 외부 로드밸런서의 여러 개의 서비스를 붙일 수 없다. 이런 제약 사항 때문에 L7계층 Application 수준 라우팅을 위한 별도의 리소스가 필요했고, Ingress가 등장하게 된다.
Ingress란
Ingress란 주로 L7 계층 라우팅을 담당하는 reverse Proxy server로, Load Balancer Type 서비스의 상위 리소스라고 보면 된다. L4 계층을 넘어 L7 계층의 라우팅을 담당한다. Ingress는 기본으로 내장된 컨트롤러가 없는 리소스로, 우리가 별도로 컨트롤러를 쿠버네티스에 설치해야 한다. Ingress 리소스는 목표 상태를 의미하며, 컨트롤러는 목표 상태에 맞게 L7(HTTP) 계층 라우팅 작업을 진행한다.
구성
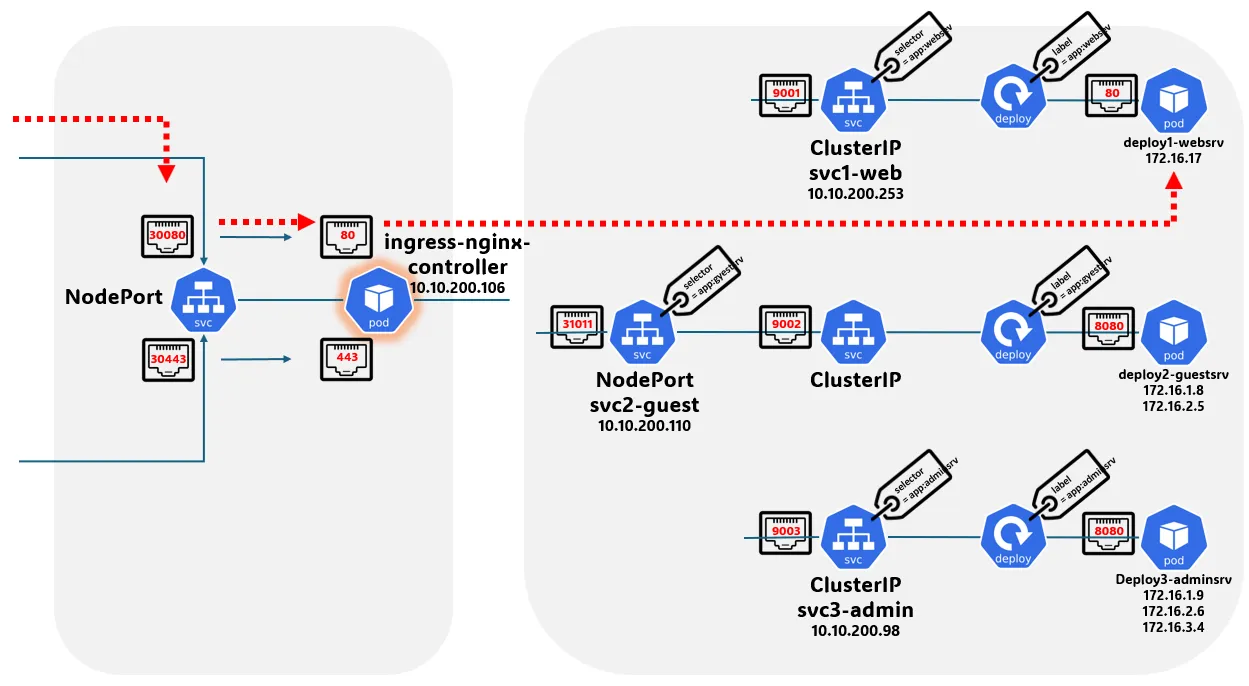
앞서, “Load Balancer Type 서비스의 상위 리소스”라고 설명했듯이 Ingress API는 ‘컨트롤러 구현체(주로 Deployment)’와 ‘Service(Load Balancer)’로 이뤄진다. 클라이언트는 Ingress 전용 로드밸런서로 접속하여, 인그레스 컨트롤러 구현체에게 전달되고, 컨트롤러는 규칙에 맞게 트래픽을 엔드포인트(파드)로 전달한다. 아래의 그림을 보면 이해하기 쉽다.
ingressClass
과거(≤1.19)에는 주로 어노테이션을 통해 자신의 상태 값을 지정하며, 컨트롤러는 어노테이션을 보고 작업을 진행했지만, 현재는 spec.ingressClassName으로 지정한다.
1
2
3
4
5
6
7
8
9
10
11
12
13
14
15
16
17
apiVersion: networking.k8s.io/v1
kind: Ingress
metadata:
  name: ingress-myservicea
spec:
  rules:
  - host: myservicea.foo.org
    http:
      paths:
      - path: /
        pathType: Prefix
        backend:
          service:
            name: myservicea
            port:
              number: 80
  ingressClassName: nginx
컨트롤러는 ingress.class를 확인하여 자신이 작업할 Ingress가 맞는지 확인한다. ingress.class를 통해 하나의 클러스터에 여러 Ingress 컨트롤러가 공존할 수 있다.
Nginx Ingress Controller
여기서는 주로 사용하는 Nginx Ingress Controller에 대해 살펴본다. Nginx는 nginx.conf 파일을 통해 설정(라우팅 규칙)을 관리한다. 파드가 재성성되면, 파드의 IP가 변경된다. 이럴 때마다 설정파일(nginx.conf) reload가 필요하나, nginx는 lua-nginx-module을 통해 reload 없이 변경된 주소를 알 수 있다고 한다. [커피고래님 블로그 참조]
작동 방식
작동 방식은 공식문서에서 제공된 아래 그림을 통해 쉽게 이해할 수 있다. 컨트롤러가 지속해서 리소스의 변화를 확인하고 변화가 감지하면 TLS와 config 파일을 업데이트한다. 그리고 reload 하는 방식으로 진행된다.
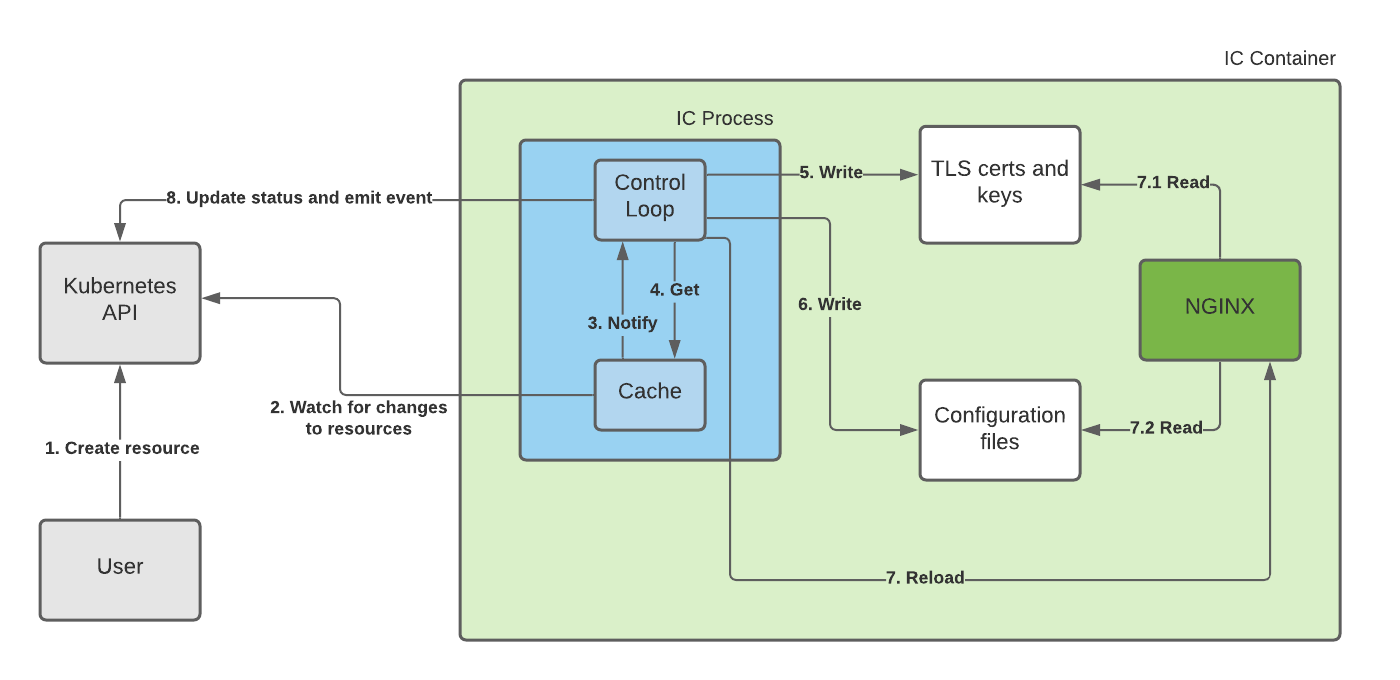
[출처: https://docs.nginx.com/nginx-ingress-controller/overview/design/]
아래의 명령어를 통해 로그를 확인할 수 있다. 로그를 통해 새로운 Ingress가 생성되면 컨트롤러 내부에서 어떤 프로세스가 진행되는지 알아볼 수 있다.
1
2
3
4
5
6
7
8
9
10
11
12
13
14
15
k -n ingress logs ingress-nginx-controller-55474d95c5-pnrd4
-------------------------------------------------------------------------------
NGINX Ingress controller
  Release:       v1.10.0
  Build:         71f78d49f0a496c31d4c19f095469f3f23900f8a
  Repository:    https://github.com/kubernetes/ingress-nginx
  nginx version: nginx/1.25.3

-------------------------------------------------------------------------------
...
store.go:440] "Found valid IngressClass" ingress="default/two-ingress" ingressclass="nginx"
event.go:364] Event(v1.ObjectReference{Kind:"Ingress", Namespace:"default", Name:"two-ingress", ... type: 'Normal' reason: 'Sync' Scheduled for sync
controller.go:190] "Configuration changes detected, backend reload required"
controller.go:210] "Backend successfully reloaded"
event.go:364] Event(v1.ObjectReference{Kind:"Pod", Namespace:"ingress", Name:"ingress-nginx-controller-55474d95c5-dgk85", ... reason: 'RELOAD' NGINX reload triggered due to a change in configuration
이제 시간 순서대로 Ingress 관련 로그를 살펴본다.
(1) nginx ingress.class를 가진 ingress를 발견했다는 로그이다.
1
"Found valid IngressClass" ingress="default/two-ingress" ingressclass="nginx"
(2) 발견한 Ingress를 가져와 Sync, 동기화를 진행한다.
1
Event(v1.ObjectReference{Kind:"Ingress", Namespace:"default", Name:"two-ingress", ... type: 'Normal' reason: 'Sync' Scheduled for sync
(3) 설정의 변화가 감지되어, backend 객체가 reload 된다.
1
2
"Configuration changes detected, backend reload required"
"Backend successfully reloaded"
로그를 통해 작동 방식을 자세하게 살펴볼 수 있었다. 이제 nginx ingress controller 파드에 접속하여, 설정파일(nginx.conf)을 확인해보자.
설정 파일 확인
아래의 명령어를 통해 nginx.conf 파일에서 ingress 설정을 확인할 수 있다.
location ~* "^/run" 이후를 확인하면, 우리가 배포한 Ingress와 서비스에 대한 정보가 나와있다.
1
2
3
4
5
6
7
8
9
10
11
12
13
14
15
16
17
18
19
20
21
22
23
24
25
26
27
28
29
$ k -n ingress exec ingress-nginx-controller-55474d95c5-pnrd4 -it -- cat nginx.conf
...
	## start server _
	server {
		server_name _ ;

		http2 on;

		listen 80 default_server reuseport backlog=4096 ;
		listen [::]:80 default_server reuseport backlog=4096 ;
		listen 443 default_server reuseport backlog=4096 ssl;
		listen [::]:443 default_server reuseport backlog=4096 ssl;

		set $proxy_upstream_name "-";

		ssl_reject_handshake off;

		ssl_certificate_by_lua_block {
			certificate.call()
		}

		location ~* "^/run" {

			set $namespace      "default";
			set $ingress_name   "two-ingress";
			set $service_name   "two";
			set $service_port   "80";
			set $location_path  "/run";
			set $global_rate_limit_exceeding n;
실습
실습 환경
해당 실습에서는 간편한 테스트를 위해서 NodePort 타입(externalTrafficPolicy: Local) 옵션으로 설정한다. Controller의 Version 정보는 아래와 같다.
1
2
3
4
5
6
7
8
-------------------------------------------------------------------------------
NGINX Ingress controller
  Release:       v1.11.2
  Build:         46e76e5916813cfca2a9b0bfdc34b69a0000f6b9
  Repository:    https://github.com/kubernetes/ingress-nginx
  nginx version: nginx/1.25.5

-------------------------------------------------------------------------------
Canary
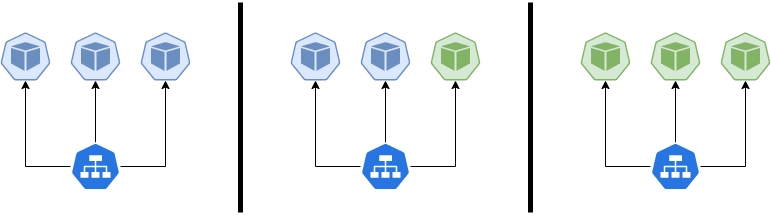
순차적으로 하나씩 업데이트하는 롤링, 업데이트 후 트래픽의 비중을 천천히 늘리는 Canary, 다음 업데이트 버전에 대한 리소스를 미리 준비하고 라우팅을 바꾸는 블루/그린 3개의 무중단 배포 방식이 존재한다. 여기서 Nginx Controller는 카나리 업데이트를 제공한다.
- 실습 파일(서비스1 및 Deployment)
1
2
3
4
5
6
7
8
9
10
11
12
13
14
15
16
17
18
19
20
21
22
23
24
25
26
27
28
29
30
31
32
apiVersion: apps/v1
kind: Deployment
metadata:
  name: dp-v1
spec:
  replicas: 3
  selector:
    matchLabels:
      app: svc-v1
  template:
    metadata:
      labels:
        app: svc-v1
    spec:
      containers:
      - name: pod-v1
        image: k8s.gcr.io/echoserver:1.5
        ports:
        - containerPort: 8080
      terminationGracePeriodSeconds: 0
---
apiVersion: v1
kind: Service
metadata:
  name: svc-v1
spec:
  ports:
    - name: web-port
      port: 9001
      targetPort: 8080
  selector:
    app: svc-v1
- 실습 파일(서비스2 및 Deployment)
1
2
3
4
5
6
7
8
9
10
11
12
13
14
15
16
17
18
19
20
21
22
23
24
25
26
27
28
29
30
31
32
apiVersion: apps/v1
kind: Deployment
metadata:
  name: dp-v2
spec:
  replicas: 3
  selector:
    matchLabels:
      app: svc-v2
  template:
    metadata:
      labels:
        app: svc-v2
    spec:
      containers:
      - name: pod-v2
        image: k8s.gcr.io/echoserver:1.6
        ports:
        - containerPort: 8080
      terminationGracePeriodSeconds: 0
---
apiVersion: v1
kind: Service
metadata:
  name: svc-v2
spec:
  ports:
    - name: web-port
      port: 9001
      targetPort: 8080
  selector:
    app: svc-v2
- 배포확인 및 애플리케이션(pod) 차이점 확인
아래는 prod1이며 1.13.0 버전을 확인할 수 있다.

반면 prod2는 1.13.1 버전임을 확인할 수 있다.

- ingress 설정
아래는 v1(as-is)에 대한 ingress이다. 해당 환경에서 v2로 업데이트되는 환경이라고 생각하면 된다.
v1에서는 kans.com에 대한 트래픽이 prod1(svc1)로 트래픽이 라우팅된다.
1
2
3
4
5
6
7
8
9
10
11
12
13
14
15
16
17
apiVersion: networking.k8s.io/v1
kind: Ingress
metadata:
  name: ingress-canary-v1
spec:
  ingressClassName: nginx
  rules:
  - host: kans.com
    http:
      paths:
      - path: /
        pathType: Prefix
        backend:
          service:
            name: svc-v1
            port:
              number: 8080
반면, v2에서는 kans.com에 대한 트래픽이 prod2(svc-v2)로 라우팅된다. 여기에 canary annotations을 추가하여 카나리 업데이트를 설정한다.
1
2
3
4
5
6
7
8
9
10
11
12
13
14
15
16
17
18
19
20
apiVersion: networking.k8s.io/v1
kind: Ingress
metadata:
  name: ingress-canary-v2
  annotations:
    nginx.ingress.kubernetes.io/canary: "true"
    nginx.ingress.kubernetes.io/canary-weight: "10"
spec:
  ingressClassName: nginx
  rules:
  - host: kans.com
    http:
      paths:
      - path: /
        pathType: Prefix
        backend:
          service:
            name: svc-v2
            port:
              number: 8080
도메인을 사서 등록해도 되지만, 여기선 간단히 테스트할 것이기에 /etc/hosts를 수정한다.
1
2
3
4
5
6
7
8
127.0.0.1 localhost

# The following lines are desirable for IPv6 capable hosts
::1 ip6-localhost ip6-loopback
fe00::0 ip6-localnet
ff00::0 ip6-mcastprefix
...
127.0.0.1 kans.com # Ingress에 등록한 도메인
이제 카나리 업데이트가 잘 구성됐는지 확인해본다. 100개로 했을 때, 3%으로 결과가 나왔지만 표본을 천개로 늘리니 10%에 근사한 모습을 보여준다.

아래의 명령어를 통해 비율을 50%으로 조정한다.
1
kubectl annotate --overwrite ingress ingress-canary-v2 nginx.ingress.kubernetes.io/canary-weight=50
이번에는 100개부터 비율이 잘 나온다.

GatewayAPI
등장배경
Note: Ingress is frozen. New features are being added to the Gateway API.
이제 인그레스 리소스에 대한 업데이트는 없고, Gateway API 리소스를 통해 새로운 기능을 추가한다고 한다. 그렇다면, 인그레스와 Gateway API 리소스는 어떻게 다를까?
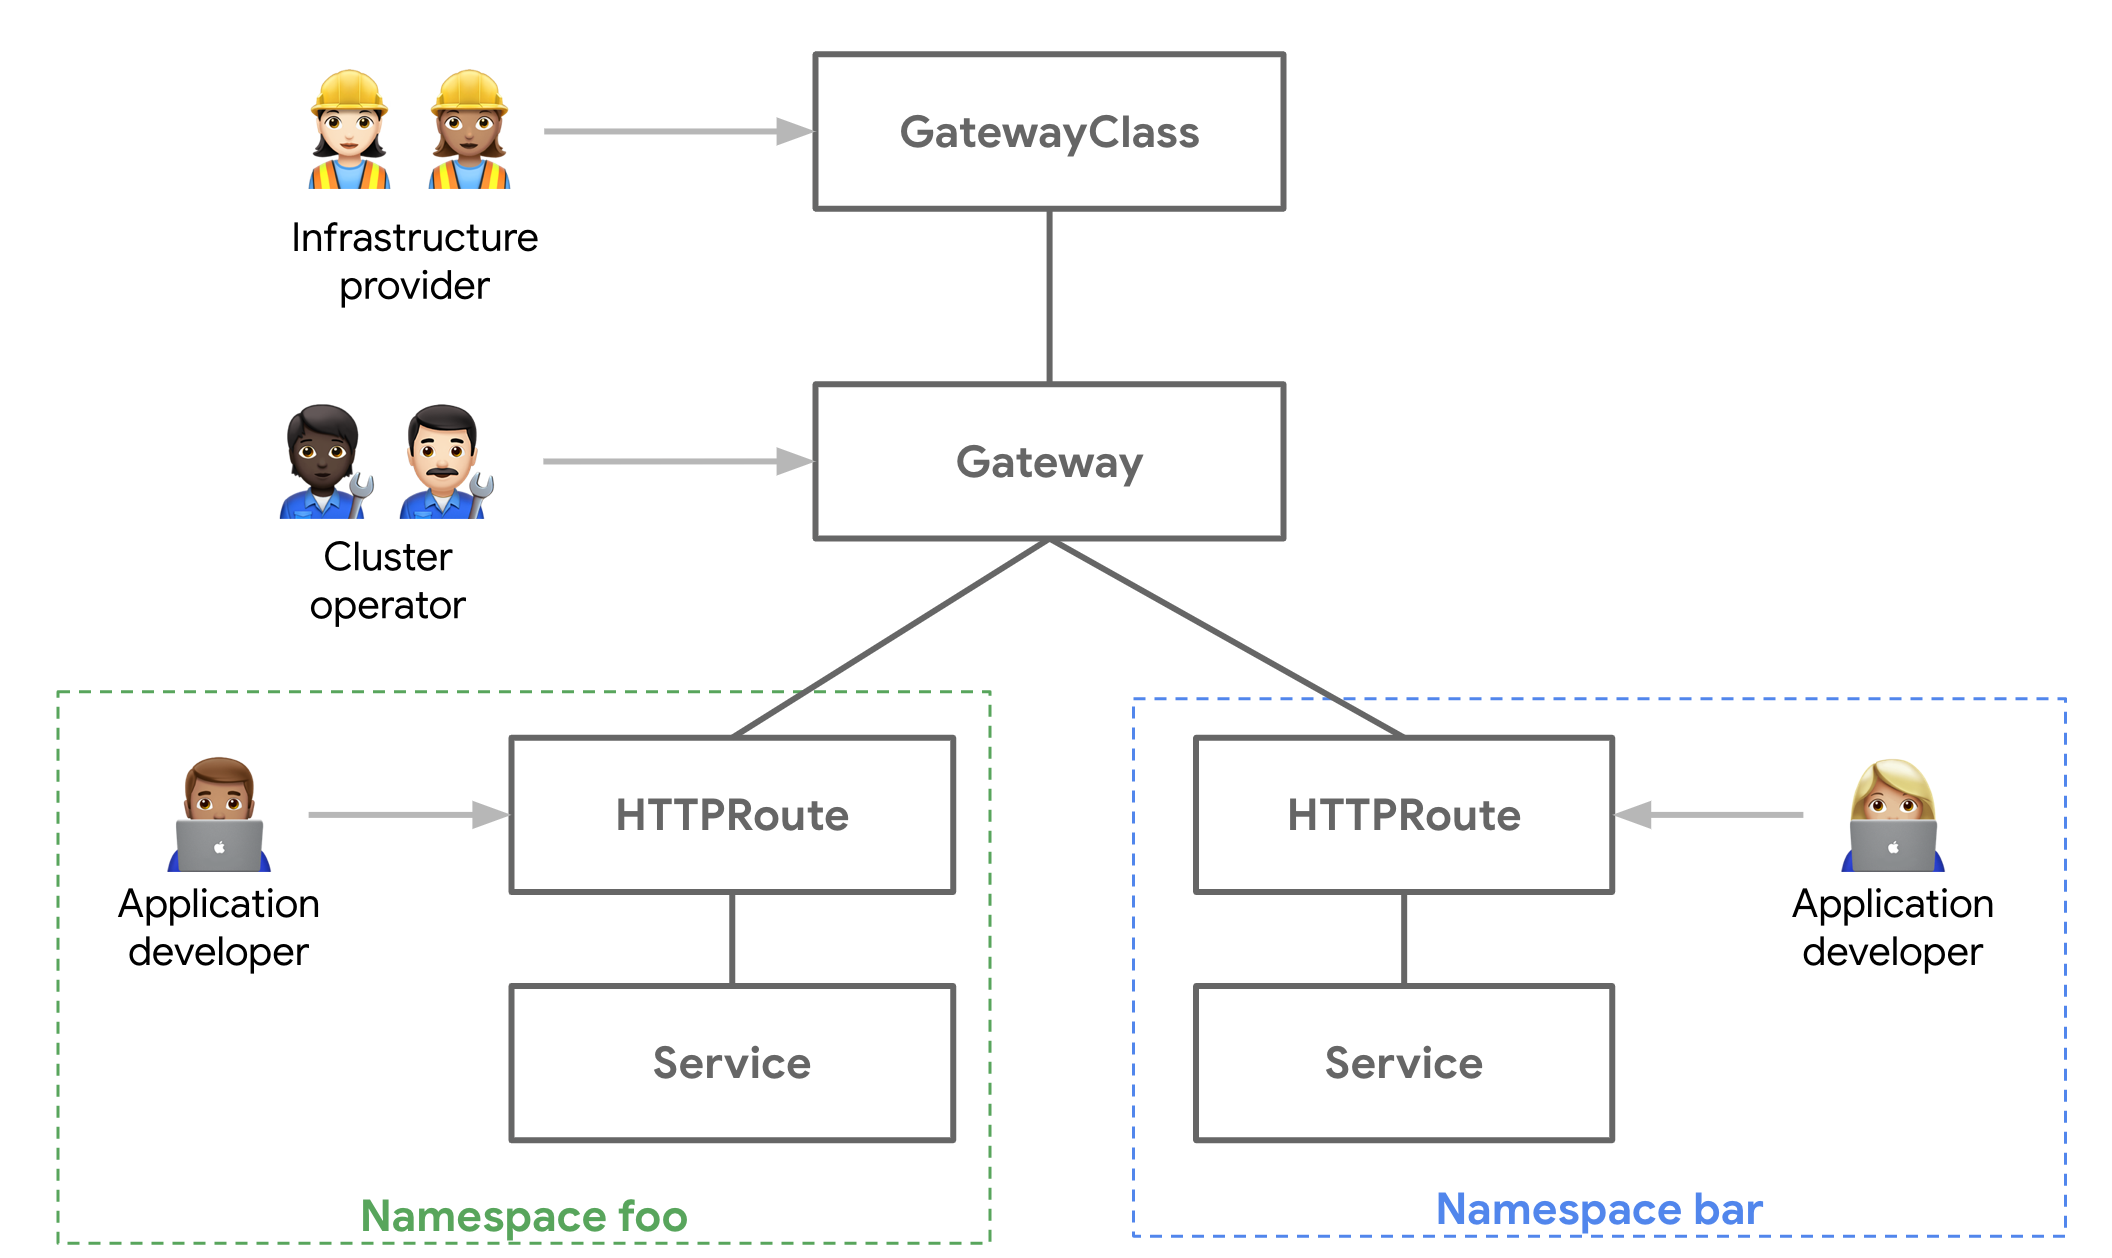
Ingress의 단점은 HTTP/HTTPS 라우팅만 가능하고, 고급 라우팅 기능이 없다. 각 구현체의 의존성이 심하며 annotation을 통해 설정을 진행한다. 반면 GatewayAPI는 HTTP(s)와 TCP, gRPC 라우팅을 지원한다. 또, 게이트웨이 클래스, 게이트 웨이, 라우팅 정보 단계를 분리하면서 각자의 역할에 맞게 리소스를 관리할 수 있다.
공식 Docs에 있는 예시를 하나 살펴보면, 아래와 같이 Gateway에 GatewayClass로 맵핑을 진행하고, Gateway에 Route 정보를 맵핑한다. 덕분에 Route 정보를 바꿀 일이 있으면, 개발자는 쉽게 변경할 수 있다.
1
2
3
4
5
6
7
8
9
10
11
12
13
14
15
16
17
18
19
20
21
22
23
24
25
26
27
28
29
30
31
32
33
34
35
36
37
38
39
40
41
42
43
44
45
apiVersion: gateway.networking.k8s.io/v1
kind: Gateway
metadata:
  name: my-tcp-gateway
spec:
  gatewayClassName: my-tcp-gateway-class
  listeners:
  - name: foo
    protocol: TCP
    port: 8080
    allowedRoutes:
      kinds:
      - kind: TCPRoute
  - name: bar
    protocol: TCP
    port: 8090
    allowedRoutes:
      kinds:
      - kind: TCPRoute
---
apiVersion: gateway.networking.k8s.io/v1alpha2
kind: TCPRoute
metadata:
  name: tcp-app-1
spec:
  parentRefs:
  - name: my-tcp-gateway
    sectionName: foo
  rules:
  - backendRefs:
    - name: my-foo-service
      port: 6000
---
apiVersion: gateway.networking.k8s.io/v1alpha2
kind: TCPRoute
metadata:
  name: tcp-app-2
spec:
  parentRefs:
  - name: my-tcp-gateway
    sectionName: bar
  rules:
  - backendRefs:
    - name: my-bar-service
      port: 6000
Gateway의 트래픽 흐름: Client > External LB > Gateway > HTTPRoute > Service > Pod
참고자료
- GatewayAPI 정리 자료(미디움)
- GatewayAPI 정리 포스팅(한국어자료)
- GatewayAPI Docs
- GKE에서 GatewayAPI 도입하기
- AWS KRUG 쿠버네티스 GatewayAPI 도입기
번외)
클라우드 환경이 아닌 내부망(On-Premise) 대규모 클러스터를 운영하는 곳들은 어떤 방식으로 네트워크를 사용할까가 궁금하여 여기저기 열심히 구글링을 해봤다.(정확한 정보가 아닐수도 있습니다.)
CNI: Cilium(L3,L4 Routing)
- service + pod 통신을 지원한다. (kube-proxy 커버 가능)
Cilium은 L3(네트워크 레이어) 및 L4(전송 레이어)에서의 라우팅을 제공하며, 특히 eBPF(Extended Berkeley Packet Filter)를 사용하여 매우 효율적이고 확장 가능한 네트워크 통신을 처리할 수 있다고 한다.
또한, egress gateway를 제공하여 트래픽 제어를 강화할 수 있다.
istio(L7) 사용
- ingress gateway로 Ingress 역할 지원 가능 » Nginx Ingress controller x
istio는 Servics Mesh 도구로 애플리케이션 레벨에서 통합된 관리가 가능하다. ingress gateway를 통해 Ingress 역할을 할 수 있으며, 이를 통해 외부에서 클러스터 내부로 들어오는 트래픽을 제어한다.
별도의 로드밸런서 서버(or 노드)
자체 LB 노드를 두고, Bird와 같은 BGP 프로토콜을 사용하는 프로그램을 이용하여 BGP 프로토콜 통신을 진행한다. 덕분에 External IP에 대한 요청을 LB 노드로 라우팅할 수 있다. BGP 관련도구로 Bird외에 GoBGP, FRR 등이 있다고 한다.