istio gateway
istio gateway 살펴보기
💡 KANS 스터디
CloudNet에서 주관하는 istio(Istio Hands-on Study) 1기 스터디입니다. 아래의 글은 스터디의 내용을 기반으로 작성했습니다.스터디에 관심이 있으신 분은 CloudNet Blog를 참고해주세요.
Ingress
등장 배경
서비스 타입으로는 provide load balancing, SSL termination and name-based virtual hosting이 불가능하다. Load Balancer 타입의 서비스로 운영하면, 외부 로드밸런서의 여러 개의 서비스를 붙일 수 없다. 이런 제약 사항 때문에 L7계층 Application 수준 라우팅을 위한 별도의 리소스가 필요했고, Ingress가 등장하게 된다.
Ingress란
Ingress란 주로 L7 계층 라우팅을 담당하는 reverse Proxy server로, Load Balancer Type 서비스의 상위 리소스라고 보면 된다. L4 계층을 넘어 L7 계층의 라우팅을 담당한다. Ingress는 기본으로 내장된 컨트롤러가 없는 리소스로, 우리가 별도로 컨트롤러를 쿠버네티스에 설치해야 한다. Ingress 리소스는 목표 상태를 의미하며, 컨트롤러는 목표 상태에 맞게 L7(HTTP) 계층 라우팅 작업을 진행한다.
Istio Ingress gateway
이스티오에서도 ingress 역할을 하는 ingress gateway가 존재한다. istio를 사용한다면, 외부 트래픽은 istio gateway를 통해서 인입된다.
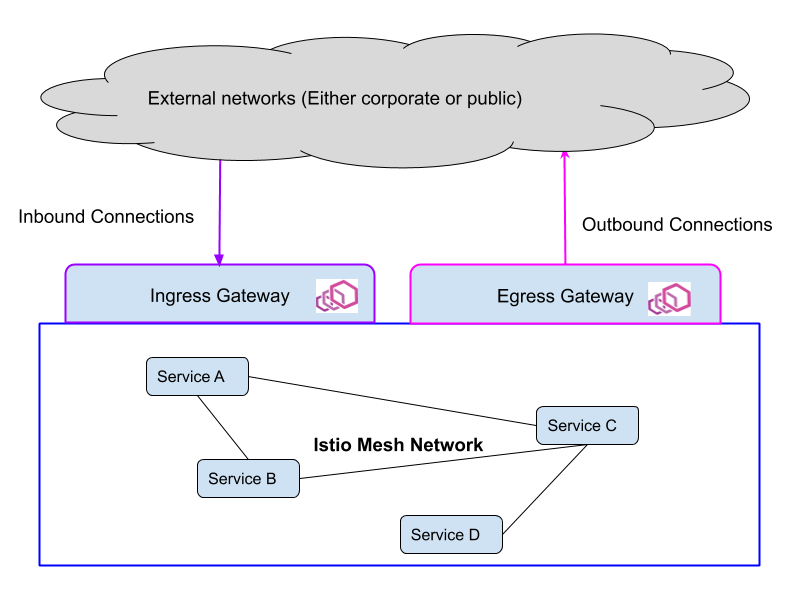
출처: https://www.istioworkshop.io/09-traffic-management/01-ingress-gateway/
istio CRD 기준으로만 보면, 게이트웨이로 들어온 트래픽은 실제 서비스와 매칭되는 VirtualService로 향하고,
DestinationRule을 적용하여 실제 파드로 트래픽이 인입된다.
“Gateway → VirtualService → DestinationRule → Pod”
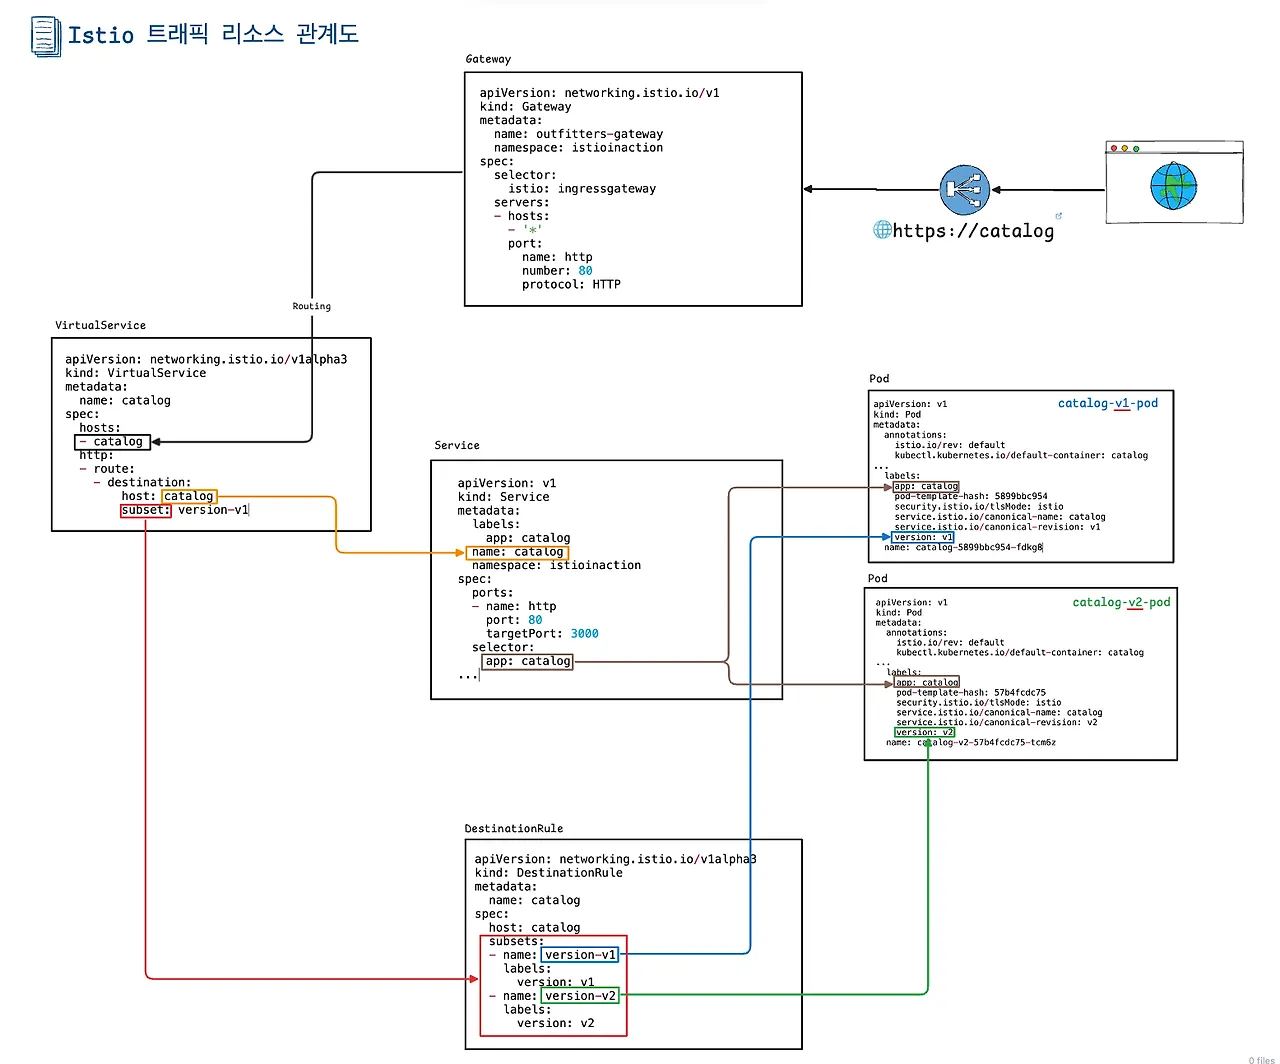
출처: https://hackjsp.tistory.com/85
환경구성
실습 환경: docker (kind - k8s 1.23.17 ‘23.2.28 - Link) , istio 1.17.8(’23.10.11) - Link
아래와 같이 YAML 파일을 통해 kind를 배포한다.
1
2
3
4
5
6
7
8
9
10
11
12
13
14
15
16
17
18
19
20
21
22
23
24
25
26
27
28
29
kind create cluster --name myk8s --image kindest/node:v1.23.17 --config - <<EOF
kind: Cluster
apiVersion: kind.x-k8s.io/v1alpha4
nodes:
- role: control-plane
  extraPortMappings:
  - containerPort: 30000 # Sample Application (istio-ingrssgateway) HTTP
    hostPort: 30000
  - containerPort: 30001 # Prometheus
    hostPort: 30001
  - containerPort: 30002 # Grafana
    hostPort: 30002
  - containerPort: 30003 # Kiali
    hostPort: 30003
  - containerPort: 30004 # Tracing
    hostPort: 30004
  - containerPort: 30005 # Sample Application (istio-ingrssgateway) HTTPS
    hostPort: 30005
  - containerPort: 30006 # TCP Route
    hostPort: 30006
  - containerPort: 30007 # New Gateway
    hostPort: 30007
  _extraMounts:
  - hostPath: /Users/gasida/Downloads/istio-in-action/book-source-code-master # 각자 자신의 pwd 경로로 설정
    containerPath: /istiobook_
networking:
  podSubnet: 10.10.0.0/16
  serviceSubnet: 10.200.1.0/24
EOF
이후 1주차와 동일하게 istioctl을 통해 istio를 배포한다. 동일하게 sidecar mode로 사용한다.
1
2
3
4
5
6
7
8
9
10
export ISTIOV=1.17.8
echo 'export ISTIOV=1.17.8' >> /root/.bashrc

curl -s -L https://istio.io/downloadIstio | ISTIO_VERSION=$ISTIOV sh -
cp istio-$ISTIOV/bin/istioctl /usr/local/bin/istioctl
istioctl version --remote=false

istioctl install --set profile=default -y

kubectl apply -f istio-$ISTIOV/samples/addons
sidecar 모드이기에, proxy 주입이 필요한데 이를 위해 네임스페이스를 생성하고, 레이블을 달아둔다.
1
2
kubectl create ns istioinaction
kubectl label namespace istioinaction istio-injection=enabled
ingress gatway 동작확인하기
“Gateway → VirtualService → DestinationRule → Pod”
아래와 같은 형식으로 Gateway를 배포한다. 해당 YAML 정보는 ch4/coolstore-gw.yaml 에서 확인할 수 있다.
1
2
3
4
5
6
7
8
9
10
11
12
13
14
apiVersion: networking.istio.io/v1alpha3
kind: Gateway
metadata:
  name: coolstore-gateway
spec:
  selector:
    istio: ingressgateway
  servers:
  - port:
      number: 80
      name: http
      protocol: HTTP
    hosts:
    - "webapp.istioinaction.io"
- 배포 전 로그
1
kubectl stern -n istio-system -l app=istiod

- 배포 후 로그

info ads RDS: PUSH request for node:istio-ingressgateway-996bc6bb6-lxxpq.istio-system resources:1 size:34B cached:0/0 를 통해 라우팅 정보가 업데이트 된 것을 확인할 수 있다.
이어서 kubectl로도 확인 가능하다.
1
2
3
kubectl get gw,vs -n istioinaction
NAME                                            AGE
gateway.networking.istio.io/coolstore-gateway   30s
이제 노드의 접속하여 istioctl로 정보를 하면 라우팅 정보와 L7 관련 설정을 확인할 수 있따.
1
2
3
4
5
docker exec -it myk8s-control-plane istioctl proxy-config listener deploy/istio-ingressgateway.istio-system
ADDRESS PORT  MATCH DESTINATION
0.0.0.0 8080  ALL   Route: http.8080
0.0.0.0 15021 ALL   Inline Route: /healthz/ready*
0.0.0.0 15090 ALL   Inline Route: /stats/prometheus*
1
2
3
4
5
docker exec -it myk8s-control-plane istioctl proxy-config routes deploy/istio-ingressgateway.istio-system
NAME          DOMAINS     MATCH                  VIRTUAL SERVICE
http.8080     *           /*                     404
              *           /stats/prometheus*
              *           /healthz/ready*
virtual service 배포
“Gateway → VirtualService → DestinationRule → Pod”
이제 VirtualService를 배포하여 게이트웨이로 들어온 트래픽이 Pod로 향할 수 있도록 해준다. (ch4/coolstore-vs.yaml)
1
2
3
4
5
6
7
8
9
10
11
12
13
14
15
apiVersion: networking.istio.io/v1alpha3
kind: VirtualService
metadata:
  name: webapp-vs-from-gw
spec:
  hosts:
  - "webapp.istioinaction.io"
  gateways:
  - coolstore-gateway
  http:
  - route:
    - destination:
        host: webapp
        port:
          number: 80
- 배포 진행
1
kubectl apply -f ch4/coolstore-vs.yaml
- 확인
1
2
3
4
5
6
kubectl get gw,vs -n istioinaction
NAME                                            AGE
gateway.networking.istio.io/coolstore-gateway   8m15s

NAME                                                   GATEWAYS                HOSTS                         AGE
virtualservice.networking.istio.io/webapp-vs-from-gw   ["coolstore-gateway"]   ["webapp.istioinaction.io"]   2m31s
게이트웨이의 라우팅 규칙을 확인해보자.
1
docker exec -it myk8s-control-plane istioctl proxy-config routes deploy/istio-ingressgateway.istio-system -o json --name http.8080
아래와 같이 우리가 게이트웨이에서 설정했던 도메인으로 향하는 트래픽을 outbound|80||webapp.istioinaction.svc.cluster.local 으로 라우팅하는 것을 볼 수 있다.
1
2
3
4
5
6
7
8
9
10
11
12
13
14
15
16
17
18
19
20
21
22
23
24
25
26
27
28
29
30
31
32
33
34
35
36
37
38
39
40
41
42
43
44
45
46
47
48
49
50
51
52
53
54
[
    {
        "name": "http.8080",
        "virtualHosts": [
            {
                "name": "webapp.istioinaction.io:80",
                "domains": [
                    "webapp.istioinaction.io"
                ],
                "routes": [
                    {
                        "match": {
                            "prefix": "/"
                        },
                        "route": {
                            "cluster": "outbound|80||webapp.istioinaction.svc.cluster.local",
                            "timeout": "0s",
                            "retryPolicy": {
                                "retryOn": "connect-failure,refused-stream,unavailable,cancelled,retriable-status-codes",
                                "numRetries": 2,
                                "retryHostPredicate": [
                                    {
                                        "name": "envoy.retry_host_predicates.previous_hosts",
                                        "typedConfig": {
                                            "@type": "type.googleapis.com/envoy.extensions.retry.host.previous_hosts.v3.PreviousHostsPredicate"
                                        }
                                    }
                                ],
                                "hostSelectionRetryMaxAttempts": "5",
                                "retriableStatusCodes": [
                                    503
                                ]
                            },
                            "maxGrpcTimeout": "0s"
                        },
                        "metadata": {
                            "filterMetadata": {
                                "istio": {
                                    "config": "/apis/networking.istio.io/v1alpha3/namespaces/istioinaction/virtual-service/webapp-vs-from-gw"
                                }
                            }
                        },
                        "decorator": {
                            "operation": "webapp.istioinaction.svc.cluster.local:80/*"
                        }
                    }
                ],
                "includeRequestAttemptCount": true
            }
        ],
        "validateClusters": false,
        "ignorePortInHostMatching": true
    }
]
서비스 배포
“Gateway → VirtualService → DestinationRule → Pod”
istio 동작을 확인하기 위해 실제 애플리케이션을 배포해본다.
1
2
kubectl apply -f services/catalog/kubernetes/catalog.yaml -n istioinaction
kubectl apply -f services/webapp/kubernetes/webapp.yaml -n istioinaction
- 배포확인
1
2
3
4
kubectl get pod -n istioinaction -owide
NAME                     READY   STATUS    RESTARTS   AGE   IP           NODE                  NOMINATED NODE   READINESS GATES
catalog-6cf4b97d-54dgd   2/2     Running   0          70s   10.10.0.13   myk8s-control-plane   <none>           <none>
webapp-7685bcb84-dskkc   2/2     Running   0          71s   10.10.0.12   myk8s-control-plane   <none>           <none>
배포를 진행하면 아래의 사진처럼 istio에선 동기화가 이뤄진다.
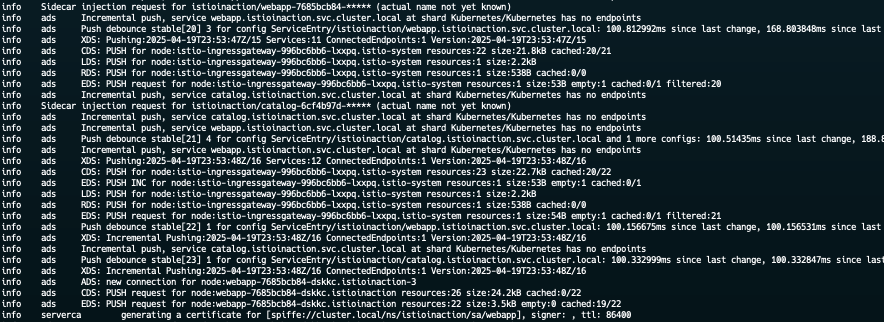
sidecar 모드에 맞게 각 애플리케이션 파드에 proxy 컨테이너도 추가된 것을 확인할 수 있다.
1
2
3
4
5
6
7
8
9
10
11
12
13
14
15
16
17
kubectl images -n istioinaction
[Summary]: 1 namespaces, 2 pods, 6 containers and 3 different images
+------------------------+-------------------+--------------------------------+
|          Pod           |     Container     |             Image              |
+------------------------+-------------------+--------------------------------+
| catalog-6cf4b97d-54dgd | catalog           | istioinaction/catalog:latest   |
+                        +-------------------+--------------------------------+
|                        | istio-proxy       | docker.io/istio/proxyv2:1.17.8 |
+                        +-------------------+                                +
|                        | (init) istio-init |                                |
+------------------------+-------------------+--------------------------------+
| webapp-7685bcb84-dskkc | webapp            | istioinaction/webapp:latest    |
+                        +-------------------+--------------------------------+
|                        | istio-proxy       | docker.io/istio/proxyv2:1.17.8 |
+                        +-------------------+                                +
|                        | (init) istio-init |                                |
+------------------------+-------------------+--------------------------------+
추가적으로 istioctl을 사용해서 라우팅규칙을 살펴보면, 아래와 같이 서비스에 대한 정보를 볼 수 있다.
1
2
3
4
docker exec -it myk8s-control-plane istioctl proxy-config cluster deploy/istio-ingressgateway.istio-system | egrep 'TYPE|istioinaction'
SERVICE FQDN                                            PORT      SUBSET     DIRECTION     TYPE           DESTINATION RULE
catalog.istioinaction.svc.cluster.local                 80        -          outbound      EDS
webapp.istioinaction.svc.cluster.local                  80        -          outbound      EDS
엔드포인트 규칙
1
2
3
4
docker exec -it myk8s-control-plane istioctl proxy-config endpoint deploy/istio-ingressgateway.istio-system | egrep 'ENDPOINT|istioinaction'
ENDPOINT                                                STATUS      OUTLIER CHECK     CLUSTER
10.10.0.12:8080                                         HEALTHY     OK                outbound|80||webapp.istioinaction.svc.cluster.local
10.10.0.13:3000                                         HEALTHY     OK                outbound|80||catalog.istioinaction.svc.cluster.local
이제 실제로 서비스에 접근해보자. 다음과 같이 특정 호스트 정보(webapp.istioinaction)로 들어오는 트래픽이 서비스로 잘전달되는 것을 확인할 수 있다.
1
2
3
4
5
6
7
8
kubectl exec -it netshoot -- curl -s http://webapp.istioinaction/api/catalog/items/1 | jq
{
  "id": 1,
  "color": "amber",
  "department": "Eyewear",
  "name": "Elinor Glasses",
  "price": "282.00"
}
secure
지금까지는 istio를 사용하면 실제 트래픽이 어떻게 서비스 파드까지 도달하는지 살펴봤다. 여기서는 istio와 관련된 보안 기능을 실습해볼 예정이다. 실제 클라우드위에서 서비스를 배포하면 보안이 더 중요해지기에 istio에서는 mTLS 등 여러 보안 기능을 제공한다.
별도 인증서 설정해보기
webapp 시크릿을 별도로 생성해둔다.
1
2
3
kubectl create -n istio-system secret tls webapp-credential \
--key ch4/certs/3_application/private/webapp.istioinaction.io.key.pem \
--cert ch4/certs/3_application/certs/webapp.istioinaction.io.cert.pem
아래와 같이 gateway 리소스에 tls 부분을 우리가 별도로 만든 tls로 변경한다.
1
2
3
4
5
6
7
8
9
10
11
12
13
14
15
16
17
18
19
20
21
22
23
apiVersion: networking.istio.io/v1alpha3
kind: Gateway
metadata:
  name: coolstore-gateway
spec:
  selector:
    istio: ingressgateway
  servers:
  - port:
      number: 80  #1 HTTP 트래픽 허용
      name: http
      protocol: HTTP
    hosts:
    - "webapp.istioinaction.io"
  - port:
      number: 443 #2 HTTPS 트래픽 허용
      name: https
      protocol: HTTPS
    tls:
      mode: SIMPLE #3 보안 연결
      credentialName: webapp-credential #4 TLS 인증서가 들어 있는 쿠버네티스 시크릿 이름
    hosts:
    - "webapp.istioinaction.io"
- 설정 배포
1
kubectl apply -f ch4/coolstore-gw-tls.yaml -n istioinaction
- 확인
1
2
3
4
docker exec -it myk8s-control-plane istioctl proxy-config secret deploy/istio-ingressgateway.istio-system
RESOURCE NAME                      TYPE           STATUS     VALID CERT     SERIAL NUMBER                              NOT AFTER                NOT BEFORE
kubernetes://webapp-credential     Cert Chain     ACTIVE     true           1049106                                    2041-06-29T12:49:32Z     2021-07-04T12:49:32Z
...
이제 TLS 적용이 완료되었는지, 확인을 해본다. 확인하면 아래와 같이 에러가 발생한다. 별도 CA 인증서가 없기에 발생한 오류이다.
1
2
3
4
5
6
7
8
9
10
11
12
13
14
15
curl -v -H "Host: webapp.istioinaction.io" https://localhost:30005/api/catalog
* Host localhost:30005 was resolved.
* IPv6: ::1
* IPv4: 127.0.0.1
*   Trying [::1]:30005...
* connect to ::1 port 30005 from ::1 port 35528 failed: Connection refused
*   Trying 127.0.0.1:30005...
* Connected to localhost (127.0.0.1) port 30005
* ALPN: curl offers h2,http/1.1
* TLSv1.3 (OUT), TLS handshake, Client hello (1):
*  CAfile: /etc/pki/tls/certs/ca-bundle.crt
*  CApath: none
* OpenSSL SSL_connect: SSL_ERROR_SYSCALL in connection to localhost:30005
* Closing connection
curl: (35) OpenSSL SSL_connect: SSL_ERROR_SYSCALL in connection to localhost:30005
- CA 인증서 생성
1
openssl x509 -in ch4/certs/2_intermediate/certs/ca-chain.cert.pem -noout -text
다시 테스트를 진행해보자.
1
2
3
4
5
6
7
8
9
10
11
12
13
14
15
curl -v -H "Host: webapp.istioinaction.io" https://localhost:30005/api/catalog \
* Host localhost:30005 was resolved.
* IPv6: ::1
* IPv4: 127.0.0.1
*   Trying [::1]:30005...
* connect to ::1 port 30005 from ::1 port 46970 failed: Connection refused
*   Trying 127.0.0.1:30005...
* Connected to localhost (127.0.0.1) port 30005
* ALPN: curl offers h2,http/1.1
* TLSv1.3 (OUT), TLS handshake, Client hello (1):
*  CAfile: /etc/pki/tls/certs/ca-bundle.crt
*  CApath: none
* OpenSSL SSL_connect: SSL_ERROR_SYSCALL in connection to localhost:30005
* Closing connection
curl: (35) OpenSSL SSL_connect: SSL_ERROR_SYSCALL in connection to localhost:30005
위의 내용 중 “* Connected to localhost (127.0.0.1) port 30005” 에서 힌트를 얻을 수 있다. 우리는 호스트네임을 원했지만, 자동적으로 localhost로 라우팅되어 문제가 발생했다.
임시로 로컬에 호스트네임을 설정해둔다.
1
echo "127.0.0.1       webapp.istioinaction.io" | sudo tee -a /etc/hosts
다시 테스트를 진행해보면, 아래와 같이 통신이 잘되는 것을 확인할 수 있다.
1
2
3
4
5
6
7
8
9
10
11
12
13
14
15
16
17
18
19
20
 curl -v http://webapp.istioinaction.io:30000/api/catalog
* Host webapp.istioinaction.io:30000 was resolved.
* IPv6: (none)
* IPv4: 127.0.0.1
*   Trying 127.0.0.1:30000...
* Connected to webapp.istioinaction.io (127.0.0.1) port 30000
> GET /api/catalog HTTP/1.1
> Host: webapp.istioinaction.io:30000
> User-Agent: curl/8.5.0
> Accept: */*
>
< HTTP/1.1 200 OK
< content-length: 357
< content-type: application/json; charset=utf-8
< date: Sun, 20 Apr 2025 00:17:34 GMT
< x-envoy-upstream-service-time: 20
< server: istio-envoy
<
* Connection #0 to host webapp.istioinaction.io left intact
[{"id":1,"color":"amber","department":"Eyewear","name":"Elinor Glasses","price":"282.00"},{"id":2,"color":"cyan","department":"Clothing","name":"Atlas Shirt","price":"127.00"},{"id":3,"color":"teal","department":"Clothing","name":"Small Metal Shoes","price":"232.00"},{"id":4,"color":"red","department":"Watches","name":"Red Dragon Watch","price":"232.00"}]
HTTPS 강제하기
chrome이나 여러 브라우저에서도 http 통신으로 접속하면 브라우저단에서 “안전하지 않은 접근”으로 표시한다. HTTP 통신은 감청당할 우려가 있기때문에 https 사용이 보편화되었다. 여기서도 마찬가지로 HTTPS를 강제하는 설정을 진행해보자.
- Gateway 수정
아래와 같이 tls.httpsRedirec의 값을 true 로 변경한다.
1
2
3
4
5
6
7
8
9
10
11
12
13
14
15
16
17
18
19
20
21
22
23
24
25
apiVersion: networking.istio.io/v1alpha3
kind: Gateway
metadata:
  name: coolstore-gateway
spec:
  selector:
    istio: ingressgateway
  servers:
  - port:
      number: 80
      name: http
      protocol: HTTP
    hosts:
    - "webapp.istioinaction.io"
    tls:
      httpsRedirect: true
  - port:
      number: 443
      name: https
      protocol: HTTPS
    tls:
      mode: SIMPLE
      credentialName: webapp-credential
    hosts:
    - "webapp.istioinaction.io"
접근 테스트를 진행하면 아래와 같이 “HTTP/1.1 301 Moved Permanently”로 다시 브라우저 혹은 클라이언트가 HTTPS를 호출하게끔 응답함을 볼 수 있다.
1
2
3
4
5
6
7
8
9
10
11
12
13
14
15
16
17
18
curl -v http://webapp.istioinaction.io:30000/api/catalog
* Host webapp.istioinaction.io:30000 was resolved.
* IPv6: (none)
* IPv4: 127.0.0.1
*   Trying 127.0.0.1:30000...
* Connected to webapp.istioinaction.io (127.0.0.1) port 30000
> GET /api/catalog HTTP/1.1
> Host: webapp.istioinaction.io:30000
> User-Agent: curl/8.5.0
> Accept: */*
>
< HTTP/1.1 301 Moved Permanently
< location: https://webapp.istioinaction.io:30000/api/catalog
< date: Sun, 20 Apr 2025 00:24:24 GMT
< server: istio-envoy
< content-length: 0
<
* Connection #0 to host webapp.istioinaction.io left intact
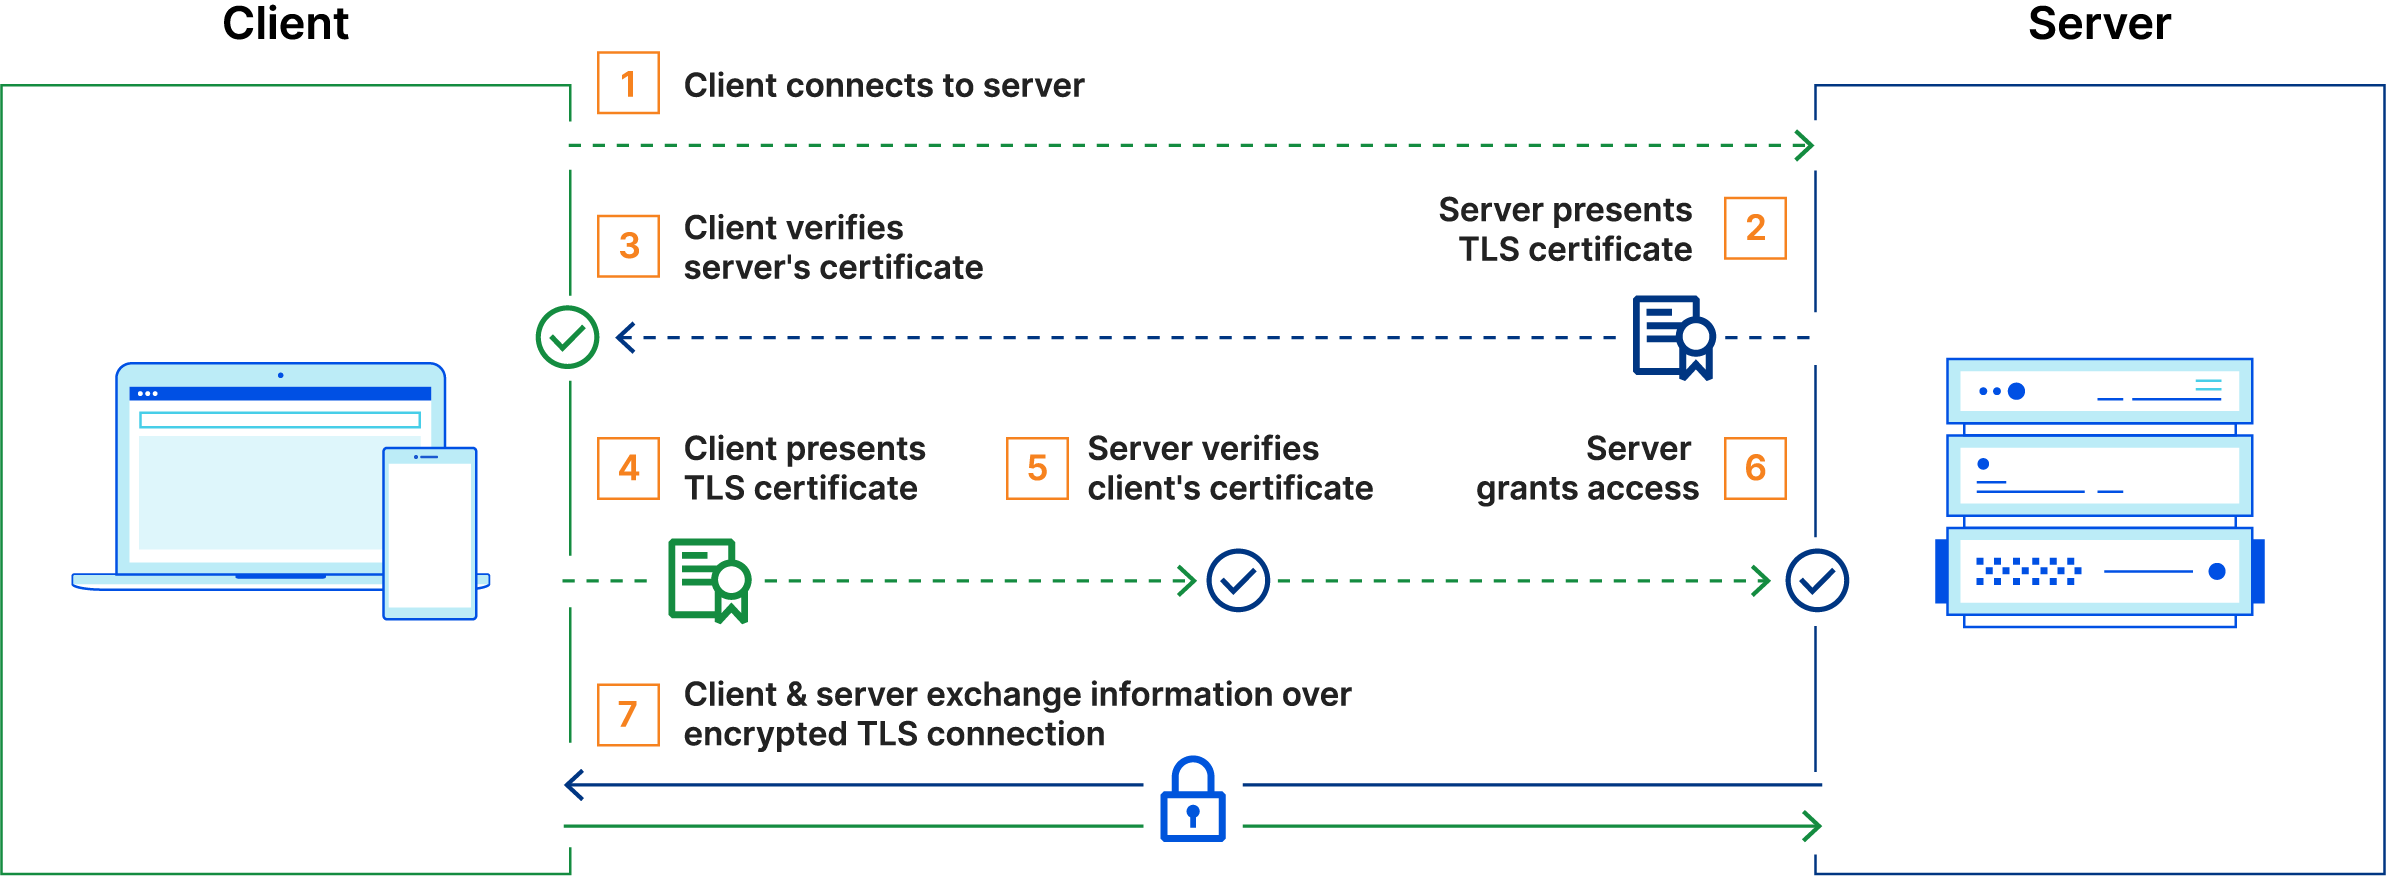
mTLS
mTLS는 mutual TLS의 약자로, 서버만 본인을 증명하는 것이 아닌 클라이언트도 서버에게 자신의 신원을 증명한다.
출처: https://www.cloudflare.com/ko-kr/learning/access-management/what-is-mutual-tls/
- Gateway 설정 진행
tls.mode=MUTUAL, tls.credentialName=webapp-credential-mtls 으로 변경한다.
1
2
3
4
5
6
7
8
9
10
11
12
13
14
15
16
17
18
19
20
21
22
23
apiVersion: networking.istio.io/v1alpha3
kind: Gateway
metadata:
  name: coolstore-gateway
spec:
  selector:
    istio: ingressgateway
  servers:
  - port:
      number: 80
      name: http
      protocol: HTTP
    hosts:
    - "webapp.istioinaction.io"
  - port:
      number: 443
      name: https
      protocol: HTTPS
    tls:
      mode: MUTUAL # mTLS 설정
      credentialName: webapp-credential-mtls # 신뢰할 수 있는 CA가 구성된 자격 증명
    hosts:
    - "webapp.istioinaction.io"
그리고 클라이언트 인증서 작업을 진행한다.
1
2
3
4
5
6
7
8
9
openssl x509 -in ch4/certs/2_intermediate/certs/ca-chain.cert.pem -noout -text

kubectl create -n istio-system secret \
generic webapp-credential-mtls --from-file=tls.key=\
ch4/certs/3_application/private/webapp.istioinaction.io.key.pem \
--from-file=tls.crt=\
ch4/certs/3_application/certs/webapp.istioinaction.io.cert.pem \
--from-file=ca.crt=\
ch4/certs/2_intermediate/certs/ca-chain.cert.pem
배포된 시크릿을 확인해보면 CA 인증서의 세부 키 내용을 볼 수 있다.
1
2
3
4
5
6
7
8
9
10
11
12
13
14
 kubectl view-secret -n istio-system webapp-credential-mtls --all
ca.crt='-----BEGIN CERTIFICATE-----
MIIFlTCCA32gAwIBAgIDEAISMA0GCSqGSIb3DQEBCwUAMGQxCzAJBgNVBAYTAlVT
MQ8wDQYDVQQIDAZEZW5pYWwxFDASBgNVBAcMC1NwcmluZ2ZpZWxkMQwwCgYDVQQK
DANEaXMxIDAeBgNVBAMMF3dlYmFwcC5pc3Rpb2luYWN0aW9uLmlvMB4XDTIxMDcw
NDEyNDkyOVoXDTQxMDYyOTEyNDkyOVowTjELMAkGA1UEBhMCVVMxDzANBgNVBAgM
BkRlbmlhbDEMMAoGA1UECgwDRGlzMSAwHgYDVQQDDBd3ZWJhcHAuaXN0aW9pbmFj
dGlvbi5pbzCCAiIwDQYJKoZIhvcNAQEBBQADggIPADCCAgoCggIBAMlfkh6SHaR8
KweBRIulWglHVCW4egMK8zSE7ZGUxFDOjcnvMCv5p3LKV/YCY69k5J6NVOr6wpqk
tbMOripaEsQ6IkQvpHMzj1IQEefGz8d1Ms32sOlDc/lIx93p5Cksggd6nr0wTH4W
EriJuJ3WzTeYmFNlJMt1mTc5djkKdcFIWEW2rkEN7i109aNecUS4iPhUsroZEpCI
/Z1n+Gfq2dsOAPcfrHtY+KowJxMhruccORpTt0VxUKOvSbiFPtqAkyTeQbUHNMpS
Uh/m2SWbY5mYLwn8ky2V7zaY0mt46C6OxNNT29muL5WCSUbCT3foNo26aZG1CSq
...
실제 클라이언트 인증서를 별도로 지정하여 테스트를 진행하면 아래와 같이 TLS 인증을 “서로” 진행하는 것을 볼 수 있다. 클라이언트도 자신의 신원을 증명한다.
1
2
3
4
5
6
7
8
9
10
11
12
13
14
15
16
17
18
19
20
21
22
23
24
25
26
27
28
29
30
31
32
33
34
35
36
37
38
39
40
41
42
43
44
45
46
47
48
49
50
51
52
53
54
55
56
57
58
59
60
61
62
63
64
65
66
67
68
69
70
71
72
73
74
75
76
77
78
79
80
81
82
83
84
85
86
87
88
89
90
91
92
93
94
95
curl -v https://webapp.istioinaction.io:30005/api/catalog \
--cacert ch4/certs/2_intermediate/certs/ca-chain.cert.pem
* Host webapp.istioinaction.io:30005 was resolved.
* IPv6: (none)
* IPv4: 127.0.0.1
*   Trying 127.0.0.1:30005...
* Connected to webapp.istioinaction.io (127.0.0.1) port 30005
* ALPN: curl offers h2,http/1.1
* TLSv1.3 (OUT), TLS handshake, Client hello (1):
*  CAfile: ch4/certs/2_intermediate/certs/ca-chain.cert.pem
*  CApath: none
* TLSv1.3 (IN), TLS handshake, Server hello (2):
* TLSv1.3 (IN), TLS handshake, Encrypted Extensions (8):
* TLSv1.3 (IN), TLS handshake, Request CERT (13):
* TLSv1.3 (IN), TLS handshake, Certificate (11):
* TLSv1.3 (IN), TLS handshake, CERT verify (15):
* TLSv1.3 (IN), TLS handshake, Finished (20):
* TLSv1.3 (OUT), TLS change cipher, Change cipher spec (1):
* TLSv1.3 (OUT), TLS handshake, Certificate (11):
* TLSv1.3 (OUT), TLS handshake, Finished (20):
* SSL connection using TLSv1.3 / TLS_AES_256_GCM_SHA384 / X25519 / RSASSA-PSS
* ALPN: server accepted h2
* Server certificate:
*  subject: C=US; ST=Denial; L=Springfield; O=Dis; CN=webapp.istioinaction.io
*  start date: Jul  4 12:49:32 2021 GMT
*  expire date: Jun 29 12:49:32 2041 GMT
*  common name: webapp.istioinaction.io (matched)
*  issuer: C=US; ST=Denial; O=Dis; CN=webapp.istioinaction.io
*  SSL certificate verify ok.
*   Certificate level 0: Public key type RSA (2048/112 Bits/secBits), signed using sha256WithRSAEncryption
*   Certificate level 1: Public key type RSA (4096/152 Bits/secBits), signed using sha256WithRSAEncryption
* TLSv1.3 (IN), TLS alert, unknown (628):
* OpenSSL SSL_read: OpenSSL/3.2.2: error:0A00045C:SSL routines::tlsv13 alert certificate required, errno 0
* Failed receiving HTTP2 data: 56(Failure when receiving data from the peer)
* Connection #0 to host webapp.istioinaction.io left intact
curl: (56) OpenSSL SSL_read: OpenSSL/3.2.2: error:0A00045C:SSL routines::tlsv13 alert certificate required, errno 0
[root@ip-172-31-7-43 book-source-code-master]# curl -v https://webapp.istioinaction.io:30005/api/catalog \
--cacert ch4/certs/2_intermediate/certs/ca-chain.cert.pem \
--cert ch4/certs/4_client/certs/webapp.istioinaction.io.cert.pem \
--key ch4/certs/4_client/private/webapp.istioinaction.io.key.pem
* Host webapp.istioinaction.io:30005 was resolved.
* IPv6: (none)
* IPv4: 127.0.0.1
*   Trying 127.0.0.1:30005...
* Connected to webapp.istioinaction.io (127.0.0.1) port 30005
* ALPN: curl offers h2,http/1.1
* TLSv1.3 (OUT), TLS handshake, Client hello (1):
*  CAfile: ch4/certs/2_intermediate/certs/ca-chain.cert.pem
*  CApath: none
* TLSv1.3 (IN), TLS handshake, Server hello (2):
* TLSv1.3 (IN), TLS handshake, Encrypted Extensions (8):
* TLSv1.3 (IN), TLS handshake, Request CERT (13):
* TLSv1.3 (IN), TLS handshake, Certificate (11):
* TLSv1.3 (IN), TLS handshake, CERT verify (15):
* TLSv1.3 (IN), TLS handshake, Finished (20):
* TLSv1.3 (OUT), TLS change cipher, Change cipher spec (1):
* TLSv1.3 (OUT), TLS handshake, Certificate (11):
* TLSv1.3 (OUT), TLS handshake, CERT verify (15):
* TLSv1.3 (OUT), TLS handshake, Finished (20):
* SSL connection using TLSv1.3 / TLS_AES_256_GCM_SHA384 / X25519 / RSASSA-PSS
* ALPN: server accepted h2
* Server certificate:
*  subject: C=US; ST=Denial; L=Springfield; O=Dis; CN=webapp.istioinaction.io
*  start date: Jul  4 12:49:32 2021 GMT
*  expire date: Jun 29 12:49:32 2041 GMT
*  common name: webapp.istioinaction.io (matched)
*  issuer: C=US; ST=Denial; O=Dis; CN=webapp.istioinaction.io
*  SSL certificate verify ok.
*   Certificate level 0: Public key type RSA (2048/112 Bits/secBits), signed using sha256WithRSAEncryption
*   Certificate level 1: Public key type RSA (4096/152 Bits/secBits), signed using sha256WithRSAEncryption
* using HTTP/2
* [HTTP/2] [1] OPENED stream for https://webapp.istioinaction.io:30005/api/catalog
* [HTTP/2] [1] [:method: GET]
* [HTTP/2] [1] [:scheme: https]
* [HTTP/2] [1] [:authority: webapp.istioinaction.io:30005]
* [HTTP/2] [1] [:path: /api/catalog]
* [HTTP/2] [1] [user-agent: curl/8.5.0]
* [HTTP/2] [1] [accept: */*]
> GET /api/catalog HTTP/2
> Host: webapp.istioinaction.io:30005
> User-Agent: curl/8.5.0
> Accept: */*
>
* TLSv1.3 (IN), TLS handshake, Newsession Ticket (4):
* TLSv1.3 (IN), TLS handshake, Newsession Ticket (4):
* old SSL session ID is stale, removing
< HTTP/2 200
< content-length: 357
< content-type: application/json; charset=utf-8
< date: Sun, 20 Apr 2025 00:30:33 GMT
< x-envoy-upstream-service-time: 13
< server: istio-envoy
<
* Connection #0 to host webapp.istioinaction.io left intact
[{"id":1,"color":"amber","department":"Eyewear","name":"Elinor Glasses","price":"282.00"},{"id":2,"color":"cyan","department":"Clothing","name":"Atlas Shirt","price":"127.00"},{"id":3,"color":"teal","department":"Clothing","name":"Small Metal Shoes","price":"232.00"},{"id":4,"color":"red","department":"Watches","name":"Red Dragon Watch","price":"232.00"}]
마지막으로 호스트네임 별로 각 TLS 인증을 적용해보자. 우리는 지금까지 “webapp.istioinaction.io” 도메인 대한 별도의 인증 절차를 진행했다. 이제 “catalog.istioinaction.io” 도메인에도 똑같이 인증서와 키를 추가한다.
- Gateway 설정
tls.mode.credentialName 을 각 도메인에 맞는 인증서로 넣는다.
1
2
3
4
5
6
7
8
9
10
11
12
13
14
15
16
17
18
19
20
21
22
23
24
25
26
apiVersion: networking.istio.io/v1alpha3
kind: Gateway
metadata:
  name: coolstore-gateway
spec:
  selector:
    istio: ingressgateway
  servers:
  - port:
      number: 443
      name: https-webapp
      protocol: HTTPS
    tls:
      mode: SIMPLE
      credentialName: webapp-credential
    hosts:
    - "webapp.istioinaction.io"
  - port:
      number: 443
      name: https-catalog
      protocol: HTTPS
    tls:
      mode: SIMPLE
      credentialName: catalog-credential
    hosts:
    - "catalog.istioinaction.io"
catalog 관련 설정
“catalog.istioinaction.io” 인증서 생성
1
openssl x509 -in ch4/certs2/3_application/certs/catalog.istioinaction.io.cert.pem -noout -text
1
2
3
kubectl create -n istio-system secret tls catalog-credential \
--key ch4/certs2/3_application/private/catalog.istioinaction.io.key.pem \
--cert ch4/certs2/3_application/certs/catalog.istioinaction.io.cert.pem
- 배포 확인
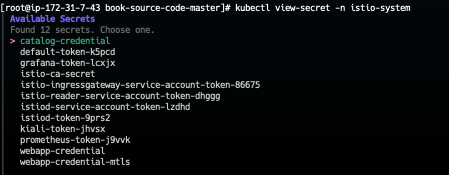
krew 플러그인을 사용하여 view-secret을 진행하면, 아래와 같이 새로 생성된 catalog 인증서를 볼 수 있다.
- VirtualService 생성
catalog를 위한 VirtualService도 생성해둔다.
1
2
3
4
5
6
7
8
9
10
11
12
13
14
15
apiVersion: networking.istio.io/v1alpha3
kind: VirtualService
metadata:
  name: catalog-vs-from-gw
spec:
  hosts:
  - "catalog.istioinaction.io"
  gateways:
  - coolstore-gateway
  http:
  - route:
    - destination:
        host: catalog
        port:
          number: 80
아래와 같이 이제 두 개의 서비스가 배포된 것을 볼 수 있다.

- DNS 설정
1
echo "127.0.0.1       catalog.istioinaction.io" | sudo tee -a /etc/hosts
통신 테스트 진행
1
2
3
4
5
6
7
8
9
10
11
12
13
14
15
16
17
18
19
20
21
22
23
24
25
26
27
28
29
30
31
32
33
34
35
36
37
38
39
40
41
42
43
44
45
46
47
48
49
50
51
52
53
54
55
56
57
58
59
60
61
62
63
64
65
66
67
68
69
70
71
72
73
74
75
76
77
78
79
80
81
82
83
84
85
86
87
88
89
curl -v https://catalog.istioinaction.io:30005/items \
--cacert ch4/certs2/2_intermediate/certs/ca-chain.cert.pem
* Host catalog.istioinaction.io:30005 was resolved.
* IPv6: (none)
* IPv4: 127.0.0.1
*   Trying 127.0.0.1:30005...
* Connected to catalog.istioinaction.io (127.0.0.1) port 30005
* ALPN: curl offers h2,http/1.1
* TLSv1.3 (OUT), TLS handshake, Client hello (1):
*  CAfile: ch4/certs2/2_intermediate/certs/ca-chain.cert.pem
*  CApath: none
* TLSv1.3 (IN), TLS handshake, Server hello (2):
* TLSv1.3 (IN), TLS handshake, Encrypted Extensions (8):
* TLSv1.3 (IN), TLS handshake, Certificate (11):
* TLSv1.3 (IN), TLS handshake, CERT verify (15):
* TLSv1.3 (IN), TLS handshake, Finished (20):
* TLSv1.3 (OUT), TLS change cipher, Change cipher spec (1):
* TLSv1.3 (OUT), TLS handshake, Finished (20):
* SSL connection using TLSv1.3 / TLS_AES_256_GCM_SHA384 / X25519 / RSASSA-PSS
* ALPN: server accepted h2
* Server certificate:
*  subject: C=US; ST=Denial; L=Springfield; O=Dis; CN=catalog.istioinaction.io
*  start date: Jul  4 13:30:38 2021 GMT
*  expire date: Jun 29 13:30:38 2041 GMT
*  common name: catalog.istioinaction.io (matched)
*  issuer: C=US; ST=Denial; O=Dis; CN=catalog.istioinaction.io
*  SSL certificate verify ok.
*   Certificate level 0: Public key type RSA (2048/112 Bits/secBits), signed using sha256WithRSAEncryption
*   Certificate level 1: Public key type RSA (4096/152 Bits/secBits), signed using sha256WithRSAEncryption
* using HTTP/2
* [HTTP/2] [1] OPENED stream for https://catalog.istioinaction.io:30005/items
* [HTTP/2] [1] [:method: GET]
* [HTTP/2] [1] [:scheme: https]
* [HTTP/2] [1] [:authority: catalog.istioinaction.io:30005]
* [HTTP/2] [1] [:path: /items]
* [HTTP/2] [1] [user-agent: curl/8.5.0]
* [HTTP/2] [1] [accept: */*]
> GET /items HTTP/2
> Host: catalog.istioinaction.io:30005
> User-Agent: curl/8.5.0
> Accept: */*
>
* TLSv1.3 (IN), TLS handshake, Newsession Ticket (4):
* TLSv1.3 (IN), TLS handshake, Newsession Ticket (4):
* old SSL session ID is stale, removing
< HTTP/2 200
< x-powered-by: Express
< vary: Origin, Accept-Encoding
< access-control-allow-credentials: true
< cache-control: no-cache
< pragma: no-cache
< expires: -1
< content-type: application/json; charset=utf-8
< content-length: 502
< etag: W/"1f6-ih2h+hDQ0yLLcKIlBvwkWbyQGK4"
< date: Sun, 20 Apr 2025 00:40:21 GMT
< x-envoy-upstream-service-time: 13
< server: istio-envoy
<
[
  {
    "id": 1,
    "color": "amber",
    "department": "Eyewear",
    "name": "Elinor Glasses",
    "price": "282.00"
  },
  {
    "id": 2,
    "color": "cyan",
    "department": "Clothing",
    "name": "Atlas Shirt",
    "price": "127.00"
  },
  {
    "id": 3,
    "color": "teal",
    "department": "Clothing",
    "name": "Small Metal Shoes",
    "price": "232.00"
  },
  {
    "id": 4,
    "color": "red",
    "department": "Watches",
    "name": "Red Dragon Watch",
    "price": "232.00"
  }
* Connection #0 to host catalog.istioinaction.io left intact
TCP
지금까지는 HTTP(S)쪽을 살펴봤는데 istio gateway에서는 TCP 프로토콜에 대한 트래픽도 처리할 수 있다.
배포
1
2
3
4
5
6
7
8
9
10
11
12
13
14
15
16
17
18
19
20
21
22
23
24
25
26
27
28
29
30
31
32
33
34
35
36
37
38
39
40
41
42
43
44
45
46
47
48
49
50
51
52
53
54
55
56
57
58
59
60
61
62
63
apiVersion: apps/v1
kind: Deployment
metadata:
  name: tcp-echo-deployment
  labels:
    app: tcp-echo
    system: example
spec:
  replicas: 1
  selector:
    matchLabels:
      app: tcp-echo
  template:
    metadata:
      labels:
        app: tcp-echo
        system: example
    spec:
      containers:
        - name: tcp-echo-container
          image: cjimti/go-echo:latest
          imagePullPolicy: IfNotPresent
          env:
            - name: TCP_PORT
              value: "2701"
            - name: NODE_NAME
              valueFrom:
                fieldRef:
                  fieldPath: spec.nodeName
            - name: POD_NAME
              valueFrom:
                fieldRef:
                  fieldPath: metadata.name
            - name: POD_NAMESPACE
              valueFrom:
                fieldRef:
                  fieldPath: metadata.namespace
            - name: POD_IP
              valueFrom:
                fieldRef:
                  fieldPath: status.podIP
            - name: SERVICE_ACCOUNT
              valueFrom:
                fieldRef:
                  fieldPath: spec.serviceAccountName
          ports:
            - name: tcp-echo-port
              containerPort: 2701
---
apiVersion: v1
kind: Service
metadata:
  name: "tcp-echo-service"
  labels:
    app: tcp-echo
    system: example
spec:
  selector:
    app: "tcp-echo"
  ports:
    - protocol: "TCP"
      port: 2701
      targetPort: 2701
1
2
3
kubectl get pod,svc -n istioinaction | grep tcp
pod/tcp-echo-deployment-584f6d6d6b-tvpzr   2/2     Running   0          33s
service/tcp-echo-service   ClusterIP   10.200.1.7     <none>        2701/TCP   33s
- istio gateway 수정
아래와 같이 TCP 부분을 추가한다.
1
2
3
4
5
6
7
8
9
10
11
12
13
14
15
16
17
spec:
  clusterIP: 10.200.1.174
  clusterIPs:
  - 10.200.1.174
  externalTrafficPolicy: Local
  internalTrafficPolicy: Cluster
  ipFamilies:
  - IPv4
  ipFamilyPolicy: SingleStack
  ports:
  - name: tcp
    nodePort: 30006
    port: 31400
    protocol: TCP
    targetPort: 31400
  - name: status-port
    nodePort: 31896
설정 확인
1
2
kubectl get svc istio-ingressgateway -n istio-system -o jsonpath='{.spec.ports[?(@.name=="tcp")]}'
{"name":"tcp","nodePort":30006,"port":31400,"protocol":"TCP","targetPort":31400}
- Gateway 생성
1
2
3
4
5
6
7
8
9
10
11
12
13
14
apiVersion: networking.istio.io/v1alpha3
kind: Gateway
metadata:
  name: echo-tcp-gateway
spec:
  selector:
    istio: ingressgateway
  servers:
  - port:
      number: 31400
      name: tcp-echo
      protocol: TCP
    hosts:
    - "*"
- Virtual Service 생성
1
2
3
4
5
6
7
8
9
10
11
12
13
14
15
16
17
apiVersion: networking.istio.io/v1alpha3
kind: VirtualService
metadata:
  name: tcp-echo-vs-from-gw
spec:
  hosts:
  - "*"
  gateways:
  - echo-tcp-gateway
  tcp:
  - match:
    - **port: 31400**
    route:
    - destination:
        host: tcp-echo-service
        port:
          number: 2701
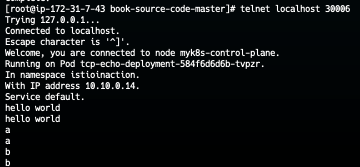
- TCP 접근 테스트 진행하기
통신을 위해 telnet 유틸을 이용한다. 해당 서비스는 echo 서비스로, 내가 보낸 값을 그대로 출력해주는 서비스이다. 아래의 사진과 같이 입력한 문자열을 그대로 출력한다.
운영을 위한 기능들
Gateway 분리
위의 실습을 하다보면, 설정을 변경할 때마다 Gateway를 수정이 필요했다. 이를 해당 서비스를 맡는 팀이 담당하게 하는 것이 관리면에서 좋다.
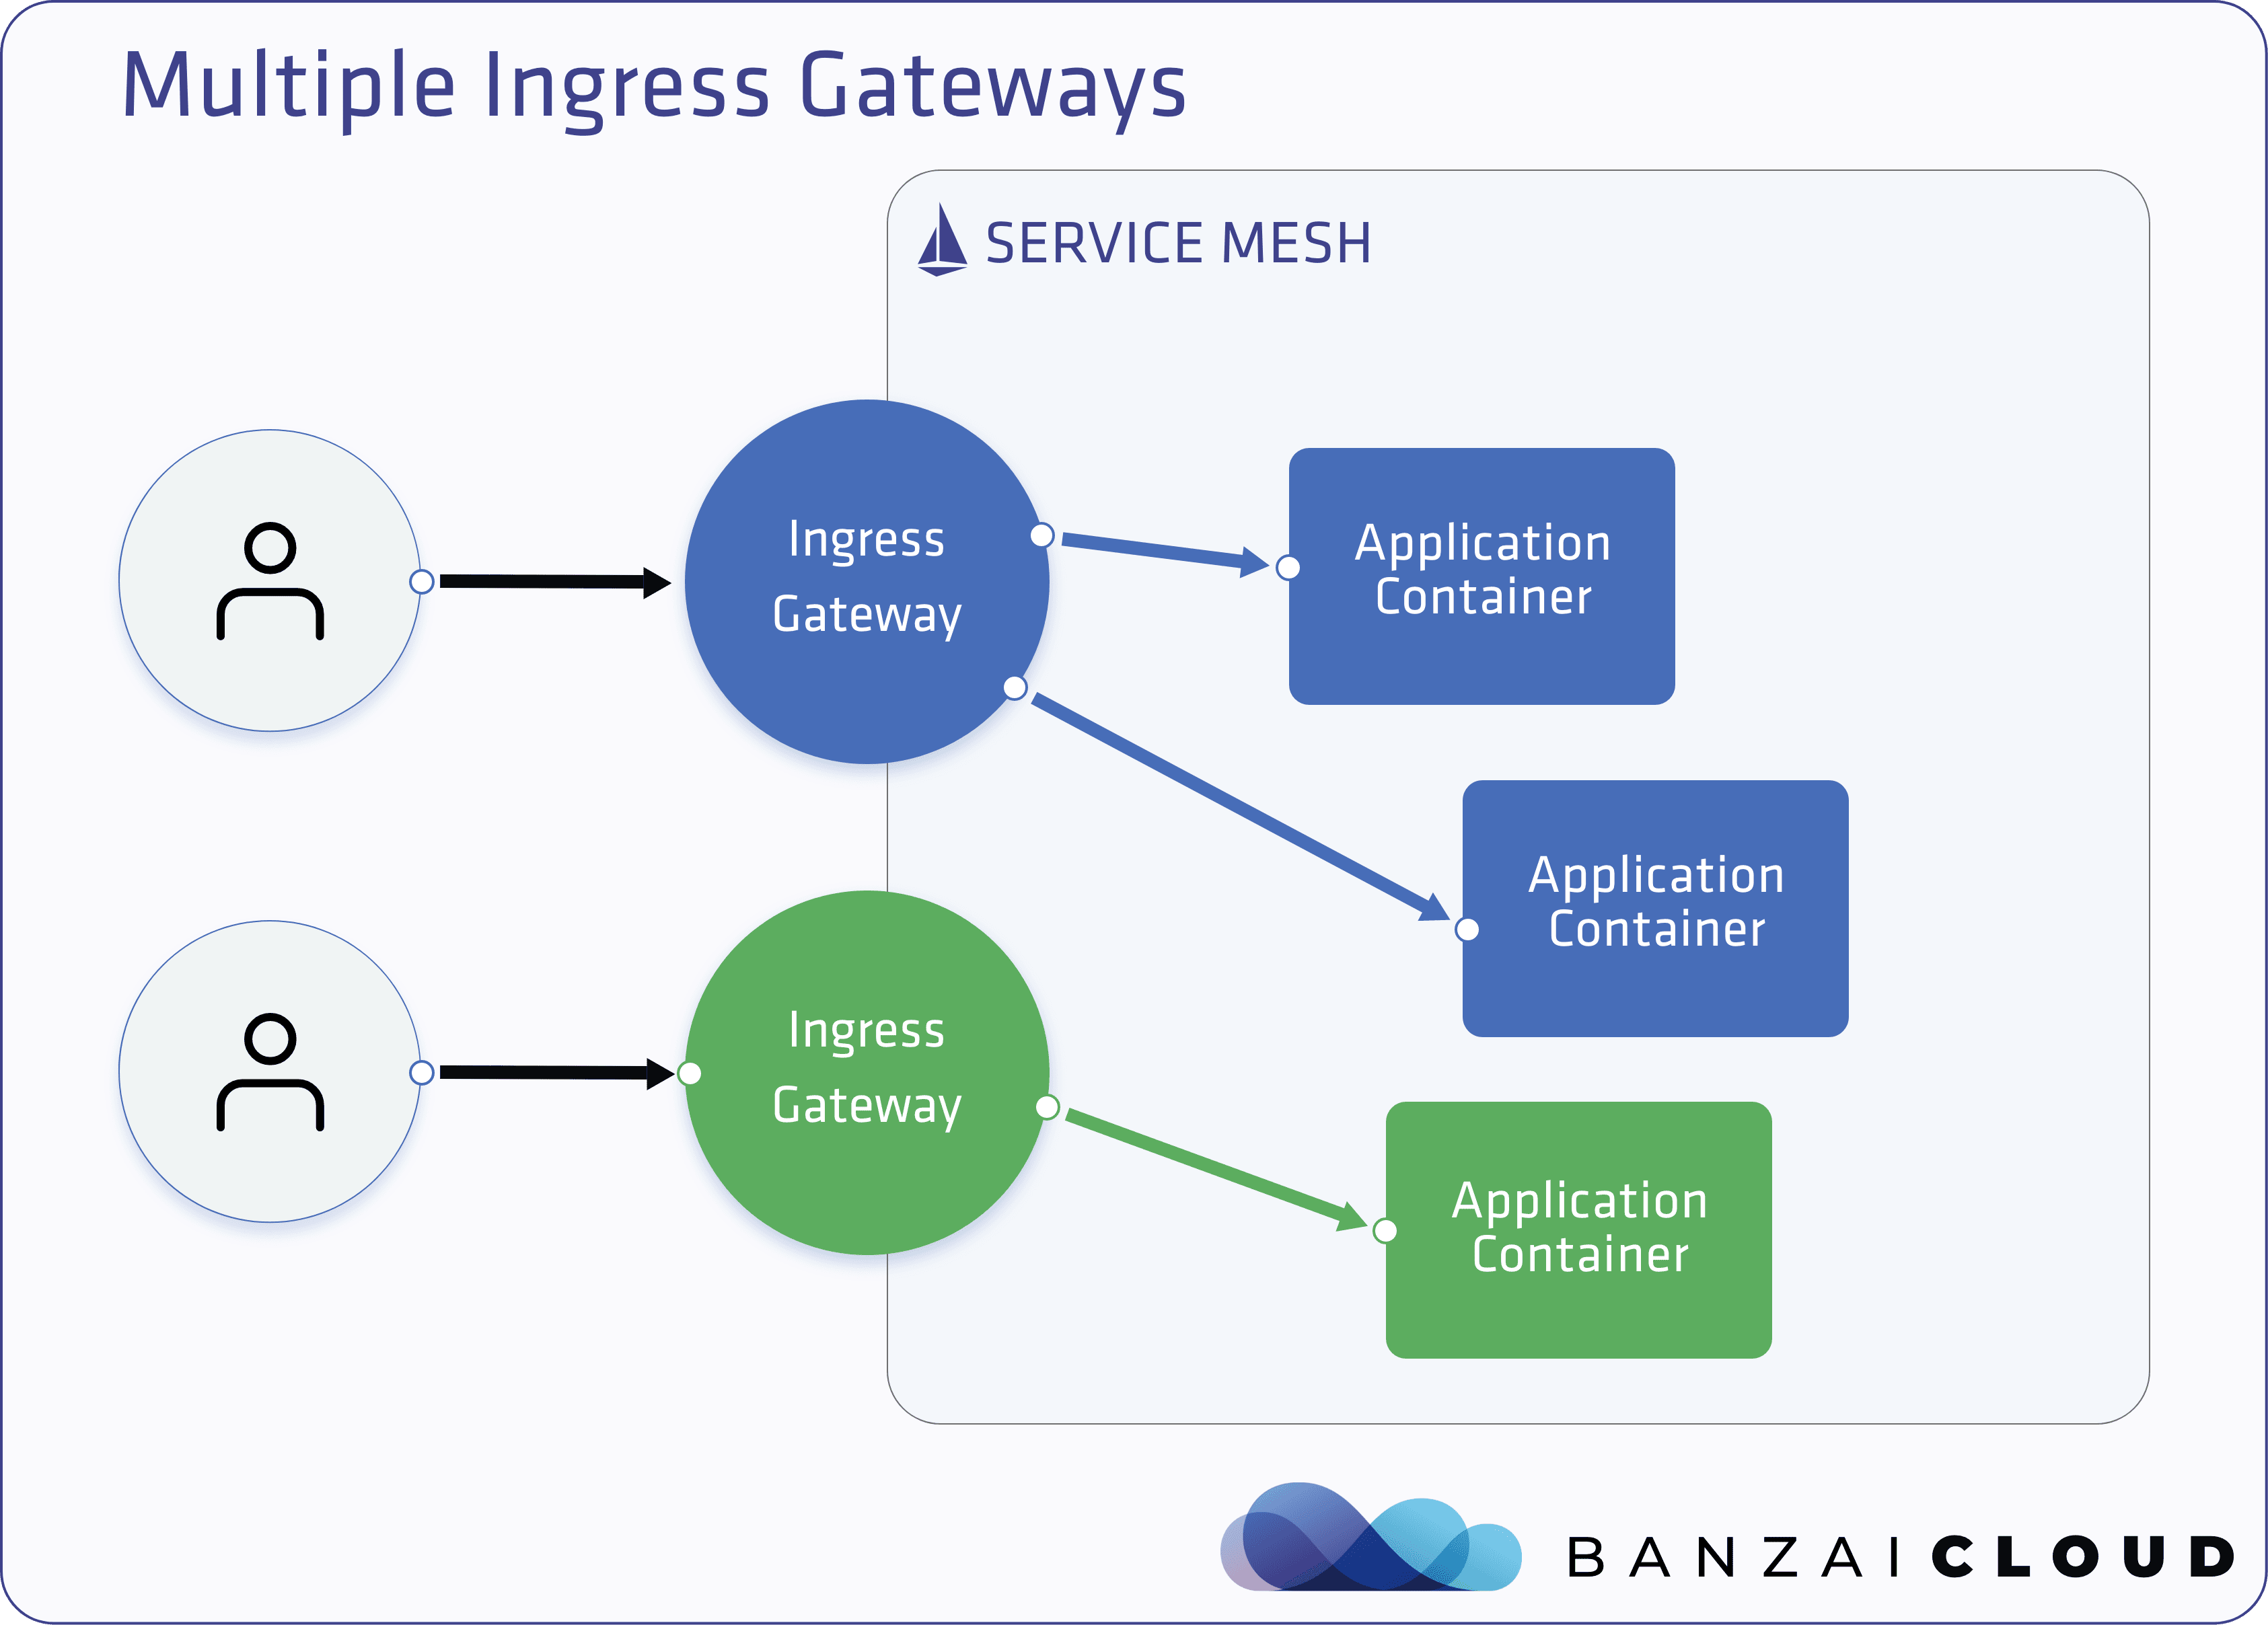
https://outshift.cisco.com/blog/istio-multiple-gateways
게이트웨이 설정을 위해 Istio operator를 설치한다.
1
2
3
4
5
6
7
8
9
10
11
12
13
14
15
16
17
18
19
20
21
22
23
24
25
26
apiVersion: install.istio.io/v1alpha1
kind: IstioOperator
metadata:
  name: my-user-gateway-install
  namespace: istioinaction
spec:
  profile: empty
  values:
    gateways:
      istio-ingressgateway:
        autoscaleEnabled: false
  components:
    ingressGateways:
    - name: istio-ingressgateway
      enabled: false
    - name: my-user-gateway
      namespace: istioinaction
      enabled: true
      label:
        istio: my-user-gateway
      k8s:
        service:
          ports:
            - name: tcp  # my-user-gateway 에서 사용할 포트 설정
              port: 30007
              targetPort: 31400
istioctl 명령어로 해당 operator를 배포한다.
1
istioctl install -y -n istioinaction -f my-user-gateway-edited.yaml
- 배포 확인
1
2
3
4
kubectl get IstioOperator -A
NAMESPACE       NAME                                      REVISION   STATUS   AGE
istio-system    installed-state                                               126m
istioinaction   installed-state-my-user-gateway-install                       116s
이제 통신 테스트를 진행해보자. 아래와 같이 게이트웨이로 TCP 통신이 잘되는 것을 볼 수 있다.
1
2
3
4
5
6
7
8
9
10
11
12
13
14
15
16
17
[root@ip-172-31-7-43 book-source-code-master]# telnet localhost 30007
Trying 127.0.0.1...
Connected to localhost.
Escape character is '^]'.
Welcome, you are connected to node myk8s-control-plane.
Running on Pod tcp-echo-deployment-584f6d6d6b-w29jt.
In namespace istioinaction.
With IP address 10.10.0.15.
Service default.
a
�
a
a
b
b
my-user-gateway
my-user-gateway
로깅
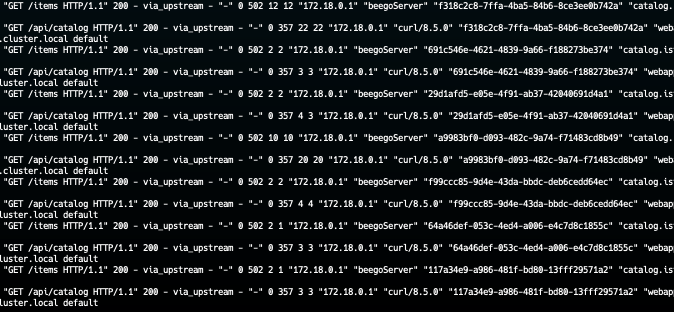
운영을하다보면 로그가 상당히 중요하다. istio gateway는 외부로부터 들어오는 트래픽의 입구로 로깅이 필요하다. 관련 로그는 ingressgateway에서 확인할 수 있다.
표준 출력 스트림으로 출력하도록 accessLogFile 속성을 변경한다.
1
2
3
4
5
6
7
8
root@myk8s-control-plane:/# istioctl install --set meshConfig.accessLogFile=/dev/stdout
This will install the Istio 1.17.8 default profile with ["Istio core" "Istiod" "Ingress gateways"] components into the cluster. Proceed? (y/N) y
✔ Istio core installed
✔ Istiod installed
✔ Ingress gateways installed
✔ Installation complete                                                                                                                                                                                                                                                                  Making this installation the default for injection and validation.

Thank you for installing Istio 1.17.  Please take a few minutes to tell us about your install/upgrade experience!  https://forms.gle/hMHGiwZHPU7UQRWe9
접근 로그가 모두 쌓이는 것을 확인하기 위해 다른 터미널에선 반복적으로 webapp에 접근한다.
1
watch -d -n 1 curl -s -v https://webapp.istioinaction.io:30005/api/catalog --cacert ch4/certs/2_intermediate/certs/ca-chain.cert.pem
아래의 명령어를 통해 webapp의 istio-proxy를 확인하면 로그가 계속 쌓이는 것을 볼 수 있다.
1
kubectl stern -n istioinaction -l app=webapp -c istio-proxy
실제 프로덕션환경에서는 로그 쌓는 것도 필수지만, 로그로 인해 full이 발생하지 않도록, 백업 및 제거 정책도 중요해보인다.
마치며
여기서는 Istio Ingress Gateway에 대해 자세히 살펴봤다. 각 기능 지원을 직접 실습을 해보며 확인을 해보면서 Istio 리소스에 대한 이해도를 높일 수 있었다.